


| Reports | |
While you are developing a report, you can preview its output at any time. You can either view reports at your terminal through the editor's viewer; or you can send output to a file or printer. In graphical environments such as Windows, the viewer accurately shows the output you can expect from printed output. Because the viewer is integrated within the editor, you can make changes immediately based on the viewer output, then output the report in the viewer again to see how your changes look. You can also use the Panther debugger to test reports that are run in the editor.
When a report is complete, you can run it from the command line or from a Panther application. You can view a report onscreen or in a web browser, print it, or save it to a file. You can also set up a report so that users can control report output.
In a three-tier environment with JetNet/Oracle Tuxedo, you can request that the report be run on the server and then have the results returned to the client after processing is complete.
Running Reports from the Report Menu |  |
The editor's Report menu lets you generate output for any report currently displayed in the editor. This menu is also available in a Panther application that uses the default Panther menu bar.
Note: In the three-tier environment, the Report menu lets you generate reports on the client only; to process reports on the application server, run the report from the command line or from within the application, using JPL or C functions (refer to "Running Reports Outside the Editor").
You can send output to the report viewer, an available printer, or a file:
 Database and select the desired database. For more information on connecting to a database, refer to "Connecting to a Database."
Figure 9-1 The Run Report dialog box lets you view reports onscreen or send reports to a printer or file.
The Page Setup dialog specifies page size, orientation, and margins. On Windows, Panther gets paper size and orientation settings from the system. On UNIX, initial settings for the Page Setup dialog box are read from the rwviewpr.ini file, if available.
Note: Settings in this dialog are not saved and are overruled by the report's Page Format node (see "Setting Page Format"). Use this node to set page layout properties permanently.
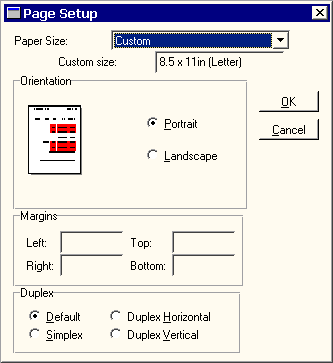
Figure 9-2 On the Page Setup dialog box, set additional margins, change the page size, and change the page orientation.
widthxheight[unit-spec]
Refer to "Page Size" for valid units of measurement.
margin-space[unit-spec]
Refer to "Page Size" for valid units of measurement.
In Windows, choosing Print Setup from the editor invokes the print dialog for that platform. For example, Windows displays this dialog:
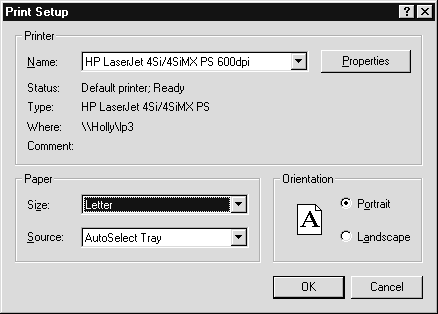
For more information about changing print setup options, refer to your system documentation.
On UNIX systems, choosing Print Setup displays a dialog box that lets you control the print driver, the spool command, and the device file for the report:

rwviewpr.ini in the current directory when the application exits.
Running Reports Outside the Editor | |
You can run a report outside the editor in several ways:
Report invocations specify a report and its arguments and options with this format:
This invocation string can also be used for subreports. For more information on subreports, refer to "Invoking Subreports."
Note:
Invocation strings for URL-invoked reports conform to URL syntax rules; refer to "How to Invoke a Report From a URL" for variations in URL report invocation.
filename[!reportname] [ (arg[, ... ] )] [ option ]...
filename[!reportname]
filename is the name of a binary report file. Panther looks for the specified file in the application's memory-resident list, then in all open libraries. For remote report processing, the report file must be a library that is open to the server. You can optionally specify reportname to invoke a specific report definition in filename. If you omit reportname, Panther uses the first report definition in the file. If filename contains spaces, you must quote filename[!reportname].
arg
option
Use the rwrun utility to run reports from the command line or in a batch file. rwrun has this syntax:
rwrunfilename[!reportname] [(arg[,... ])][ option ]...
For example, the following UNIX invocation runs the custinfo.rpt report and writes the report to the file custinfo.txt. The invocation string passes a customer ID number as a parameter to the report.
rwrun custinfo.rpt \(1001\) output=custinfo.txt
Note:
Any punctuation that has special usage in the operating system, such as parentheses (), must be prefixed with an escape character (\).
runreportfilename[!reportname] [(arg[,...])][option]...
The following JPL procedure runs the custinfo.rpt report for the value in the cust_num variable and writes the report to the file custinfo.txt.
proc make_report( cust_num )
runreport custinfo.rpt (cust_num) output=custinfo.txt
return
sm_rw_runreport (char *invocation-string)
For example:
int make_report( int cust_num );
{
	char invocation[128];
	sprintf (invocation,
		"custinfo.rpt (%d) output=custinfo.txt", cust_num);
	return sm_rw_runreport( invocation );
}
protocol://domain/filepath[?[!reportname][(arg[,...])][option]...]
Specify the desired report and, optionally, any arguments and invocation options.
For example, this URL invokes report custinfo.rpt in the web_vb application:
http://myhost.com/cgi-bin/web_vb/custinfo.rpt
You can add arguments and invocation options as parameters to the URL by appending a question mark ? to the report file specification, followed by the desired report name, arguments and options. For example, you can modify the previous report invocation by adding an argument of 11, which is mapped to report parameter cust_id when you invoke the report:
http://myhost.com/cgi-bin/web_vb/custinfo.rpt?(11)
Spaces within a URL are illegal. For more about URL syntax rules, refer to "Specifying a URL" in the Web Development Guide.
Note: Reports that are invoked by a URL do not share global data with the screens or reports that call them. Pass any needed data as parameters in the URL.
A report invocation string can contain one or more of the following options:
remote [service=service-name] [async]
remote, Panther runs the report locally on the client. The remote option can be specified for any report that is in a library open to the application server, such as common.lib or server.lib. The server calls the specified report service (service=service-name), or, if none is specified, uses the default report service sm_rw_runreport.
Note: The default report service and the included unload handler process the report on the server and then send the results (in metafile format) back to the client where they can be viewed, printed or saved to a file for later output via sm_rw_play_metafile. Refer to "Default Report Service and Unload Handler" for a detailed description of how the default service and the unload handler process the report.
If you specify a custom report service with service=, the service must be defined in the JIF; the service routine must also receive and return service messages as defined for the default report service.
By default, report service requests are synchronous—that is, all client processing ceases until the service request returns, either with report output or an error. Use the async option to continue client processing while the report service executes. When the service returns, the report is saved or printed in the background.
Note:
rwrun and URL invocations ignore the async option. All remote processing options are invalid for sm_rw_play_metafile.
For more information about report services, report service messages and remote processing requirements, refer to "Calling Report Services in JetNet/Oracle Tuxedo."
In Windows, rwrun32.exe and rwrun64.exe support the -ini option to use a specific initialization file. The user may specify SMBASE, SMPATH, SMVARS, SMUSER, SMFLIBS, SMRBCONFIG, SMRBHOST, SMRBPORT, and SMTPJIF in the initialization file.
Note:
If the -ini option is not specified, prol5w32.ini or prol5w64.ini in the Windows directory will be used.
If the report invocation string omits driver specification and report processing is local, Panther determines the default driver according to the local machine's platform: windows for reports processed on Windows and text for all other platforms.
When the invocation string omits driver specification and report processing is handled by a server—either a Web application server or an application server—Panther determines the default driver as follows:
html for browser invocations and rwmetafile for client invocations. In both cases, the server returns output to the invoking site.
On Windows systems, you can usually omit driver specification and rely on defaults to yield the desired output. Explicitly name the driver only if you need to redirect the output to a file. This can be desirable on UNIX systems, where usage of scalable fonts and graphics requires PostScript or PDF output. For example, this invocation string outputs a report to PostScript and spools the output to a printer:
To specify an output driver, use this option in the invocation string:
runreport custinfo.rpt (cust_num) driver=postscript \
spool="lpr -Pljet"driver=
driver-namedriver-name can have one of these values:
html
pdf
postscript
rwmetafile
text [ device=device-file ]
device option lets you use the capabilities of the named device configuration file to control report output. For more information about device files, refer to Appendix C, "Report Device Configuration Files."
For example, the following command-line invocation uses the device file printfile to generate the output of custhist.rpt:
rwrun custhist.rpt driver=text device=printfile spool=lp
windows
xml
You can direct output to one of several destinations: to an output file, printer, spool file, or to the report viewer. If no output destination is specified, the following defaults obtain:
To direct report output, use one of these options:
output=output-file [overwrite | append]
output option directs the finished report to the named file. If output-file already exists, the overwrite option suppresses the confirmation message and allows report output to overwrite the file's contents; the append option appends report output to the file. If output-file contains spaces, it must be quoted.
For example, the following command-line invocation outputs custhist.rpt in PostScript and saves the output to c.ps even if the file already exists:
rwrun custhist.rpt driver=postscript output=c.ps overwrite
printer=printer-name
printer-name must be in quotes if it contains spaces.
print
printtofile
spool=spool-command
rwrun custhist.rpt spool="lpr -Pljet"
view
For more information about using the viewer, refer to "Viewing Reports Onscreen."
Note:
If you invoke a report for remote processing, do not use the view and async options together; otherwise, the viewer invocation might interrupt another operation that is in progress on the client. To show report output in the viewer when an asynchronous service returns, use a custom unload handler that calls sm_rw_play_metafile with the view option.
nocancel
async; otherwise, the progress dialog might interrupt another operation that is in progress on the client.
This option is invalid in URL invocations and sm_rw_play_metafile.
showwarnings | nowarnings
showwarnings specifies to display warning messages on the screen or sends them to the standard destination for error messages in your configuration. nowarnings specifies to suppress warning messages.
In Web applications, both options are ignored; in three-tier applications, they are ignored by the application server. These options are invalid for sm_rw_play_metafile.
If neither option is specified, the default depends on whether the report is invoked as a primary report or as a subreport:
The following options are applied to report format; they are invalid for sm_rw_play_metafile, which outputs a report that is already formatted.
paper_size=dimensions
widthxheight [unit-spec]
Refer to "Page Size" for valid units of measurement.
Even though this option replaces the lines and columns option which specified the length and width of the printing area in previous releases, those options can still be specified.
margin-type=margin-amt [unit-spec]
margin-type can be one of the following:
leftmargin
rightmargin
topmargin
bottommargin
For example, this string specifies a left margin of 1 inch:
leftmargin=1in
Note: There must not be any space between the margin amount and the unit of measurement.
The default value for margins is 0 for the HTML and text drivers and .25 inch for the metafile, PDF, PostScript and Windows drivers. Refer to "Page Size" for valid units of measurement.
portrait | landscape
portrait or landscape keyword tells the output device how to orient the report to the page dimensions. portrait (the default) specifies to orient the report page to the specified paper height; landscape specifies to orient the report page according to the paper width.
When the text driver is in use, Panther seeks the capabilities landscapeon and landscapeoff in the device file in use. It outputs the control string given by landscapeon at the beginning of each page printed in landscape mode, and follows each such page with the string given by landscapeoff. Refer to information on "landscapeon/landscapeoff" for details.
lines=nlines
nlines specifies the length of the printing area on the report page.
columns=ncols
ncols specifies the width of the printing area on the report page.
Range options are valid only with sm_rw_play_metafile. Because the distribution's unload handler calls this function, you can also supply these options in a report invocation that uses the remote option.
The invocation string can specify to print a range of pages in the report with one or both options:
frompage=startpage
topage= option is omitted, output includes all pages from startpage to the end.
topage=endpage
frompage= option is omitted, output includes all pages from the first page through endpage.
The following options apply to the Windows printer driver only:
[simplex | duplex_horizontal | duplex_vertical]
Also, each page format node has the Duplex option. Using this option, different sections of a report can be printed with different settings.
copies=ncopies
paper_source=source
paper_source="Tray 2"
Reports can be invoked with arguments. This is commonly done in order to change the data that is fetched for a given report, or to set format variables. Each argument must be a valid JPL expression—either a string within quotation marks, a number, or the name of a Panther variable to evaluate when the report is run. Typically, arguments contain data that define the scope of the report. In order to process these arguments, the following conditions must be true:
Refer to "Creating Dynamic Reports" for a sample report that is invoked with arguments.
Viewing Reports Onscreen | |
You can direct output to the viewer either from the Report menu or with the view invocation option, or you can view output that has been saved in metafile format. The report viewer displays the report one page at a time. Output is initially scaled to fit the entire page in the viewer window (ViewFull Page). To view the report scaled to 100 percent, choose ViewActual Size or the corresponding toolbar button. This option can be controlled at runtime using the application property view_full_page.
Note: The report must use scalable fonts in order for the report viewer to display it correctly in full page mode.

Figure 9-3 The report viewer lets you examine report output online.
The report viewer has its own menu and toolbar. The View menu lets you navigate through the report and determine the size of the report display. The Edit menu allows you to copy the report to the clipboard. The File menu lets you print the current output; save the output to a metafile for later viewing, save the report as a PDF file, and open an existing metafile.
The report is saved to a file with a default .rwm extension in metafile format. The output saved to this file can be displayed at any time through the report viewer or by calling sm_rw_play_metafile.
Open. The file browser displays available files.Exit.Creating Dynamic Reports | |
You can design a report so its users have control over the content or format of its output. For example, a report can accept user input to determine report composition, such as which layout areas to use. The following example shows an application screen that asks the user to enter information that determines which data to fetch for a report. In Figure 9-4, a user enters the customer code for which they want data:

Figure 9-4 Query screen asks for the customer ID number, which the application supplies to the report as an invocation argument.
After the code is entered in the cust_num widget, the JPL Validation property for the widget is used to generate a report with the customer data. In this example, the database name and the customer code are passed as arguments—the database name as a string and the customer code as a JPL variable:
runreport custinfo.rpt \
	('vbizplus', cust_num) \
	remote async \
	output=cust.out overwrite
The report has two parameters defined in its report node's Parameters property, db_name and cust_id, which are dynamic output widgets:
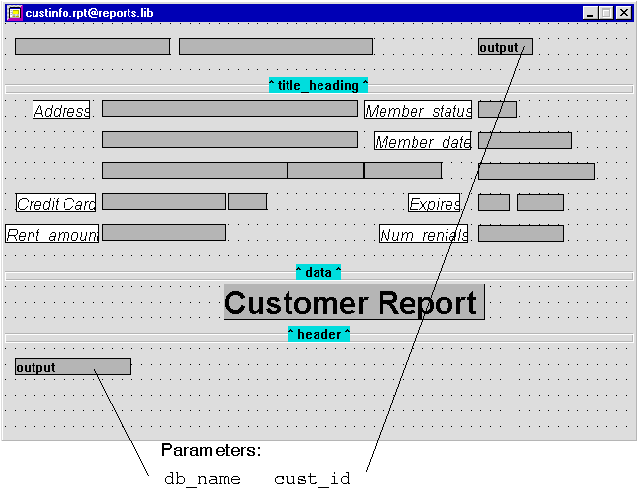
Figure 9-5 Argument values are passed to widgets that are named in the Parameters property.
The first parameter db_name receives the first invocation argument, the database name. The report uses this database name in a call node to connect to the database.
The second parameter cust_id receives the second invocation argument, cust_num. A call node executes this JPL procedure to declare the cursor:
proc make_cursor
DBMS DECLARE sel_cursor CURSOR FOR \
	SELECT cust_id, first_name, last_name, \
	address1, address2, city, state_prov, postal_code, \
	phone, cc_code, cc_number, cc_exp_month, cc_exp_year, \
	member_date, member_status, num_rentals, rent_amount \
	FROM customers \
	WHERE cust_id = ::cust_id
The detail node has its Data Source property set to Predefined Cursor and executes the following entry in the Cursor and Using property to fetch data for the report:
sel_cursor cust_id
Calling Report Services in JetNet/Oracle Tuxedo | |
In a three-tier environment with JetNet/Oracle Tuxedo, clients can request that reports be run on an application server. You can specify to run a report on the server by using the remote invocation option, or by calling a report service directly with the service_call command. If you use the remote option and omit naming a report service, Panther uses the default report service. The default service will be advertised under the name sm_run_report if that option has been chosen during the server configuration.
Report invocations that include an unqualified remote option use the distribution's unload handler for producing report output on the client. The default unload handler returns the report in metafile format to the client so that you can view, print or save it locally. You can specify your own report unload handler by directly calling a report service with service_call. The remote option is described under "Remote Processing."
In order to run reports on a server, these conditions must be true:
proserv) must be configured to advertise the default report service (sm_run_report) or a custom report service (refer to "Auto Advertised Services" on page 3-23 in JetNet/Oracle Tuxedo Guide).
The JPL procedure shown in Figure 9-6 runs the report
Caution:
When you run the utility rwrun with the The default report service processes the report as follows:
orders.rpt—which is in the server library server.lib—on the server and then returns the output to the client's screen.
remote option, Panther attempts to connect to the application middleware through a call to client_init. Because this call supplies no arguments, special provisions are required to enable client authentication. Refer to "Remote Processing and Client Authentication" for more information.
Default Report Service and Unload Handler
devserv_id property.After the report service returns to the client, a report unload handler accesses the metafile and determines how to handle it. The unload handler that is provided in the distribution performs these tasks:
If the service fails, the handler reports the failure to the client with a message.
The default report service saves report output to a metafile on the server and returns the metafile's name and location to the client. In order to process reports differently, you can write your own report service. As with other service routines, you must store it in a library and define it in the JIF. A standard application server must be configured to advertise this service.
Note: The JIF definition of a custom report service should not specify an unload handler; report services that are called in a report invocation string always use the distribution's unload handler. To specify a custom unload handler, call the report service directly with the service_call command. Refer to "Handling Client Output" for more information and an example.
For more information on defining services, refer to Chapter 5, "Defining Services in JetNet and Oracle Tuxedo Applications," in JetNet/Oracle Tuxedo Guide.
At a minimum, a report service performs these tasks:
Three-tier report processing in JetNet/Oracle Tuxedo relies on service messages of datatype JAMFLEX or FML in order to pass data between client and server. The request message for all report services that are called through a report invocation string, including the default report service, contains three fields with this data:
Report Service Messages
sm_rw_report_invocation—Report file name and, optionally, report name and arguments.
The reply message also contains three fields with this data:
sm_rw_message—An error message if the server's call to sm_rw_runreport returns with SM_RW_ERROR; otherwise null.
For more about service messages, refer to "Service Messages and Data Types" in JetNet/Oracle Tuxedo Guide.
The following code shows a report service that spools report output to a server printer instead of saving it to a metafile:
In order to make report output available to the invoking client, a report service must output the report to a metafile and return the file path to the client. The default report service's unload handler In order to specify a custom unload handler, the application must call a report service directly with For example, an application that allows report service calls to be invoked asynchronously for concurrent processing can also keep track of each service's return status. The following code obtains the call ID for each service call and stores it in a grid widget. The unload handler Example
proc sm_rw_print_report()
vars sm_rw_report_invocation,\
>     sm_rw_server_options,\
>     sm_rw_client_options

receive ARGUMENTS( {...} )
// run the report; spool output to printer
rval = sm_rw_runreport ( sm_rw_report_invocation\
##" "##sm_rw_server_options##" spool=lp" )
if rval == SM_RW_OK
sm_rw_message = "Report spooled to printer"
else
sm_rw_message = "Unable to print report."// return with report output status
service_return \
({sm_rw_message, sm_rw_pathname="", sm_rw_client_options}) Handling Client Output
sm_rw_unload_hdl moves the metafile to the client and processes it with sm_rw_play_metafile. This function takes as its argument an invocation string that contains the options originally specified by the client; these direct the report output—for example, to a printer or PostScript file.
service_call and supply the name of an unload handler.
report_status uses this call ID to update the grid with each service call's return data:
/**********************************************
         call report service
***********************************************/
proc invoke_report( cust_num )
vars sm_rw_report_invocation="custinfo.rpt("##cust_num##")"
vars new_grid_occ

// call default report service with custom unload handler
service_call "sm_run_report"(      \
	{ sm_rw_report_invocation,      \
	  sm_rw_server_options="",      \
	  sm_rw_client_options=""},     \
	{ sm_rw_message,                \
	  sm_rw_pathname,               \
	  sm_rw_client_options}),       \
	ASYNC,                          \
	UNLOAD_HANDLER "report_status", \
	NOTIMEOUT
// populate new occurrence of report status grid with new ID
new_grid_occ = call_id->num_occurrences + 1
call_id[new_grid_occ] = @app()->tp_return
report_info[new_grid_occ] = \
"custinfo.rpt for customer "##cust_num
ret_status[new_grid_occ] = "Processing..."/**********************************************
report status unload handler
***********************************************/
proc report_status( callid, msg_source, method )
vars local_file, ct, tmp_status
vars sm_rw_client_options, sm_rw_message, sm_rw_pathname
// get the service reply message data
unload_data
// report service success
if sm_rw_message == ""
{
//create local file name
local_file = sm_tmpnam()
// move report metafile to client
call sm_file_move( sm_rw_pathname, local_file )
tmp_status = "Report output complete"
}
// report service failure
else
tmp_status = "Error occurred; no report generated"
// update grid occurrence with report output status
for ct = 1 while call_id[ct] != callid
{}
ret_status[ct] = tmp_status
rpt_file[ct] = local_file
Running Reports in a Web Browser | |
The default driver for all reports invoked from a Web application is html. If a browser-invoked report specifies a non-HTML driver such as text and omits an output destination, Panther returns the specified output to the browser. The browser's own capabilities determine how it handles this output. If you specify an output destination along with the driver specification, Panther saves the report output on the Web application server.
The browser user can invoke a report directly through a URL. Reports that are incorporated in a Web application can be invoked in two ways:
If you invoke a report with a URL, the browser receives the HTML document with its original URL; this ensures that all internal links are interpreted correctly. If you invoke the report with runreport or sm_rw_runreport, the browser receives the HTML document without a URL. Consequently, some browsers are liable to confuse this document with the one that invoked it and thereby misinterpret internal links.
For information on including report parameters in the URL, refer to "How to Invoke a Report From a URL."
When a report is displayed in a browser, a series of navigational controls appear at the top of each page. These controls allow the user to go to the previous page, to the next page, to the top of the report, and to a page index. The up arrow goes to the screen or report that starts the application, as denoted by the URL displayed in the web browser. Like other Panther web applications, the first URL you enter remains in the URL field until the application calls sm_web_invoke_url. This prevents users from entering the application except at the start point.
At the end of each report is the index of page numbers. Click on the index icon of any page to reach the index. Click on a number in the index to jump to that page of the report.
The default browser page size for reports is 25 lines. A set of navigational controls appears at the top of each Web page. To turn the navigational controls off, set the page length to 0, either in the report's Page Size property (described under "Page Format Properties") or with the report invocation's If the report definition or invocation string contains page dimensions that are appropriate to printed output—for example, the report's page format node has its Paper Size property set to Viewing Reports
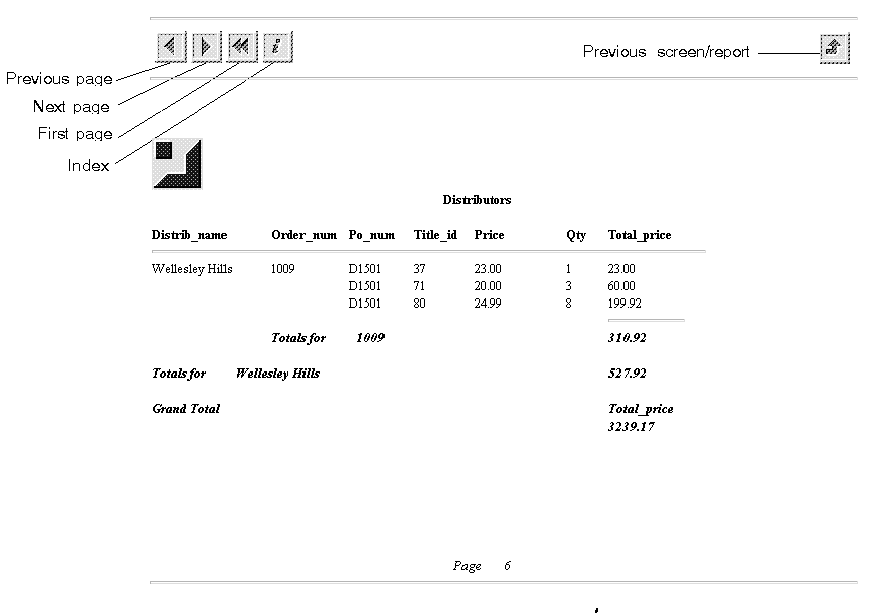
Figure 9-7 This final page of the Distributors report shows the totals for the entire report.

Figure 9-8 The page index of the Distributors report allows you to easily go to any page in the report.
paper_size option (described under "Paper Size"). For example:
paper_size=8.5x0
8.5 x 11in—the browser approximates that page size when it calculates page breaks. If no page size is specified, Panther attempts to fill a full screen between page breaks. In both cases, Panther also uses other properties that control page breaks (refer to "Controlling Pagination").
Debugging Reports | |
The Panther debugger is just as useful in debugging reports as in analyzing Panther applications. The debugger's Data Watch window, for instance, can display the current value of any widget in your report layout window, as well as JPL variables and LDB entries.
When a report is running, the debugger's Source Code window lists the report structure with the current node highlighted. You can step through execution of the report, set breakpoints, and animate the display exactly as in a JPL program. JPL appears in the Source Code window if you are tracing it, whether it is called directly by your application—say, from a control string—or from within a report.
Report events are displayed in the debugger's Status window. These events include node execution, area output, subreport invocation, and page processing. Because they might cause other report events and non-report events such as execution of a JPL procedure, each report event remains displayed in the debugger's Event Stack window until it completes.
Refer to Chapter 39, "Using the Debugger," in Application Development Guide for information about Panther's debugger.
