


| Reports | |
Usually, you want a report to do more than just present data; you also want it to organize and present information efficiently and attractively. For example, you might want page numbers along with descriptive text to appear at the top or bottom of each page. Reports often begin with a cover page that displays a title, the date, and other introductory material.
This chapter shows how to improve your report's appearance by:
Setting Page Format |  |
Page layout properties—the size and orientation of the page and footer placement—are set by the page format node. The layout areas for the page header and footer are output through two print nodes that are attached to the page format node's header and footer sections, respectively.
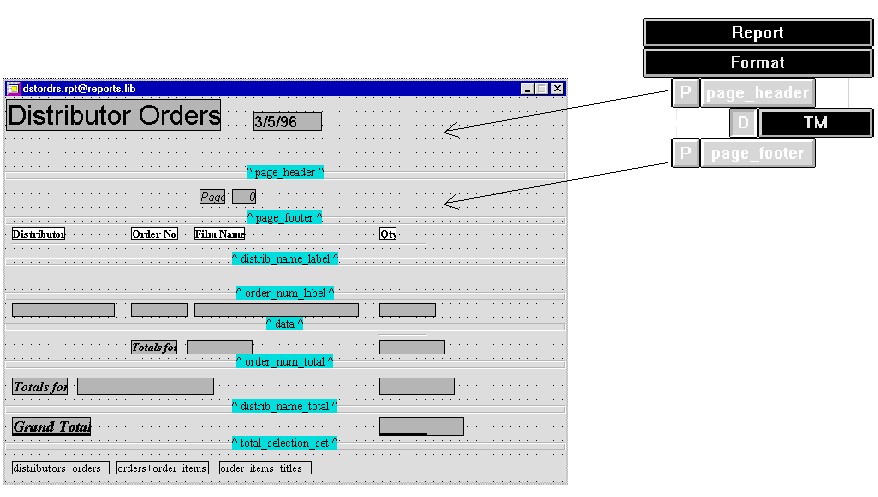
Figure 8-1 Specify page header and footer output through page format print nodes.
A page format node has three properties:
widthxheight [unit-spec]
For example, 7 x 9 in specifies a page width of 7 inches and a length of 9 inches. 80 x 40 specifies a page that is 80 characters wide by 40 lines long.
Units of measurement (unit-spec) can be specified in inches (in), millimeters (mm), or characters (c—the default). If you specify dimensions in character (c) units, Panther uses the average character size in the report's default font to calculate a character unit's width and height.
You can change the report's page format at any stage of report execution by inserting a new page format node in the report structure. The new node's properties supersede the previous page format property settings. These properties take effect on the first page to output after execution of the new page format node. To enforce new page format properties immediately, insert an end page node after the page format node.
Note: Execution of a new page format node does not by itself force a page break. If the node is executed before the current page is full, Panther continues to use the previous page properties through completion of that page.
To display page numbers in a report:
By default, Panther sets a page number widget to 1 at the beginning of a report and increments its value at each page break. Page numbering is continuous throughout a report. You can ensure that a subreport inherits the calling report's page number by setting the subreport node's Use Caller Format property to Yes. Otherwise, page numbering restarts for that subreport.
You can programmatically reset a page number widget's value at any stage of report execution. Simply insert a call node in the portion of the report structure where you want to restart page numbering. This call node's function resets the page number widget to the desired value.
For example, Figure 8-2 shows the structure of a report with a single group node; the report restarts page numbering for each iteration of that group. The group's header section contains a call node whose function init_page initializes page number widget pagenum to 1. So, each time the report processes a break in this group, pagenum is reinitialized to 1; successive page breaks automatically increment pagenum's value until the next group break occurs.

Figure 8-2 Report that restarts page numbering on each group break.
Controlling Pagination | |
By default, page breaks can occur wherever they do not split output of a layout area. If the next area to be output can fit on the current page, it is output to that page; otherwise, a new page begins.
You can override this behavior and control page breaks in several ways:
By default, detail print nodes have their Keep on Page property set to Yes. This keeps the output for each detail row on the same page; it also ensures that group header and footer output are accompanied by at least one detail row.
If the detail's print node has Keep on Page set to No, output for a detail row can be split across pages. Setting this property to No also allows Panther to output group headers and footers which are not accompanied by a detail row, so that group headers can print at the bottom of a page, before the group data is output, and group footers can be at the top of a new page.
You can also print each detail on its own page by setting the detail node's One per Page property to Yes.
By default, Panther prints as many groups on a single page as space allows, and splits groups across pages. Group headers and footers are printed intact and with at least one detail row. You can override this behavior in several ways:
Allowing Detail Page Breaks
Controlling Group Pagination
How to Keep Group Data Together on the Same Page
When you set a group node's Keep on Page property to Yes, Panther keeps the specified group's header, detail, and footer data on the same page, if possible. If the entire group, including its header and footer, can fit on the current page, it is output immediately; otherwise, Panther starts a new page.
When you set a group node's One per Page property to Yes, Panther starts a new page for each group generated by that node. The new page begins after Panther outputs the footers of the previous group.
For example, given a report that shows video orders grouped by film names, distributors, and order numbers, you can force a page break after each break on name by setting One Per Page to Yes for name's group node. This yields the following output:

By default, the print nodes that output group headers and footers have Keep on Page set to Yes. This prevents page breaks within the header or footer output; it also ensures that group headers and footers are output with at least one detail row from the group. So, if a new group begins and the current page lacks enough space to fit all of the header output and at least one detail row, a new page begins before the header data. Similarly, Panther reserves enough space to print on the same page all footer output along with one detail row.
If Keep on Page is set to No for the print node of a group header or footer, its output can end, span, or begin a page.
To keep subreport output on the same page, set the subreport node's Keep on Page property to Yes. If the subreport can fit in the space remaining on the current page, it is output immediately; otherwise, Panther starts a new page.
If Keep on Page is set to No (the default), subreport output begins on the current page and continues on the following pages if needed.
Inserting an end page node in the report structure forces a page break at that stage of report execution. A forced page break closes the current page and executes the page footer nodes; if more output follows, Panther begins a new page and executes the page header nodes. Typical uses include outputting title and trailer pages, separating sections within a report, and generating blank pages.
Note: To start group or detail output on a new page, use the One per Page property for their corresponding nodes.
Inserting Blank Pages | |
Execution of an end page node forces a page break whether or not there is output on the current page. Thus, you can insert successive end page nodes to create blank pages.
Blank pages are not always entirely blank—they typically carry over any page headers and footers that are in effect. To output a page that is truly blank, clear the existing page specifications by inserting a new page format node before blank page output begins; if no layout areas are specified for the page header and footer, the end page nodes that follow generate text-free pages.
Generating Title and Trailer Pages | |
Reports often begin with a cover or title page; they can also end with a separate page that contains summary information. Reports that contain multiple sections also might require title pages for each section. You can add each of these components by creating a layout area and modifying the report structure.
Note: If you want the title page to omit the header and footer output of the report's main body, insert a new Page Format node immediately below the Report node; attach to it the instance node and the title page's print node.
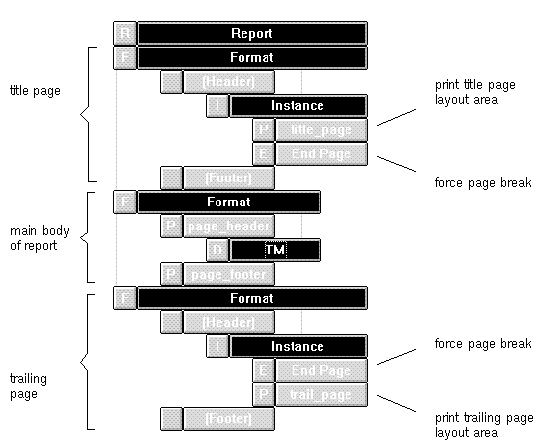
Figure 8-3 Report structure that specifies title and trailing pages.
Using Fonts | |
You can format all widget output by applying different fonts and font sizes and setting one or more attributes—bold, italic, and underlined. Fonts can be chosen from these categories, listed in descending order of universality:
[Postscript Fonts] section. PostScript fonts are available to all platforms.
If you specify a font that is undefined for a given environment, the device driver determines the actual output.
Although the editor lets you choose any GUI-resident font and font alias, you should use only those fonts that are valid for report output—or printable fonts. If you intend to run reports on multiple platforms, use font aliases to ensure the desired output in each environment.
When you create a report, a default font is applied to all layout areas and output widgets. This default is derived from the configuration map file. Under the Font heading in the Properties window, all font-specific properties are initially set to Default for the report file, layout areas, and output widgets. Only objects that inherit their font properties from a repository or were copied from another source have their own font assignments.
You can set fonts at several levels in a report, listed below in order of precedence:
Setting Fonts
Note: Changing the font will change the grid size unless the grid height and grid width are set in the layout window's geometry property. If you change the font after setting the height and width, Panther will ask if you wish to rescale the grid to match the new font. If you say no, the grid will remain as you have specified. If not, the grid will adjust to the new font. When grid height and width are adjusted in this manner, the grid height and width are set to match the average height and width, respectively, for the newly selected font.
You can define GUI-independent printing font aliases in the configuration map file with the following format:
alias-name[(font-qualifier...)]=font-spec(
[ [font-qualifier...)]=font-spec]...
The default configuration map file defines four aliases:
Prolifics Courier
Prolifics Times Roman
Prolifics Helvetica
Prolifics Symbol
The default configuration map file associates each of these aliases to a valid font for a given platform. For example, the default Windows configuration map file defines font alias Prolifics Times Roman in the various sections:
[Windows Fonts]
# Prolifics Font Name   Qualifiers     Windows font
# -------------------   ----------     ------------
Prolifics Times Roman                = Times New Roman

[PostScript Fonts]
# Prolifics Font Name   Qualifiers      PostScript font
# -------------------   ----------      ---------------
Prolifics Times Roman   (italic bold) = Times-BoldItalic
                        (italic)      = Times-Italic
                        (bold)        = Times-Bold
                                      = Times-Roman

[PDF Fonts]
#Prolifics Times Roman (italic bold)= c:\windows\Fonts\timesbi.ttf
#                      (italic)     = c:\windows\Fonts\timesi.ttf
#                      (bold)       = c:\windows\Fonts\timesbd.ttf
#                                   = c:\windows\Fonts\times.ttf

[Text Fonts]
# Prolifics Font Name   Qualifiers         Text Font
# -------------------   ----------         ---------
Prolifics Times Roman   (24 italic bold) = Times_i_b_24
                        (24 italic)      = Times_i_24
                                         = Times

[HTML Fonts]
Prolifics Times Roman   = New Times Roman,Times
Given this definition, Panther can resolve usage of Prolifics Times Roman in a report, regardless of the platform that it runs on. For more information on how Panther resolves font aliases, refer to "Panther Font Aliases" on page 45-38 in Application Development Guide.
Note:
Aliases that are defined in the [Text Fonts] section are resolved via the device configuration file. For more information, refer to Appendix C, "Report Device Configuration Files."
Positioning Output | |
Ordinarily, the layout of a print node's output is determined by the position of the widgets within its layout area. A print node has two Composition properties, Justification and Indent, that generally override widget positions and determine where to place the print node's output at runtime.
For example, Figure 8-4 shows layout area page_header, which is specified by the report header's print node. In the layout window, the first widget's position is flush left. You can center the actual header output by setting its print node's Justification property to Center:
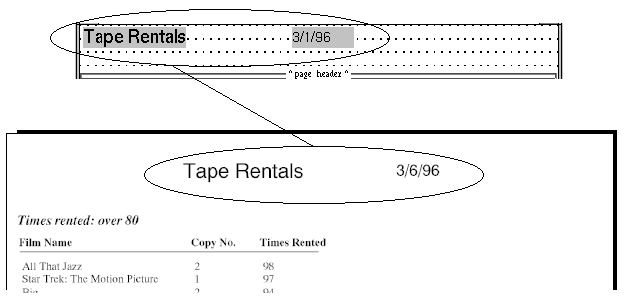
Figure 8-4 To center the contents of a print node's layout area, set the print node's Justification property to Center.
unit-spec) can be specified in inches (in), millimeters (mm), or characters (c—the default). If you specify dimensions in character (c) units, Panther uses the average character size in the report's default font to calculate a character unit's width.
Reducing White Space | |
You can optimize use of the specified page dimensions in two ways:
Panther always outputs vertical white space between widgets, whether they are empty or not.
Sometimes, a layout area must anticipate variable amounts of data to output. This typically happens for two reasons:
Shrinking Layout Areas
You can eliminate this white space by setting a print node's Shrink property to Yes. This tells Panther to condense the layout area vertically when some of the allocated fields and array elements are empty.
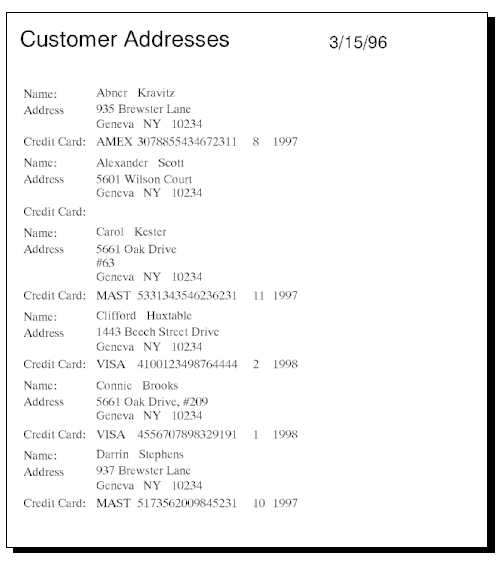
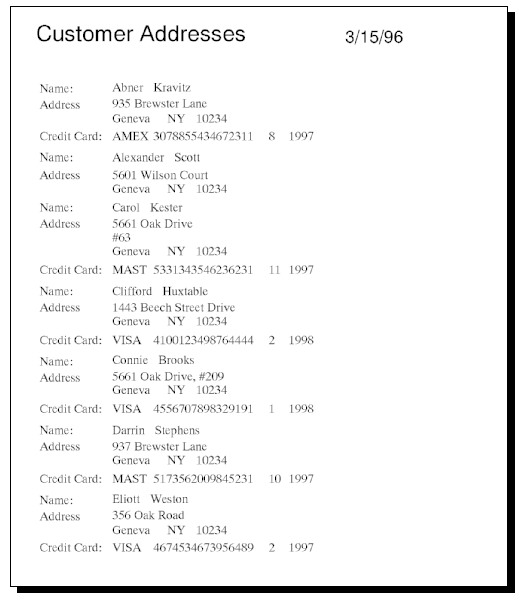
A detail's layout area can include fields that are sometimes empty, depending on the data in a given record. For example, a report that lists customer addresses contains two fields from the
Panther eliminates only lines that contain empty widgets, and only if all widgets on a line are empty.
Note:
To make sure that all adjoining widgets are on the same line, align them horizontally so that their Start Row properties have the same value.
The detail layout used in the earlier output contains a line for credit card information. This line contains dynamic output widget Figure 8-5 shows how this function is called through a call node that precedes the detail's print node:
When
Note:
Setting the Shrink property has no effect on blank space—that is, lines that contain no widgets. For information about consolidation of blank space, refer to "Consolidating Blank Space."
Reports can also contain arrays that are not always fully populated each time they are output. For example, you might produce an report that uses an array to show film descriptions. The amount of descriptive data varies for each film, so one or more occurrences in this array are often empty.
To ensure that the report shows only the populated rows in this array and shrinks out the remaining elements, follow these guidelines:
Shrinking Out Empty Lines
customers table that stores street and apartment/floor numbers: address1 and address2. The report's layout screen looks like this:

address1 always contains data; address2 is frequently empty. To close up the empty space otherwise created by address2, the print node that calls layout area data should have its Shrink property set to Yes. This yields the following output:
cc_label, which precedes the customer's credit card data—cc_code and cc_number. Not all customer records contain this information, but because cc_label's Label property is set to Credit Card, Panther outputs this line whether or not the rest of the line is empty. To output this line only when credit card data exists, modify the report to call a function that checks whether data exists in cc_number; if no such data exists, it sets cc_label to an empty string:
proc check_cc_data
if cc_number == ""
{
  cc_label = ""
}
return
Figure 8-5 Shrink out a line from the detail output by setting widgets on that line to an empty string.
cc_label is set to an empty string, Panther perceives the entire line as empty and removes it from the detail output. The call node that follows the print node resets cc_label to its previous content. When you run this report, it yields the following output:
Shrinking Arrays
When the report is generated, the empty array occurrences are shrunk out, so the amount of space between all film descriptions is consistent:
Note:
Setting the Shrink property to Yes removes null fields only if the null character is a blank space.
Panther consolidates trailing and leading blank space of adjacent layout areas. The amount of blank space that is actually output equals the amount of trailing blank space in the first layout area or leading blank space in the second area, whichever is greater.
Note:
Panther recognizes an area as blank only if it is completely empty—that is, unoccupied by widgets of any kind. An area that contains empty fields is affected only by the Shrink property.
This behavior is especially useful in reports where group headers and footers can appear anywhere on the page—that is, the group nodes have their One Per Page property set to No. Headers can include leading blank lines to achieve natural spacing when printed immediately after the previous group footer. Blank space consolidation ensures that these blank lines do not exaggerate the amount of blank space produced when the group headers appear after a page break and immediately follow the page header. So, if the page header ends with two blank lines, and the group header begins with a single blank line, Panther consolidates the amount of blank space between these areas to two lines only.
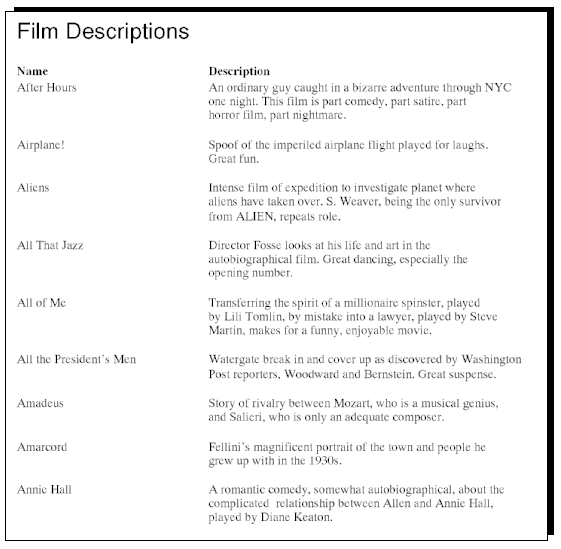
Figure 8-6 Eliminate empty occurrences in an array by setting the print node's Shrink property to Yes.
Consolidating Blank Space
Adding Graphics | |
Graphics can be added to a report to enhance its appearance. Panther lets you add lines and boxes while creating a report, or you can use your own graphics files. For more information on adding graphics, refer to Chapter 21, "Graphics Widgets," in Using the Editors.
To include a pixmap in a report, create a dynamic output widget and set its Active Pixmap property to the name of the pixmap.
If you run a report that has pixmaps in it remotely, the pixmaps must be in a library that is open to the server.
The graphics for web output must be located in a sub-directory of the HTTP server's document root directory.
Lines and Boxes may also be added to reports; however, the Label property, available in application screens, is not supported.