


 | JetNet/Oracle Tuxedo Guide |     |
The graphical JetNet Manager (JetMan) integrates all the facilities you need to configure and manage the middleware component of a Panther application. With it, you create and edit a binary JetNet configuration file; this file specifies how to set up an application's clients and servers and configure their interaction—for example, whether multiple workstations can attach to the application, the maximum number of machines, servers, and services that the application can support, how many servers to activate and on which machine.
JetNet configuration files can be used with the Tuxedo middleware adapter, and are accessible to all Tuxedo utilities, including xtuxadm. Thus, you can use the JetNet manager to create a configuration file, then edit and enhance it for use with Tuxedo later on.
Note: The JetNet manager is designed for editing JetNet configuration files only; you should edit and manipulate Tuxedo configuration files with the appropriate Tuxedo utilities.
This chapter shows how to use the JetNet manager to create and configure an application. It describes the interface and the properties that you can set for each object— application, machine, and server. For information about using the JetNet manager to manage a running application, refer to page 4-1.
Using the JetNet Manager |  |
You invoke the JetNet manager through the executable jetman. When you start JetNet manager on UNIX, it automatically reads its Jetman resource file; on Windows, it reads the jetman32.ini initialization file. It then reads the configuration file specified by SMRBCONFIG or TUXCONFIG; if neither is set, the JetNet manager opens without a configuration file.
The following steps create a basic configuration file. For more information about each field, refer to page 3-7.
Creating a Configuration File |  |
 New Application from the menu bar or the New Application button from the toolbar. If another configuration file is already selected, the JetNet manager asks whether to close it.
The JetNet manager displays the Application Configuration dialog:
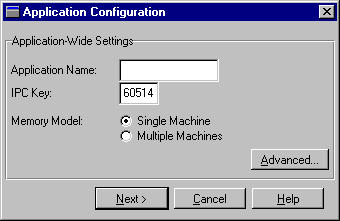
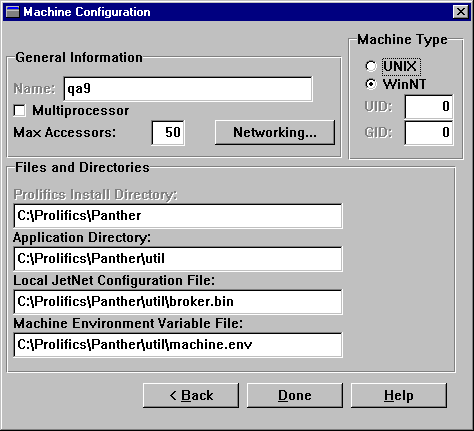
Note: In a multi-machine application, this machine is initially defined as the master machine. Later, you can reassign this machine to a non-master role after other machines are added (refer to page 3-8).
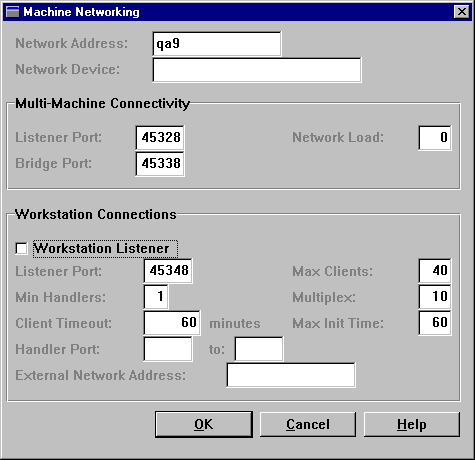
JetNet Configuration File already exists, a message asks for confirmation to overwrite it.
Note: You can create a minimal configuration through the utility rbconfig.
Editing a Configuration File |  |
The JetNet manager's opening Application Status dialog shows the hierarchy of components in an application. Initially, only the top-level component—for the application itself—is shown. Double-click on each component in the list to toggle in and out of view components that are one level below. Or you can expand and collapse the list of all components below the selected component by choosing View Expand Subtree and View
 Collapse Subtree. A component with subordinates is prefixed with a - or + symbol to indicate whether they are visible or not.
Note: In an inactive multi-machine application, you can edit the configuration file from the master machine only.
When you edit an inactive application's configuration, the hierarchy list can contain three types of components:
You can also edit the configuration file of an active application. Some component properties are editable only when the component itself is inactive. For more information about managing an active application, refer to page 4-1.
To the right of the hierarchy list, the Details list displays information about the selected component, such as its name, type, and state (active or inactive). The dialog also contains a Status box that displays informational messages.
You can use the hierarchy window to add and delete components from an application's configuration; you can also use it to access those components' definitions and edit them:
Add servers and machines to a configuration by selecting a higher-level object—for a new server, its host machine; for a new machine, the application—and choosing the appropriate File You can also create a copy of an existing server by selecting the server and choosing File To delete a component from the configuration, select it and choose Edit A JetNet configuration file defines three types of application components—the application itself, machines, and servers. You access these definitions through the JetNet manager. Definitions can be viewed and edited whether a component is active or not; however, you can change some settings only when the component is inactive. All changes that you make in the JetNet manager are written to the configuration file immediately.
To edit a component's settings, select its name from the hierarchy list and choose Edit To edit another configuration file, choose File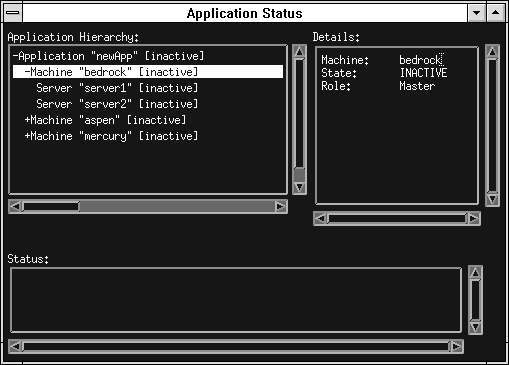
Adding and Deleting Components
 New option or toolbar button. Servers and machines can be added and removed whether their parent objects are active or inactive.
 New
New Server or the corresponding toolbar button. This adds a new server to the host machine and copies all non-unique properties from the selected server to the new one. You must assign the new server a unique name in order to save it.
 Delete. You can delete any inactive component from the configuration. If the selected component has subordinate components, these are deleted also.
Editing Components
 Properties or the Object Properties button from the toolbar. Properties for each component type are described in later sections of this chapter.
Selecting Another Enterprise's Configuration
 Select Application. This invokes the Select File dialog where you choose the desired configuration file. When you select a file, Panther reads the configuration definition. If the JetNet manager was connected to the previous application (refer to page 4-4), the connection is automatically broken.
Setting Enterprise Properties |  |
To access application properties, select the application name from the hierarchy list and choose Edit Properties.
The application properties that are initially displayed set an application's identity—its name, IPC key, and whether it runs on a single or multiple machines. For more advanced application properties, choose the Advanced push button.

You should always specify a backup master machine; this is especially important for 24-hour applications to allow a smooth transfer of operations in case the master machine unexpectedly ceases operation or is deliberately brought down for periodic maintenance. In a running application, the backup master is always prepared to take over the role of master machine.
In an inactive application, you reassign the master machine by running the JetNet manager from the machine that you want to designate as the new master. You must always reassign the backup master from the master machine.
In a running application, you can reassign machine roles by running the JetNet manager from any active machine.
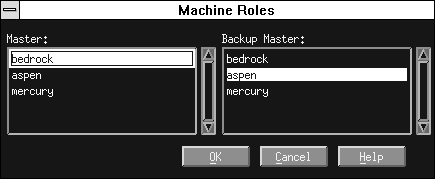
Two list boxes show all machines in the application. The Master list highlights the current master; the Backup Master list highlights the current backup master, if any.
Advanced Settings |  |
The Advanced Application Configuration dialog sets limits such as the maximum number of machines and servers that the application supports, and general application properties such as the application password.
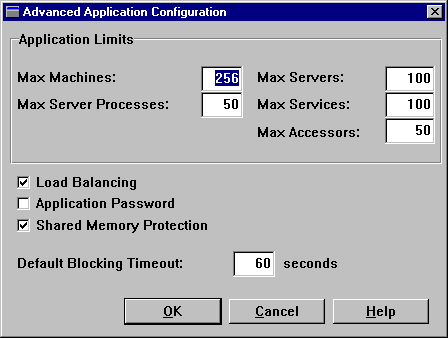
The value that you should set for this property should account for one listener server on each workstation, and the maximum number of instances anticipated for each server. Because this property directly increases semaphore and shared memory costs, deployed applications should have this property set to the lowest value that ensures acceptable performance. In a development environment, set this property sufficiently high to account for additional resource requirements.
All requests are equally weighted; this means that JetNet simply calculates a given server's load from the total number of services waiting to be processed, and ignores their cumulative processing time. To make maximum use of load balancing, organize services into service groups according to their processing requirements and associate these groups with servers as needed. You can also optimize throughput on the machine level by setting Network Load for each machine (refer to page 3-16).
Note: Load balancing is not required when services are offered by only one server.
When Password is enabled, you supply or change the application password by choosing Change Password. This invokes the Application Password dialog where you enter the new password twice. If the two entries do not match, an error message is posted and you must repeat the process.
The application password provides level-2 authentication. Level-3 authentication is provided in the Oracle Tuxedo version. For more information, refer to page 2-13 in the Programming Guide.
tp_block property is set to PV_YES. The default is 60 seconds. If the application uses a server executable that has the debugger linked in, increase this value sufficiently to allow for slower response time.
The entered value must be a multiple of 10. If an entry's last digit is non-zero, the JetNet manager changes it to 0.
Setting Machine Properties |  |
A Panther application can run on a single machine or across a network on multiple machines. To access machine properties, select the machine name from the hierarchy list and choose Edit—Properties.

A UNIX machine can also specify its user and group IDs, UID and GID. When you define a new UNIX machine, its UID and GID values are initially set to the UID and GID of the machine on which the JetNet manager is running, if available. You can change these values to any integer between 0 and 2,147,483,647, inclusive.
A Windows machine prevents access to the UID and GID properties and sets them to 0.
ULOGmmddyy) is also written to this directory.
machine.env in the application directory. You can override the default by entering the pathname directly or by using the Browse push button to select the desired file.
This environment supplements the one already established when the machine is activated. For example, you can set a different server library for each server by setting SMFLIBS in its environment file. You cannot use this file to override settings in Panther Install Directory, Application Directory, and Local JetNet Configuration File.
For more information about the contents and format of a machine environment file, refer to page 2-5.
If you are defining a new configuration file, the JetNet manager creates a file according to the pathname specified and stores your initial settings in it. Settings for SMRBCONFIG must exactly match this pathname.
Note: Under shared file systems such as NFS, make sure that local configuration files on different machines have unique pathnames.
Warning:
The configuration file created by JetNet manager or rbconfig includes references to itself. If you change the master machine's Local JetNet Configuration File property, these internal references become invalid. To rename a configuration file, convert it to ASCII with rb2asc and edit the TUXCONFIG string to the new file; then run rb2asc again to convert the edited file back to binary.
Network Settings |  |
Networking settings specify the information that each workstation requires to contact other computers and vice versa.
/dev/tcp.
At boot time there is no bridge process to receive communication. Instead, each listener process on the non-master and backup master machines awaits a message from the master machine to begin the local boot process. The master machine uses the port number in each machine's Listener Port property to address its listening process. Consequently, the port number supplied to rblisten to invoke a machine's listening process must match this property.
For more information about rblisten's role in booting a Panther application, refer to page A-7.
When the machine's bridge process is booted, it appropriates this port for its own use; consequently, you should reserve this port number for Panther.
For example, a network of two machines, fred and wilma has one server on each, fred_srv and wilma_srv. If fred_srv has 6 requests pending and wilma_srv has 9, fred_srv ordinarily gets the next service call, whether the caller is local or remote. Because routing calls across the network is expensive, you can set each machine's Network Load property to a level that deters excessive network traffic. So, if fred`s Network Load property is set to 10, the next remote client with a service call sees fred_srv as having 16 pending requests, so the request broker routes the call to wilma_srv; however, a local client always sees fred_srv's level of activity as it actually is, so its next call is processed locally.
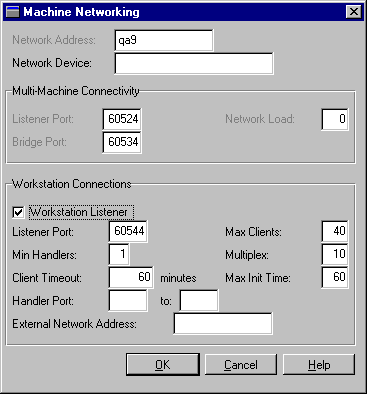
In order to permit workstation clients to connect to the application on this machine, enable the Workstation Listener toggle button. This starts the workstation listener process on this machine. When client_init is invoked from a workstation, it uses the workstation's settings in SMRBHOST and SMRBPORT to request a client connection. The workstation listener at this host and port intercepts the connection request and, if possible, finds a handler for the connection.
Note: When you add a machine to an application's configuration from a PC workstation, you cannot enable the machine's Workstation Listener toggle button (on the machine's Network Settings dialog). To activate a machine's workstation listener process, you must run JetNet manager on the server machine.
For more about enabling workstation client connections, refer to page 2-9.
client_exit.
To prevent timeouts, set this property to blank. The default value is 60.
bedrock with a TCP/IP address of 123.1.123.12 and the port number is 9876, the network address could be specified as any of the following:
//bedrock:9876
//123.1.123.12:9876
0x000226947B017B0C
Setting Server Properties |  |
All services in a Panther application are processed by a server. Servers are defined as part of each machine's configuration. You can define standard servers that advertise JIF-defined services, and conversion servers that provide services to client screens converted from a two-tier model. Both types can connect to a one or more database engines. You can also define file access servers for access to remote Panther libraries.
To access server properties, select the server name from the hierarchy list and choose Edit Properties. The following properties are common to all server types:
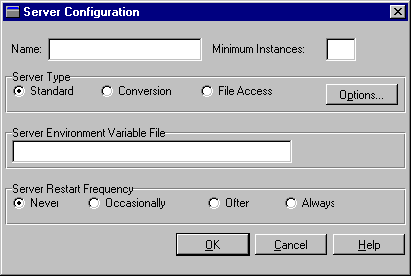
Note:
The machine environment file of a file access server's host must set PATH to ${SMBASE}/util (refer to page 2-5).
proserv.env for a standard server or progserv.env for a conversion server. You can override the default by entering the pathname directly or by using the Browse push button to select the desired file. By default, file access servers use the settings in machine.env; however, you can add additional settings in devserv.env.
This environment supplements the one already established when the server is activated. For example, you can set a different server library for each server by setting SMFLIBS in its environment file. You cannot use this file to override the machine settings for Panther Install Directory, Application Directory, and Local JetNet Configuration File.
For more information about the contents and format of a server environment file, refer to page 2-6.
Server Details |  |
You can set one or more properties that define a server's functionality, depending on its type—standard, conversion, or file access. For example, a standard server specifies which JIF-defined services to advertise, whether it is enabled for debugging, and its database connection.
You access server detail properties by choosing Options from the Server Configuration dialog. This invokes a dialog that is appropriate to the server's type. The following sections describe properties for each dialog:
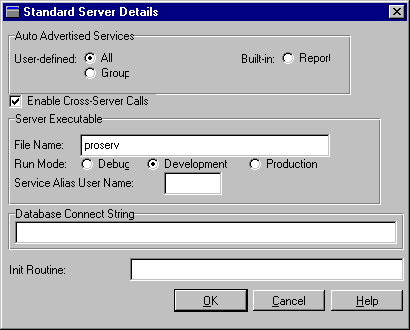
Under User-defined, select one of these options to determine which services this server advertises:
If you leave both options unselected, you must define services for this group through the server's initialization routine (refer to page 3-26).
Under Built-in, select Report to enable this server to process reports. A server that has this check box set advertises the default report service. In addition, a file access server on the same machine will need to be specified. For more information about this service, refer to page 9-23 in Reports.
proserv is the default value. You can also specify a standard server that has the Panther debugger linked in, by default prodserv. You can enter the file name directly or use the file browser. If the file name omits a path, JetNet looks for the executable in the application directory (specified in the machine's Application Directory property), or in /bin.
After you set the server executable's file name, specify whether it is configured for development or production environments by setting one of these options:
Note:
If you choose Debug for a server, also edit its server environment file so that it sets DISPLAY appropriately and LD_LIBRARY_PATH to Motif shared libraries. You might also need to reset the application's Default Blocking Timeout property.
prodserv), choose Production only in order to simulate a production environment; deployed applications should always use a standard server that does not have the debugger linked in (proserv).
Table 3-1 shows which default handlers are established for development and production servers. For detailed information about these handlers, refer to Chapter 6, "JetNet/Oracle Tuxedo Event Processing."
userName+JifAliasEntry
For example, you might define a server that advertises services from the banking service group and sets lisa as the service alias user name. Given the following JIF entries for this group:
| Service name | Alias entry |
|---|---|
|
|
|
|
|
|
|
|
|
|
|
|
The server advertises these service aliases:
lisa1001
lisa1002
lisa1003
lisa1004
Servers that advertise aliases are typically set up for the exclusive use of developers who want to modify existing services without affecting the running application. For more information, refer to page 5-8.
DBMS DECLARE CONNECTION command. The command is executed after default handlers are established and before the initialization routine executes.
One database connection string is allowed per server. If you want to enable multiple database engine connections, you can do so through the server's initialization routine, specified through its Init Routine property.
advertise command to set the services advertised by this server. Enter the function name and optionally any arguments that it requires, supplied as constant values. The routine is called after default event handlers are established and the database connection is made.
Conversion servers have three properties:
progserv is the default name for a conversion server. You can enter the file name directly or use the file browser. If the file name omits a path, JetNet looks for the executable in the application directory (specified in the machine's Application Directory property), or in /bin.
DBMS DECLARE CONNECTION command. The command is executed after default handlers are established and before the initialization routine executes. One database connection is allowed per server.
Because a server connects to a single database, make sure that none of the services that it advertises depends on a different database connection.
File access servers have a single property, File Access Server ID. This property identifies the server by name. If left blank, the property is set to the name of the host on which the server resides.
A Panther application can get a file access server's ID at runtime through the application property devserv_id. Report services use this property to return the path of report metafile output to the invoking client (refer to page 9-23 in the Reports).
Reasons for setting this property include partitioning requests to your devserv processes by creating multiple devserv groups
devserv groups in order to partition requests to the devserv processes. For example, in development you might have two devserv groups on a machine—one for providing remote library access and another for providing remote report file access.


