

 | Reports |     |
This chapter describes how to fetch data from the database and group the data in reports. These tasks require the use of the following structure nodes:
Connecting to a Database |  |
If the report gets its data from a database, the application architecture determines whether the report file must open a database connection.
In a three-tier environment running remote reports, database connections are maintained by the Panther application server. The report file does not need to open a database connection. Invoke the report file using rwrun, runreport, or sm_rw_runreport with the remote option and, if multiple database engines are in use, specify the appropriate report service.
In a three-tier environment running local reports or in two-tier environments, a database connection must be established before the report's detail node is executed. How the connection is made depends on how the report is run. A stand-alone report should specify the desired connection in the report structure through a call node that executes before detail processing begins. Alternatively, if the report is run through a Panther application, the application can specify the connection before running the report.
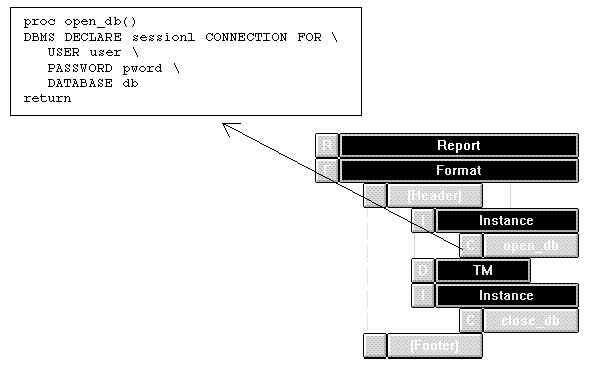
Figure 6-1 shows a typical stand-alone report, which sets the database connection through a call node attached to the main report's page format node; this call node's function contains the DBMS DECLARE CONNECTION command. Required arguments for the connection are supplied to the report when it is invoked and made accessible to the procedure through report parameters user, pword, and db. The call node is attached to an instance node, so it is called only once.

Figure 6-1 A stand-alone report connects to a database through a call node that executes before detail processing begins.
If a report sets its own report connection, it should also close the connection before terminating. The report structure shown in Figure 6-1 closes its database connection through a call node that is called at the report's end. This call node also is attached to an instance node, so it is called only once.
In a three-tier environment running remote reports where a report fetches data from only one database engine, each engine should have its own proserv executable. In the JIF, define a report service for each engine, placing that service in an engine-specific group. In Jetman, the engine-specific proserv only advertises the services applicable to that database engine. To run a report, specify the appropriate service.
In a three-tier environment running remote reports where a report fetches data from multiple database engines, the proserv executable is linked with all the database engines. Call nodes in the report must open, maintain, and close database connections.
In a three-tier environment running local reports or in two-tier environments, connections for each engine can occur in a call node. Subsequent detail nodes using DBMS DECLARE CURSOR and DBMS QUERY statements should include a WITH CONNECTION clause.
For information about running reports, refer to Chapter 9, "Running Reports." For engine-specific information about database connections, refer to "Database Drivers" and check the database engine documentation.
Fetching Report Data |  |
The detail node's Data Source property specifies how to fetch report data. Data can come from one of the following sources:
Reports typically get their data from a database. Panther can use any of the provided database drivers to connect to the desired database and fetch report data. The layout window should contain a dynamic output widget for each database column whose data you wish to use in the report—either for output or for calculations. When the query is executed, the database driver pairs the report widgets to database columns and reads data into the report widgets accordingly.
If no widget corresponds to a fetched database column, the data in that column is ignored. No error is reported. For more information on how Panther pairs database columns to its own widgets, refer to Chapter 29, "Reading Information from the Database," in Application Development Guide.
A report can fetch database data in one of three ways:
Using Database Data
If you set Data Source to TM View, the transaction manager generates the SQL statements required to fetch data. The transaction manager fetches report data through its VIEW and CONTINUE commands. When Wizard-created reports rely on the transaction manager to fetch data. The report wizard automatically creates the widgets, links, and table views that might be needed.
If you create a report manually and want the transaction manager to supply the report's data, copy some or all of the layout widgets from a repository entry that is imported from a database. Using repository components automatically sets the properties needed by the transaction manager. Specifically, copy these objects:
Transaction Manager
VIEW executes, the transaction manager fetches data for any widget belonging to a table view that is included in the transaction. CONTINUE is repeatedly executed until all data is fetched for the report.
How to Fetch Data Using the Transaction Manager
For more information about table views, refer to "Table Views" on page 31-7 in Application Development Guide, part of a chapter describing a transaction manager screen.
Set Data Source to SQL Query if you want to use your own SQL to fetch report data. The SQL statement must conform to the syntax of the database in use.
In order to set Data Source to SQL Query, the report must contain a dynamic output widget for each database column in the query, and the widget and column names should be identical. If the database column and the Panther widget have different names, your SQL statement must map between the two; otherwise, you can write your own SQL statement only by setting Data Source to Predefined Cursor (described under "Named Cursors").
For example, this SQL statement generates an order list for the specified customer:
SELECT orders.order_num, order_date, title_id, price, qty
	FROM orders, order_items
	WHERE distrib_id = :+distrib_id
	ORDER BY order_num, title_id
Panther executes this statement, then repeatedly executes DBMS CONTINUE until all the data is fetched into the report.
For Sybase, you can also fetch report data using the SQL EXEC command to execute a stored procedure. For example, this statement executes procedure fetch_order, passing the value in order_num as an argument to that procedure.
SQL EXEC fetch_order :+order_num
For more information about how Panther's database drivers fetch data from a database, refer to Chapter 29, "Reading Information from the Database," in Application Development Guide.
Named cursors are useful for fetching data to subreports that are invoked repeatedly. The cursor is declared just once—typically, at startup of the application or the parent report—then executed each time a subreport is invoked. Because the statement is already parsed, Panther can execute it faster than an equivalent SQL query.
For this option, a cursor is declared and associated with the SQL SELECT statement that fetches the report data. For more information about declaring cursors in Panther, refer to "Using Database Cursors" in Application Development Guide.
 Data Source property to Predefined Cursor. The Cursor and Using subproperty is displayed.
USING clause. DBMS CONTINUE is repeatedly executed until all data is fetched for the report.
Caution: Panther reserves the following naming convention for its own use:
_RWC_xxxx
xxxx is a four-digit hexadecimal number that uniquely identifies the cursor.
JPL's receive command can process bundle data transmitted by a send command previously executed in the calling Panther application. When the detail node first executes, Panther fetches as much bundle data as the receiving widgets require; each successive fetch continues where the last fetch left off, until no more bundle data remains to be read. This method is appropriate for transferring limited amounts of data from a screen to a report.
send command.send command. If no bundle name was specified, leave this property blank; Panther uses the unnamed bundle.For more information on send and receive, refer to Chapter 25, "Moving Data Between Screens," in Application Development Guide.
If you set the detail node's Data Source property to TM View or SQL Query, Panther's database interface fetches data. If your report requires data from flat files, wire services, or other sources not directly supported by Panther, you might need to set Data Source to Custom Function and specify your own function to fetch data. This function must fetch the desired data and place the data into the target widgets in layout window.
You can write a custom function in either JPL or C. If you call a C function, it must be installed on the prototyped function list and linked into Panther. For information on installing prototyped functions, refer to "Installing Prototyped Functions" on page 44-9 in Application Development Guide.
For information about report-specific return codes, refer to "Using JPL Return Codes."
The print nodes that you attach to a detail node are executed after every fetch; the specified layout determines the format and content of detail data. You can avoid outputting detail data by omitting this print node—for example, to produce reports that contain summary data only (refer to "Outputting Summary Data Only"). For information about print node composition properties, refer to Chapter 8, "Refining the Look."
Creating Groups |  |
Reports can visually separate groups of detail output and display introductory and summary data for each group. Groups can be nested; their summary data, such as totals and averages, can be used in graphs and displayed as bar or pie charts.
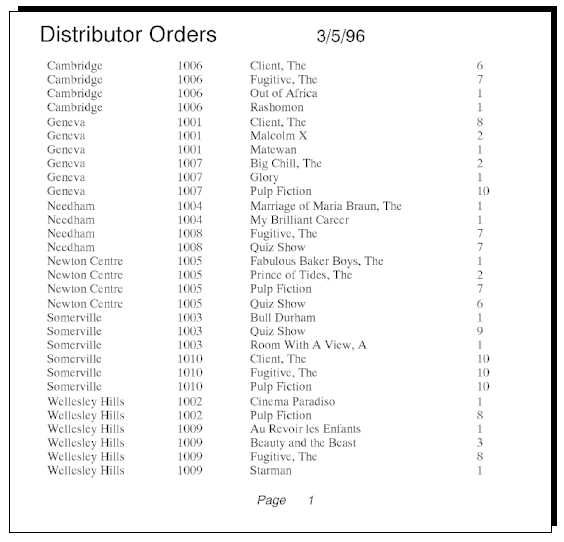
Report data can be grouped according to the values of any sort widget. If report data is sorted on more than one widget, you can group data at multiple levels. For example, the following report is sorted on distributor IDs and order numbers:

Repeating values under the distrib_name and order_num columns show how data in this report might be grouped. The next report eliminates repeating values to clarify groupings:

Data should be grouped in the same order in which it is sorted. For example, the root table view for the previous report specifies its sort widgets as distrib_name, order_num, and name, in that order. Given this sort order, data can be grouped first by distributor IDs, then by order numbers, and finally by film names.
If you rely on the transaction manager to fetch data, you can sort report data through the root table's Sort Widgets property. For information about this property, refer to "Sort Widgets" in Using the Editors. A SELECT statement can also sort widgets as desired. If the report fetches data from a send/receive bundle or through your own function, make sure that the data you supply is appropriately sorted.
A report structure's group nodes and their respective Break On properties determine how data is grouped. The Break On property specifies a named dynamic output widget, or break field, whose values define a single level of data grouping. Each grouping can contain data from one or more detail fetches; the group grows as long as the break field's value remains unchanged. When the break field's value changes, the previous grouping ends and a new one begins.
On each fetch, before outputting the current detail, Panther checks whether this widget's current value differs from the previous fetch; if it does, Panther begins break group processing with these actions:
Insert group nodes below the detail node in the desired order. For example, the report structure in Figure 6-2 yields the output shown earlier:

Figure 6-2 Group nodes in a report structure specify how to group report data.
The first group node's Break On property is set to distrib_name; for the second, it is set to order_num. In order to suppress repeating values within sort columns, both group nodes have their Print Break Value property set to First and Page Top.
A report that groups data can also generate totals and other calculated values from numeric columns; for more information, refer to Chapter 7, "Calculating Report Data."
By default, Panther outputs the values in all dynamic output widgets with each detail fetch. You can control frequency of output in a group's break field by setting the group's Print Break Value to one of these values:
When you create a group node, Panther automatically inserts header and footer sections to indicate all processing and output that takes place before and after a group's detail output. Group's header and footer sections can contain print nodes that output text at the beginning and end of the group's detail output. Typical header output in a column report includes column titles and the break field's current value; footer output often contains group totals for one or more columns.
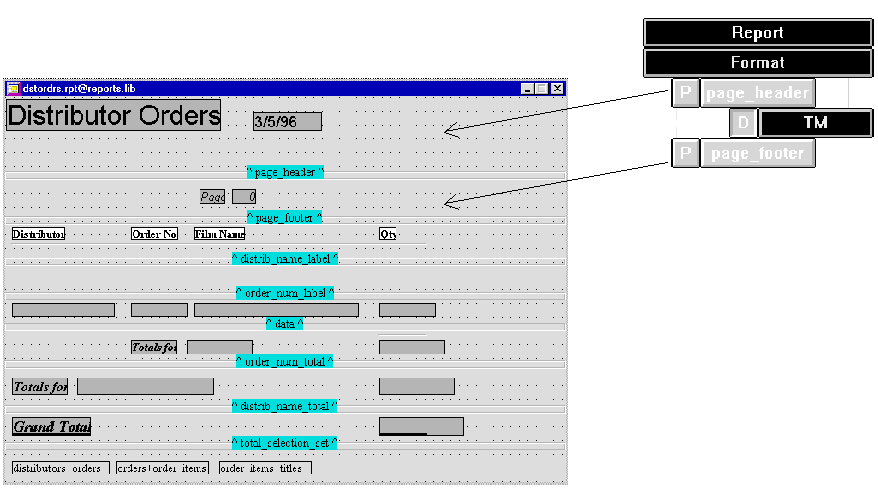
For example, in the following report structure, group node
When this report runs, Panther outputs the two layout areas at the beginning and end of each group of video distributors. Total widget Several group node properties control header and footer output:
Outputting Group Headers and Footers
distrib_name's header and footer sections each contain a print node that specifies a layout area, distrib_name_label and distrib_name_total, respectively. The footer layout area includes dynamic output widget Tdistrib_name_qty, which totals values in column qty for the current group:

Tdistrib_name_qty contains the subtotal of qty values for each group. For more information about totaling group values, refer to page 7-4, "Totaling."
Note: Setting this property has no effect on printing group headers and footers when a break occurs in the group.
For example, you might set this property to Yes when column labels in the lower group's header are a subset of those in the group above it. In this case, it is redundant to output headers from both groups.
You can set the amount of space in inches (in), millimeters (mm), or characters (c—the default). For example, 1in inserts 1 inch of blank space after a one-detail group, while 2 specifies to insert the height of 2 characters. If the value is in character (c) units, Panther uses the average character size in the report's default font to calculate a character unit's height.
A report that outputs summary data in group footers can easily be modified to omit detail data. To create a summary-only report:
Note: Whether or not the report outputs detail data, the layout window must contain dynamic output widgets that receive the fetched data, either in an unused layout area or in the layout window's unnamed area.
Figure 6-3 shows the structure of a summary-only report and its output:

Figure 6-3 Summary-only report structure and its output.
In order to process data for the entire report—for example, to calculate grand totals—Panther can view all detail output as a single group. To give this group primacy over all other groups, its group node must be topmost in the report structure. No breaks occur in this group, so its Break On property is left empty. For more information on generating grand totals, refer to "Totaling."


