


| Reports | |
The Panther editor offers two views into a report file: the physical layouts used by a report are shown in the layout window, while specifications for report generation are schematically rendered in the Report Structure window. This chapter focuses on report structure components and their properties.
The report structure for any report is available by choosing View Report Structure.
Report Structure Window |  |
The Report Structure window schematically shows how a report executes. Stages of report execution are depicted in a vertical hierarchy composed of nodes. The topmost node defines a report; when this report runs, all nodes below and subordinate to it execute in top-down order.
For example, the following column report sorts orders from video store outlets by distributor name and order number:
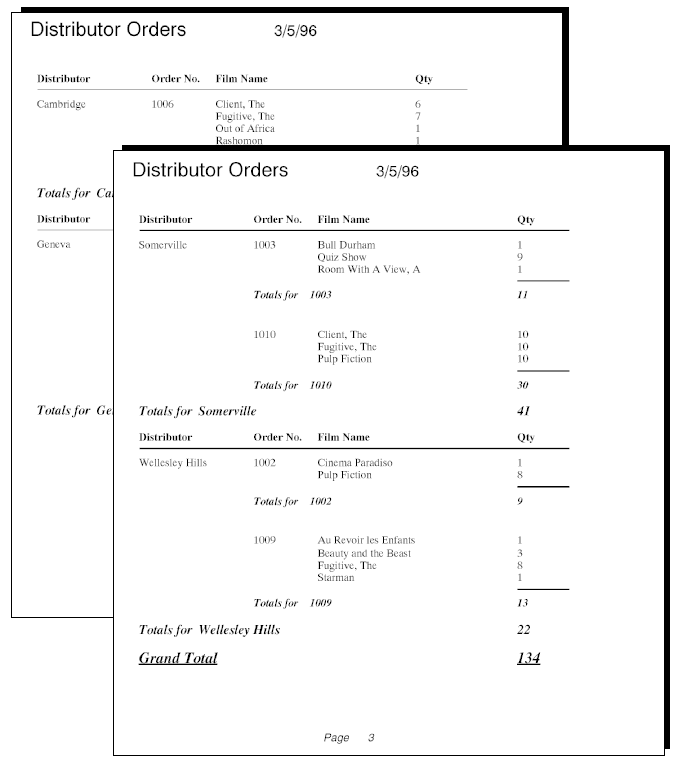
Figure 3-1 Column report by distributor name and order number
Figure 3-2 shows how execution of this report is viewed through the Report Structure window and its corresponding layout window. The two windows offer complementary views into the same report definition:

Figure 3-2 Structure of report that outputs video outlet orders.
Figure 3-2 shows a report structure composed of these node types:
Nodes belong to one of two classes—structure nodes and action nodes:
Node Classes and Types
Table 3-1 lists the different node types and summarizes their purpose:
You can attach any number and type of action nodes to all structure nodes except a report node. Action nodes can be attached in any order.
The order of a report's structure nodes is summarized in this formula:
A report structure conforms to these rules:
Node Hierarchy

The flexibility offered by report structures lets you create almost any flavor of report with as many levels of complexity as needed.
You can modify the report structure by adding, removing, and moving nodes. You can also control the amount of detail shown by collapsing and expanding portions of the structure's hierarchy.
Editing the Report Structure
How to Add a Node
Select a node and do one of the following:
Cut or the Cut button from the toolbar.
This places the removed node and its attachments in the structure's clipboard. You can then paste the node wherever its placement is valid in the report structure. The cut node remains in the clipboard until it is overwritten by the next Cut or Copy operation.
Delete or press the Delete key.
Select the node to copy and choose Edit This places a copy of the node and its attachments in the structure's clipboard. You can then paste the copy anywhere its placement is valid in the report structure. The copy remains in the clipboard until it is overwritten by the next Cut or Copy operation.
How to Copy a Node
Copy or the Copy button from the toolbar.
How to Paste a Node
Paste or the Paste button from the toolbar.Select the node that you want to move. Do either of the following:
Move Up or ArrangeMove Down.
Click on a node's type ID button to toggle all attached nodes in and out of view; or from the Edit menu, choose Arrange
You can also collapse or expand the entire structure. From the Edit menu, bring up the Arrange submenu and choose the desired option:
How to Collapse and Expand the Structure View
Expand or ArrangeContract. Figure 3-3 shows how you can collapse and expand portions of the report structure.
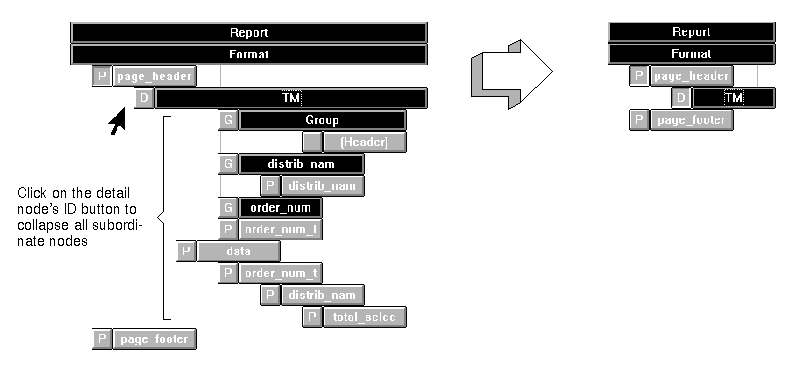
Figure 3-3 Click on a node's type ID button to collapse and expand the view of its subordinate nodes.
Through the Properties window, you can edit the properties of any selected node. To bring the Properties window into focus for the current node, give focus to the node. An arrow marks the selection; you can bring the Properties window forward by double-clicking on this arrow.
Each node type has one or more properties that are unique to it; these are discussed in later sections. Nodes also share a common set of Identity properties; these are discussed below.
Editing Node Properties
area property and set it according to the runtime context:
if amount < 0
{
   detail_output->area = "debit_entry"
}
else
{
   detail_output->area = "credit_entry"
}
Report nodes must be named in order to be explicitly invoked—for example, by another report or from the command line.
Refer to "Naming Conventions" in Using the Editors for more information about widget naming conventions and requirements.
repository-entry!widget-name
A node can inherit any properties that are set in its source, such as Break On and Orientation. However, nodes cannot inherit their relationships to each other as specified by their relative order in the repository entry's report structure.
For more information about inheritance, refer to "Controlling Inheritance" in Using the Editors.
You can review dependencies between a node and widgets in the layout window by selecting that node and choosing ReportShow Property Links. The Property Links dialog displays, which contains two types of entries:
prop-name -> widget-name shows that this node's prop-name property is set to widget-name. For example, the links for a print node might include this entry:
This entry shows that the print node's Area -> distrib_name_footer
Area property specifies to output layout area distrib_name_footer.
prop-name <- widget shows that a widget in the layout window specifies this node in its prop-name property. If widget is an unnamed widget, it is identified as Field #n, where n is its field number. For example, the links for a detail node might include this entry:
This entry shows that the detail node is referenced by total widget Note that group and detail nodes can be linked to a total or history widget's Initialize In and Update In properties even when those properties are blank. Panther infers the default for these properties from the node in which the widget is output.
Update In <- Tdistrib_name_qty
Tdistrib_name_qty's Update In property.
For example, this dialog shows the links for a group node:
Note:
The Property Links dialog only shows links to existing widgets; if a property specifies a widget or node that does not exist—either because it is not yet created or it is included at runtime—the dialog omits this link.
When you display the Property Links dialog, you can give focus to the widget or node specified in the selected entry by choosing Go To, or by double-clicking on the entry. If the widget is in the layout window, this window gets focus.

Figure 3-4 Property Links dialog shows the widgets that are specified in a node's properties.
Going to a Property Link
