


| Reports | |
At runtime, Panther can automatically capture data as it is output and use it to calculate totals. It can also copy output to other locations in the report, or use an array to collect a series of output values. You can also write your own functions to process output—for example, to calculate summary data such as averages, maximums, and minimums, or to control report execution by changing node properties at runtime.
Outputting Derived Values |  |
A dynamic output widget's Value property controls how it gets its output value. You can set this property so that a widget gets its value from previous report output—for example, totals of column values within a given group. You can reset the widget's Value property to one of these options:
Unless set to Page Number, the Value property has one or more subproperties:
Usually, you should leave this property blank. Panther sets it to the same group node that outputs the widget's layout area.
Set this property only in three cases:
Usually, you should leave this property blank. Panther updates the widget as follows:
Reset this property in these cases:
In either case, Panther might be unable to determine the widget's default context, so you should explicitly set its context with one of these values:
For example, an investment firm might use a report to calculate total payments due to a set of clients. The report then calls a program that transfers the money electronically. This report has no actual output of its own; the group node that breaks on clients has a footer section that only has a call node. This calls a function that is passed two arguments that identify the client and amount due:
Given this structure, the report requires its layout window to contain three widgets: 
client_id, payment_dtl, and total_due. Values in payment_dtl are totaled in total_due, whose Value property is set to Total and its Value Source property to payment_dtl. The report has no output of its own, so it requires no layout area. Because client_id and total_due have no output context in the report structure, Panther needs to be told explicitly their correct context. Thus, both widgets have their Context property set to Group.
You can create widgets that automatically calculate and display totals for a column's values. These totals can be for a given group, for a specific page, or for the entire report.
Reports typically generate subtotals for one or more columns within each group, and a grand total for all values. Figure 7-1 shows a report whose output is grouped on distrib_name and order_num. Each group ends with a subtotal of qty values; the end of the report also contains a grand total for qty:
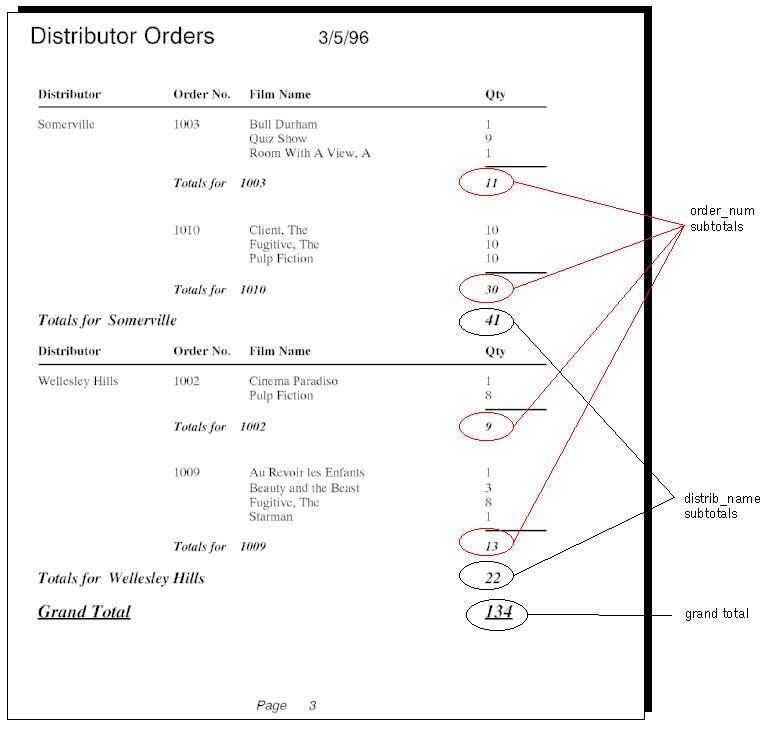
Figure 7-1 Report that generates group subtotals and grand total.
To generate this output, the report relies on three components:
Figure 7-2 shows how to define a report that generates the output shown earlier:
You can also generate totals at the page level by creating a layout that includes a total widget and outputting this layout from the page format node's footer section.
Reports sometimes need to reproduce data that has already been output. For example, it can be helpful to identify a group's totals by reproducing the output of the widget on which the group broke. Figure 7-3 shows a report fragment where subtotals for distributors and orders are each accompanied by a dynamic output widget; these widgets each repeat the output from their respective break fields:
To reproduce output from one widget in another, create a copy widget—that is, a dynamic output widget whose Value property is set to Copy. The Value Source subproperty must be set to the name of the widget whose values you wish to reproduce. For example, the layout areas for the group footers shown earlier contain copy widgets whose Value Source is set to the groups' break fields,
The previous example copies group-level output. You can also copy data into page headers and footers. For example, you might want the page header to show the first value that is output by a group's break field, or the footer to show the last value that is output by that field.
You can set a dynamic output widget to collect the values that are output in another widget. A widget that collects data from another—or history widget—can be used, for example, to collect totals for a given group and present these in a graph.

Figure 7-2 Layout areas and report structure for generating group and grand totals.
Page Totals
Copying
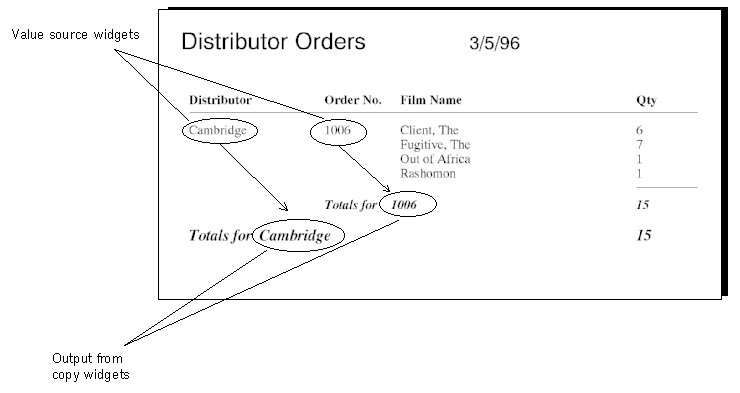
Figure 7-3 Use copy widgets to repeat output from other widgets.
distrib_name and order_num:

Collecting
How to Create a History Widget
Figure 7-4 shows a report that calculates and displays totals for each distributor in the vbizplus database. It then displays these totals in a graph:

Figure 7-4 Outputting report values in a bar graph.
The data required to draw this graph is derived from two history widgets:
Tdistrib_qty_hist collects the output from Tdistrib_qty, which totals qty values for each group of distributors.
Two graph properties of the graph widget are set to the values of the two history widgets: the Value Source property for Data Series #1, which populates the bar data, is set from To review dependencies between a dynamic output widget that processes another widget's data, and other widgets and nodes:
Tdistrib_qty_hist; and the Label Source property for X Tick Marks, which sets the labels under each bar along the X axis, is set by distrib_name_copy_hist.
Viewing Property Links
Panther displays the Property Links dialog:

The Property Links dialog can contain two types of entries:
prop-name -> obj-name shows that this widget's prop-name property is set to obj-name, either another widget or a node. If obj-name is an unnamed node, it is identified by its node type. For example, the links for a total widget might include these entries:
These entries show that this widget totals values in Note that group and detail nodes are linked to a total or history widget's Initialize In and Update In properties even when these properties are blank. Panther infers the default for these properties from the node in which the widget is output.
Value Source -> qty
Initialize In -> Group #2
Update In -> Detail #1qty and updates the accumulated total on each detail fetch.
prop-name <- obj-name shows that a node or another widget specifies this widget in its prop-name property. If obj-name is an unnamed node, it is identified by its node type. For example, the links for a widget node might include these entries:
This entry shows that copy widget
Note:
The Property Links dialog only shows links to existing widgets; if a property specifies a widget or node that does not exist—either because it is not yet created or it is included at runtime—the dialog omits this link.
Value Source <- distrib_name_copy
Break On <- Group #2distrib_name_copy uses this widget as its data source, and an unnamed group node specifies it as the group's break field.
When you display the Property Links dialog, you can give focus to the widget or node specified in the selected entry by choosing Go To, or by double-clicking on the entry. If the widget is in the structure window, Panther brings this window forward; if the structure window is closed, Panther opens it.
Going to a Property Link
Outputting Database Calculations | |
You can take advantage of your database's aggregate or mathematical functions to calculate column values. The transaction manager fetches these values as part of the report data. To do this, create a dynamic output widget and set its properties as described below. You can create this widget either in the report itself or in a repository entry. If you add the widget to your repository, it is available for selection when you create reports through the report wizard. For more information on adding widgets to a repository, refer to page 4-19, "How to Add an Item to a Repository Entry."
Set these widget properties:
name) property. This value identifies the widget as a column name in report wizard dialogs.
use_in_select) to Yes.
select_expression) that calculates the widget's value.
After you set the widget's properties, update the members of the table view to include the new widget.
Note:
Add the widget to a repository entry in order to make it available for selection when you create other reports, specifically those created with the report wizard.
Using Call Nodes | |
By using call nodes to call your own functions, there is no limit to the types of operations that you can perform on report data. You can insert a call node anywhere in the report structure, giving you access to data at every level of report execution. The functions that you write can be written in either C or JPL; you can store them in the report file itself or on disk in a file or library.
You can call functions that compute typical summary data such as average, minimum, or maximum values. Summaries can be calculated for any given group, for each page, and for the entire report. The following report shows the largest video order from each distributor:
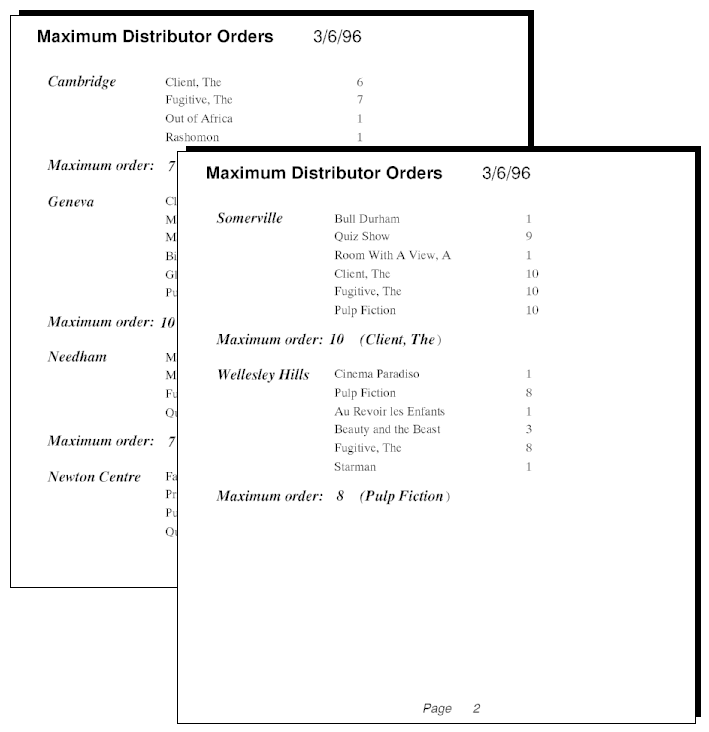
Figure 7-5 Maximum order quantities for each distributor.
A report can generate and display calculated data through three components:
A report that generates the kind of output shown earlier might use the following layout area and report structure:
A calculation widget acquires and optionally outputs calculated data. To show calculated data, place the calculation widget in a layout area that is output. To hide calculation widget data, place the widget in the layout window's unnamed area (below all layout areas), or set its Hidden property to Yes or Always.
The report defined in Figure 7-6 defines a single group whose break field is Before any detail data is output, the function called from the group node's header section initializes This initialization function is called each time a break in After fetching and outputting each row of data, Panther executes the call node that is attached to the detail node. This call node's function compares the fetched data in You can programmatically control report execution through JPL return codes that affect subsequent processing; you can also modify execution by setting report node properties at runtime—for example, a print node's Area property.
The JPL procedures that you call during report execution can return with values that influence subsequent processing. Table 7-1 lists these return codes and how they affect report execution.
For example, you can conditionally execute a report's title page, generated by a print node and end page node, if both are preceded by a call node that calls this procedure:
The previous example shows JPL code that sets a print node's Area property at runtime. A number of node properties, listed in Table 7-2 are accessible at runtime. You can read and change these properties using JPL or equivalent calls to Panther library functions. For example, this JPL statement gets the name of the report invoked by subreport node Only named nodes are accessible at runtime; their object class is
You can use Panther's send command to send data back to its caller. If the caller is a Panther application, it can retrieve this data through a corresponding receive command; otherwise, it can use Panther library functions such as sm_receive or sm_get_bundle_data. The The call node whose function contains the 
Figure 7-6 Report that calculates maximum output.
Creating a Calculation Widget
distrib_name; the layout area for the group's footer contains calculation widget Mxdistrib_qty. During detail processing, this widget gets the maximum qty value that is calculated for the group; when the group breaks and its footer area is output, Mxdistrib_qty contains this value.
Initializing Calculated Data
Mxdistrib_qty to 0:
proc init_max_distrib_qty()
Mxdistrib_qty = 0
returndistrib_name generates a new group.
Updating Calculated Data
qty and compares it to Mxdistrib_qty; if the data in qty is greater, the function puts this value into Mxdistrib_qty. It also updates the value in the group footer widget Mxdistrib_film:
proc update_max_distrib_qty()
if Mxdistrib_qty < qty
{
  Mxdistrib_qty = qty
  /* if updating max, also get film name */
  Mxdistrib_film = name
}
return
Controlling Report Execution
Using JPL Return Codes
proc set_area

if draft_arg == 1        /* draft distribution */
   @widget("title_pg_print")-> area = "draft_title"

else if draft_arg == 0   /* final distribution title */
   @widget("title_pg_print")-> area = "final_title"

else                     /* no distribution, no title page */
   return SM_RW_SKIP     /* skip print/end page nodes */

return SM_RW_OK          /* process print node */
Setting Node Properties at Runtime
qtr_summary:
vars sub_rpt
sub_rpt = @widget("qtr_summary")->report_invocation@widget. For more information about accessing widget properties, refer to "Properties" in Application Development Guide.
Transferring Data from a Report
send command can send data from report widgets and global variables, or any valid expression.
send command can be placed anywhere in the report structure, so you can send data back to the caller at any stage of report execution. Use send and receive as vehicles for return values when the report returns to its caller, or for sending data during report execution—for example, to save status or error messages.
Grouping Data on Computed Break Fields | |
In previous examples, groups are defined through break fields that obtain their values from the report's data source—typically, a database. You can also set a group node's Break Field property to a widget whose value is computed by a function written in JPL or C.
Computed breaks can be used to group data in a number of ways. For example:
n detail lines and output a group footer that consists of blank lines, in order to improve readability of the report.
In each of these cases, the group's break field is a widget or global variable whose value is computed. The function that sets the break field's value must be set in the report detail node's Pre-Break Call property. Panther performs this function after it fetches the detail data but before it checks for break field changes and begins break group processing.
In the following example, the break field's value is derived from fetched data. The report fetches tape rental data and groups it in ranges of times rented —over 80, between 61 and 80, and 41 and 60. The report must order the fetched rows by the times_rented field in descending order, and contains these components:
rental_group. This widget serves as the group's computed break field.
rental_group.
When you run this report, Panther executes This procedure sets the break field
set_rental_group each time a row is fetched:
proc set_rental_group

/* check the fetched value in widget times_rented
 * and determine which group this record belongs
 * in, set widgets rental_group and rental_range_label
 * accordingly.
 *
 * the ranges are:  1: 41 - 60
 *                  2: 61 - 80
 *                  3: over 80
 *
 * the variable rental_group is a non-output widget
 * in the layout window's unnamed area
 */

if times_rented >= 81
{
   rental_group = 3
   rental_range_label = "Times rented: over 80"
}
else if times_rented >= 61
{
   rental_group = 2
   rental_range_label = "Times rented: 61 - 80"
}
else if times_rented >= 41
{
   rental_group = 1
   rental_range_label = "Times rented: 41 - 60"
}
else if times_rented < 41
/* don't bother to check any further */
{
   return SM_RW_ENDDETAIL
}rental_group before break group checking occurs, so Panther can correctly determine whether to start a new group. When you run this report, it yields this output: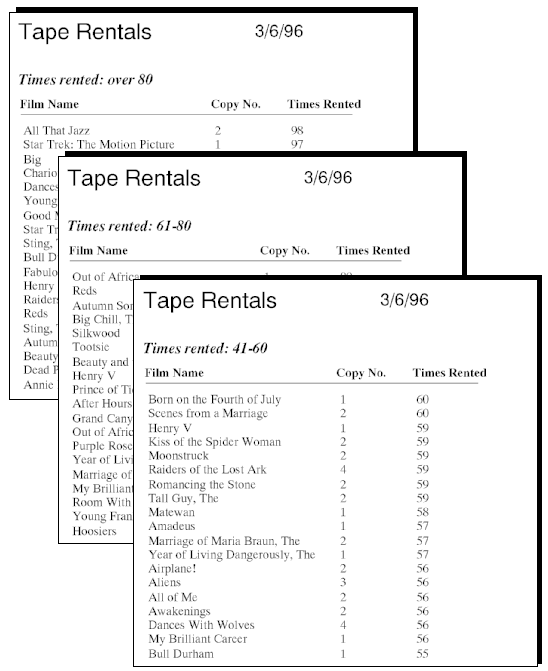
Figure 7-7 Report with groups generated by computed break field.
 Show Property Links.