

 | Using the Editors |     |
For JetNet and Oracle Tuxedo applications, the JIF is a file that contains information about services and service groups. For Oracle Tuxedo applications, the JIF can also contain information about reliable queues. The JIF is a central repository of all such information and is accessed by Panther to determine the requirements and specifications of services and queues. The JIF is stored in the distributed common library and is accessible to the team.
The JIF is a critical component of your JetNet and Oracle Tuxedo applications. It is accessed:
If you use the screen wizard to create your client screens and service components, the wizard specifies service information on these screens. However, if you create your screens outside of the screen wizard, you need to specify the service information on the appropriate screens. In both instances you need to define the services in the JIF. The information provided in the JIF must match the information in the client screens and service components associated with a particular service.
You need to create a JIF or update it to define services, service groups, or queues. This chapter shows you how to create and edit a JIF using the graphical JIF editor.
The utility jif2asc is provided to allow you to convert a JIF between binary and ASCII formats.
Starting the JIF Editor |  |
The JIF editor is an interactive tool used to create a new JIF or edit an existing one. You can invoke the JIF editor by choosing Tools JIF Editor, or you can follow the directions for your environment:
Double-click on the JIF editor icon.
Type the following at the command line:
Specify
Note:
If no jifedit [
jif-file]jif-file to start up the editor with an existing JIF loaded.
jif-file is specified, Panther opens the JIF specified by the setup variable SMTPJIF. If you invoke the editor with no options, you can load a JIF file from the editor File menu.
The JIF Editor Workspace |  |
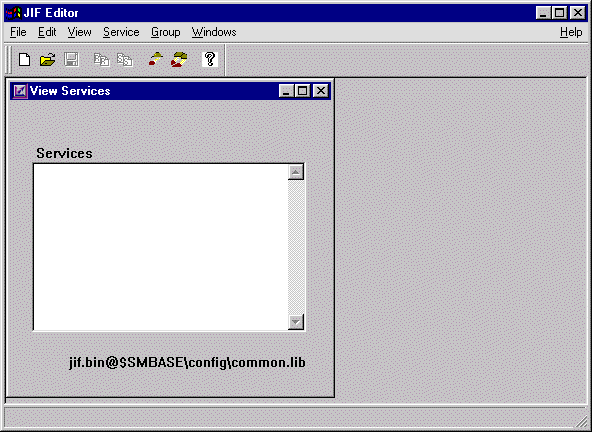
At startup, the JIF editor workspace consists of three components: the View Services screen containing a list of services, a menu bar containing six pulldown menus (Panther) and seven pulldown menus (Oracle Tuxedo only), Help, and a toolbar.

Figure 24-1 The JIF editor workspace: the View Services screen, menu bar, and toolbar.
The View Services screen displays the jifname@current_library name at the base of the screen. If you have invoked the editor naming an existing JIF, or if SMTPJIF is set to a JIF, the services appear in the list box.
The JIF editor provides you with easy access to the operations and commands that help you define a JIF. This section provides a brief overview of each menu option and its contents.
jif2asc in Application Development Guide.
jifname@current_library name is displayed at the base of each of the View screens. The View menu option screens provide a starting point for the update procedures of services, service groups, and queues.
Defining and Updating Services |  |
You can specify service information on the client screens and service components via the screen wizard or independent of the wizard. In both instances, you use the Create Service screen to define new services. On the Create Service screen, you enter and select data that describe a service. The service description and the service options in the JIF must match the information in the client screens and service components associated with the described service. These services can later be included in service groups. For further information on service groups, refer to "Defining and Updating Service Groups."
 Create (or the Create Service button on the toolbar). The Create Service screen opens.
Note:
The Update Service screen contains information for the specified service. It is identical to the Create Service screen except for its title bar.

Figure 24-2 Define a service with the Create Service screen.
If you used the screen wizard to generate your screens, the service name includes a suffix that indicates the particular transaction manager operation that a service implements. In this case, when you tab into the Routine Name field or the Service Component field, the JIF editor automatically enters the appropriate information into both these fields.
If you created your screens without the screen wizard, the service name should not include the suffix that indicates the transaction manager service. In this case, when you tab into the Routine Name field or the Service Component field, the JIF editor automatically duplicates the name of the service in both the fields. To enter a different name, edit the text in the appropriate field.
Note: If you used the screen wizard to generate your screens, you will find the appropriate routine name in this field.
Note: If you used the screen wizard to generate your screens, you will find the appropriate service component name in this field.
The View Services screen is automatically updated as services are defined or modified during an editing session.
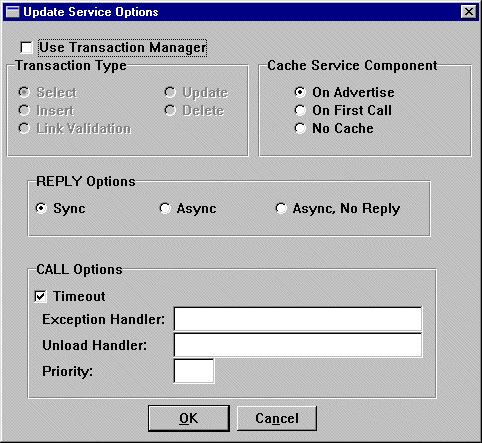
The service options allow you to control which transaction a service implements, when a service component is opened and cached to memory, and the behavior of the service itself when it is called.
To specify service options, choose the Options button on the Create Services screen or the Update Services screen, as the case may be. The Update Service Options screen opens.

Figure 24-3 Control service behavior with the Update Service Options screen.
You can control the behavior of services by specifying service options on the Update Service Options screen. The options are as follows:
The transaction options determine the type of transaction manager operation that a service implements. To specify the transaction type, choose the Use Transaction Manager check box. The transaction type options are activated.
The default is set to Select. The options are as follows:
The options control the relationship between a service and when its service component gets opened, closed, and cached to memory. The default is set to On Advertise. The options are as follows:
Cache Service Component
The reply options determine whether or not the sender of the request waits for a reply. The default is set to Sync. The options are as follows:
The call options determine the order in which services are processed, the time taken for services to be processed, where the service call is executed, which handler should be used, and what priority a service should hold. You can set or unset the following call options:
In Oracle Tuxedo applications, if you do not specify an exception handler, the default is the transaction handler. However, if a transaction handler is not specified when a transaction is active, then the default is the application-wide handler. For more information on exception events and handlers, refer to "Exception Events" in JetNet/Oracle Tuxedo Guide.
In Oracle Tuxedo applications, if you do not specify an unload handler, the default is the transaction handler. However, if a transaction handler is not specified when a transaction is active, then the default is the application-wide handler. For more information, refer to "Unload Handlers" in JetNet/Oracle Tuxedo Guide.
 Services. The View Services screen opens.
 Delete.
The View Services screen is automatically updated as services are deleted during an editing session.
Defining and Updating Service Groups |  |
A service group is a collection of services; services can be grouped in several different ways. Services are grouped to facilitate advertising services in servers. Services contained within a unique server can be defined as a service group. In addition, services can also be grouped into multiple service groups within one server. If you have multiple service groups in a server, it should be a logical grouping based on the application's tasks. For example, in a banking application, you might want to group all the services that can be accessed from an ATM client.
You use the Create Group screen to create groups and to include services in these groups. You can create service groups without any services in them; however, you can add existing services to these service groups. For further information, refer to "Defining and Updating Services."
 Create (or the Create Group button on the toolbar). The Create Group screen opens.
Note:
The Update Group screen displays the services currently in the group. It is identical to the Create Group screen except for its title bar.

Figure 24-4 Define a service group with the Create Group screen.
Note:
You can click+drag or Shift+click to select contiguous services or use Ctrl+click to select non-contiguous services in the list boxes.
The Assign All and Remove All buttons provide shortcuts to include all services in the group or remove all services from the group.
The View Groups screen is automatically updated as service groups are defined or modified during an editing session.
 Groups. The View Groups screen opens.
 Delete.
The View Groups screen is automatically updated as services are deleted during an editing session.
Defining and Updating Queues |  |
The Oracle Tuxedo middleware adapter uses a System/Q feature that allows messages to be queued—stored in stable memory and processed later. A queuespace contains queues, and queues contain messages. Messages are enqueued (pushed onto a queue), dequeued (released from a queue), and forwarded to either clients or servers, as the case may be. For further information about the System/Q feature, refer to "Reliable Queues" on page 8-11in JetNet/Oracle Tuxedo Guide and refer to the Oracle Tuxedo/Q Guide in the Oracle Tuxedo documentation.
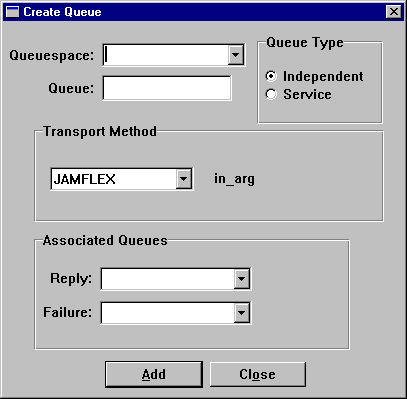
To process messages, you need to identify your queues and their respective queuespaces in the JIF. Queues are uniquely identified by their name and the name of the queuespace to which they belong. A queue can be either associated with a service or be independent. The parameters for a service queue are defined via its associated service, while the parameters for an independent queue are self-defined. In a service queue, enqueued messages get forwarded to the associated service having the same name as the queue. In an independent queue, messages are enqueued and dequeued explicitly by an agent.
 Create. The Create Queue screen opens.
The default queue type is specified to be an independent queue.
 Queues. The View Queues screen opens. Select the queue to be updated and choose Queue
 Update, o² double-click on the selected entry. The Update Queue screen opens.
Note:
The Update Queue screen displays the independent queue's current definition. It is identical to the Create Queue screen for an independent queue except for its title bar.

Figure 24-5 Define an independent queue with the Create Queue screen.
Note: You cannot modify the queuespace name if you are updating a queue.
Note: Queues are uniquely defined by their name and the queuespace to which they belong. Queue names need only be unique within a given queuespace.
The View Queues screen is automatically updated as independent queues are defined or updated during an editing session.
 Create. The Create Queue screen opens. Choose the Service radio button. The screen updates to show the new service queue.
Note:
The Update Queue screen displays the service queue's current definition. It is identical to the Create Queue screen for a service queue except for its title bar.

Figure 24-6 Define a service queue with the Create Queue screen.
Note: You cannot modify the queuespace name if you are updating a queue.
For INPUT queues, the name of the queue must be the same as the name of the service associated with it. Thus, the associated service must already be defined and you must know its name before you enter the name of the queue.
Note: Queues are uniquely defined by their name and the queuespace to which they belong. Queue names need only be unique within a given queuespace.
The data type of the message buffer that the queue uses is determined from its associated service.
The View Queues screen is automatically updated as service queues are defined or updated during an editing session. This screen lists the queues belonging to the selected queuespace.
You can only change a queue's membership if there are two or more queuespaces.
 Queues. The View Queues screen opens.
Figure 24-7 The Queue Transfer screen is used to move a queue to a different queuespace.
Note: You can click+drag or Shift+click to select contiguous queues or use Ctrl+click to select non-contiguous queues in the list boxes.
If you want to move all queues from one queuespace to another, choose the double-arrow button that points in the direction of the queue list to receive the queues.
The View Queues screen is automatically updated as queues are transferred between queuespaces. This screen lists the queues belonging to the selected queuespace.
 Queues. The View Queues screen opens.
 Delete.
The View Queues screen is automatically updated as queues are deleted during an editing session.
JPL Code Generation |  |
When you create your screens in the screen wizard, the JPL code for services and service requests is automatically generated and accessible to the screens. However, if you create your client screens and service components from scratch, then you need to generate your own service definition code and service request code. The JIF editor provides an easy-to-use mechanism for generating JPL code for services and service requests. The generated JPL code can be implemented as a:
The JIF contains the necessary information about services that you defined via the Create or Update Services screen and can output this information to a template that generates the appropriate JPL code. You can generate the following two types of service code:
Service Code Generation
In Windows and Motif, the service code is generated to the clipboard. In character mode, the code is written to a file. The output for code generated to either the clipboard or a file is as follows:
You can generate service code to the clipboard or file, as the case may be. However, for character mode, you have to set the configuration variable SMTPCLIPFILE either in the environment or in SMVARS. You need to set the value of this variable to the full path name of the file where you want the code written. If Output For Service Definition Code
proc routine-name
	receive args (service-parameters)
service_return (
return-data)routine-name is the name of the JPL or C procedure which will perform the named service, identified in the Routine Name field of the Create or Update Service screen.
service-parameters are the representations for the IN parameters.
return-data are the representations for the OUT parameters.
Output For Service Request Code
service_call
service-name (argument-list)service-name is the name of the service, as identified in the Service Name field of the Create or Update Service screen.
argument-list are the representations of the IN and OUT parameters.
Generating Service Code
SMTPCLIPFILE is not set, the default file name is clip.dat.
How to Generate Service Code
In character mode, remember to copy the contents of the file before the facility is used again, since SMTPCLIPFILE is overwritten each time code generation is done.
The format of the template used to generate code can be found in the config/msgfile. The values that undergo variable substitutions are enclosed in double angle brackets ("<<...>>"). These directives are replaced by the values that have been designated in the service's definition in the JIF. You can edit the template code in the msgfile, but you cannot create new directives. The template message strings that you can edit are as follows:
TP_JED_CLIP_TMPL_REQUEST
The text that replaces the argument directives listed in Table 24-2 depends upon the transport mechanism that they correspond to:
The JetNet-specific buffer types are Two arguments in If directives are unintentionally created that are unrecognized, they are stripped of their angle brackets. Also, directives can be \Qescaped' (for example, to be used in a comment) by enclosing them in another set of angle brackets. The following are examples of how text with embedded angle brackets in the template code is interpreted by the JIF editor.
JAMFLEX and none. The Oracle Tuxedo-specific buffer types are JAMFLEX, FML, FML32, STRING and none.
<<arg_list>> are separated by a comma.
Text
Replaced with
<<unrecognized>>
unrecognized
<<<service_name>>>
<service_name>
<<<<service_name>>>>
<<service_name>>


