


 | Getting Started-JetNet |     |
The first step in preparing the three-tier Panther software environment for JetNet and Oracle Tuxedo applications is to set up the application server. This includes creating the directory where you run the tutorial, populating it with the appropriate files, setting some environment variables, copying or linking to the server executables, and then starting the application.
In this lesson you learn how to:
A Panther application server can run either on UNIX or Windows; instructions are given for both.
UNIX Application Server |  |
If you are setting up the server on UNIX, it is assumed that you are running under either the Korn or Bourne shell.
Before beginning this lesson, you need to know the following:
/usr/prolifics.)
Panther is installed at: ______________________
(The default location is /usr/prolifics/licenses/license.dat.)
For the tutorial, it is recommended that you create the application directory as a local directory under your home directory. You will work in that directory, copying all the necessary files for the tutorial application to that location. In practice, the application directory is located in a central location that is accessible to the development team.
Create an application directory
proltut. At the command line, type:
mkdir proltutproltut directory:
cd proltut
setup.sh from the Panther server installation's config directory to the proltut directory. This file contains environment setup information that is required by Panther, such as path names and terminal information. Usually, a copy of this file resides in the application directory and in each developer's working directory.
cp ProInstallDir/config/setup.sh .
where ProInstallDir is the full pathname to the Panther application server installation (which you noted on page 1-2). It is /usr/prolifics by default.
You set the Panther environment on a UNIX server with the setup.sh file. Edit your copy of this file to include information needed by Panther such as location of the installation and license file.
/usr/prolifics by default. If Panther is installed at another location, then set SMBASE to the full path name of the correct directory (as noted on page 1-2).
$SMBASE/licenses/license.dat), set the LM_LICENSE_FILE variable to the license file's full path name (as noted on page 1-2 ). Uncomment this setting and its export line.
LD_LIBRARY_PATH=$SMBASE/lib:$LD_LIBRARY_PATH
export LD_LIBRARY_PATH
setup.sh file.. ./setup.sh
This applies the settings in setup.sh.
The Panther newapp directory contains three standard application libraries and three server environment files; all must be copied to the proltut directory. The libraries will include all components used by the application such as screens and menus. The three environment files provide environment settings for Panther servers.
newapp directory to the application directory (proltut):
cp $SMBASE/samples/newapp/* .
This copies the libraries ( client.lib, server.lib, common.lib ) and the server environment files (progserv.env, proserv.env, machine.env) to the proltut directory.
More About Libraries
All Panther application components such as screens and menus reside in libraries. The three standard application libraries listed below are installed with Panther software; you can add other libraries to your application as needed.
The Panther tutorial directory includes a tutorial-specific library and the JDB database vidsales. (JDB is a single-user SQL database provided with Panther; it is described in Lesson 6.) You need to copy these to the application directory.
proltut directory.
cp $SMBASE/samples/tutorial/* .
This copies the tutorial library (tutorial.lib) and the JDB database (vidsales) to the proltut directory.
In the tutorial, you run executables that are associated with two server types: proserv for standard servers, and devserv for file access servers. When these servers are activated, they read the environment files proserv.env and/or machine.env.
Edit the environment files (use any ASCII text editor such as vi) so that each server can find the Panther installation and knows which libraries to open.
SMBASE (remove the # from the beginning of the line) and provide the full path name of the Panther installation (as noted on page 1-2 ) if it is not /usr/prolifics.
SMBASE=
ProInstallDir
You need to create local links in the proltut directory to the server executables provided with Panther. These executables are located in the distributed util directory.
ln -s $SMBASE/util/proserv .
This creates a symbolic link to the server executable proserv, which runs a standard server.
ln -s $SMBASE/util/devserv .
This creates a symbolic link to the server executable devserv, which runs a file access server.
More About Panther Servers
Panther supports three types of application servers to handle requests from clients:
For more information about servers, refer to the JetNet/Oracle Tuxedo Guide.
A configuration file is required for Panther's middleware, JetNet, which manages communication between clients and servers. You create this file through JetMan, the JetNet manager.
Note:
In the Oracle Tuxedo version, JetNet configuration files can be used with— and are accessible to—all Oracle Tuxedo utilities, including xtuxadm. Thus, you can use the JetNet manager to create a configuration file, then edit and enhance it for use with Oracle Tuxedo later on. The alternative option is to use Oracle Tuxedo's own configuration files; in which case you would not use JetNet at all.
jetman
The opening screen of the JetNet manager displays:
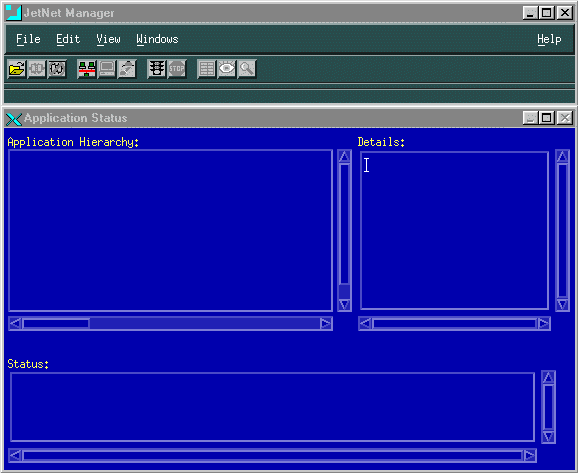
JetMan integrates all the facilities you need to configure and manage the middleware component of a Panther application. With it, you create and edit a binary Jet Net configuration file—by default, broker.bin—in the current directory.
 New
New Application.
JetMan displays the Application Configuration dialog:
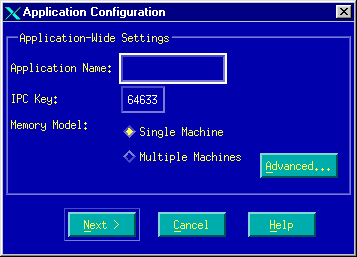
All components of a Panther application—servers, clients, and services—are identified to your system through the name that you enter in the configuration file's Application Name property.
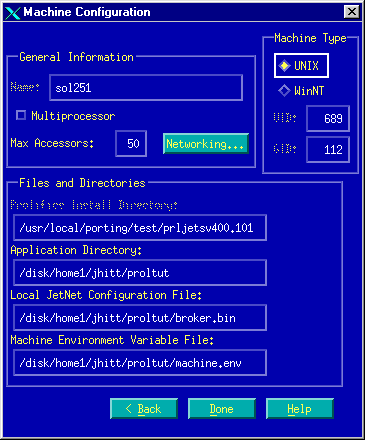
The Machine Configuration dialog contains two properties that you use later to set the environment variables SMRBHOST and SMRBCONFIG:
Host Machine Name:_______________________________
(SMRBHOST)
appDirectory/proltut/broker.bin. Make a note of this property setting for later reference:
Local JetNet Config File:________________________
(SMRBCONFIG)
It is likely that you use your own workstation to develop applications and to run JetNet manager for most application configuration tasks. In both cases, a workstation establishes a client connection to the server machine via the machine's name and workstation listener port.
You obtained the host machine's name in the previous section; now get the value of its workstation listener port, which you use later to set the client environment variable SMRBPORT.
The Machine Networking dialog displays:
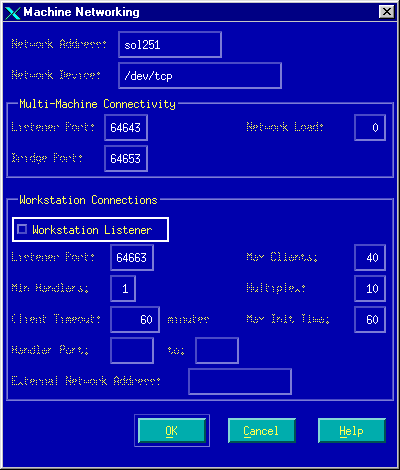
Listener Port:____________________________
(SMRBPORT)
It takes a few moments as the JetNet manager creates a configuration file for the Tutorial application.
 Exit, and choose Yes to the closing message.
The name and location of the configuration file broker.bin must be defined in the server environment through the SMRBCONFIG variable:
SMRBCONFIG variable:
Edit setup.sh to include and export the location of broker.bin. Add the variable and the value for SMRBCONFIG exactly as it is displayed in the JetNet manager (as you recorded in step 22).
SMRBCONFIG=appDirectory/proltut/broker.bin
export SMRBCONFIG
Save and close the file.
Note:
The value in SMRBCONFIG must match the value in JetMan. If your home directory is a symbolic link to another disk location, the disk location that appears in JetMan must be entered, not the value displayed with the UNIX command pwd.
Now you can start your application with the JetNet manager. Run the following utility each time you want to start up your Panther application. Make sure you are in the Tutorial application directory (proltut) and follow these steps:on page 1-15
. setup.sh
jetman
The Application Status dialog opens.
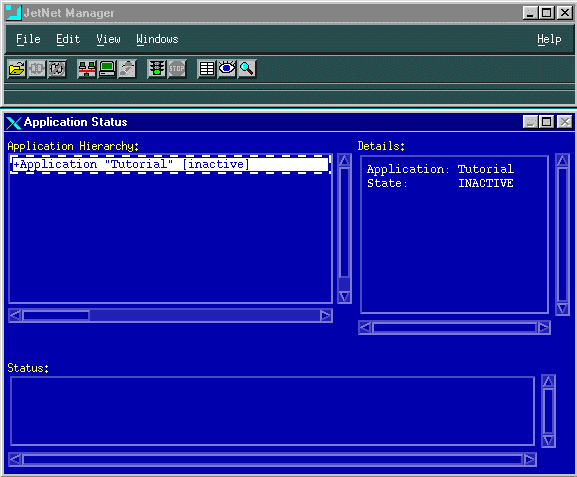
 Select Application.
 Activate from the menu bar.
This starts the application. The status window indicates success or failure for each attempt to activate an application server. A successful boot of all servers starts your Panther application.
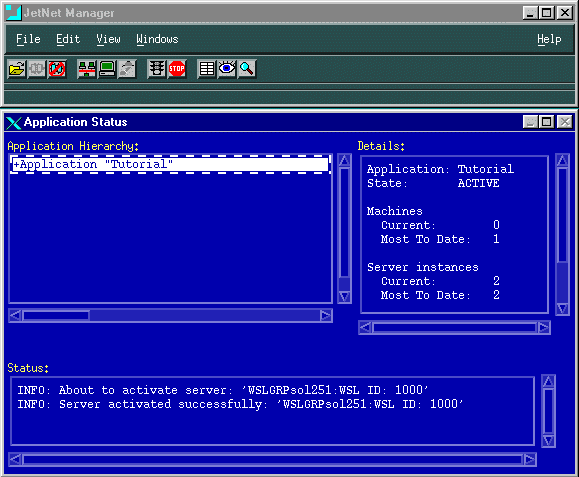
Note:
If you have problems starting the application, refer to Appendix B on page B-1. Before trying to restart the application, first shut it down by selecting the Application item from the hierarchy list and choosing Edit Deactivate. This shuts down all components of the Panther application, including any active servers.
To view all components of an active application, you must connect to the JetNet manager as a client. If your user name is set in your environment, the connection window displays it.
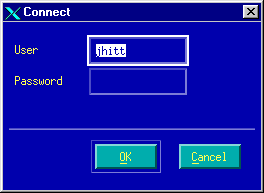
The information required by the Connect dialog differs for native and workstation clients:
Note:
In this tutorial, user name and password are not needed; however, a deployed application typically requires, at a minimum, this level of security. You can set a password in the JetNet manager through the application's Application Password property (refer to page 3-12 in JetNet/Oracle Tuxedo Guide).
All components of the tutorial application now display in the Application Status window.
More About Panther Utilities
Instead if using the Jet Net manager to create and manage an application, you can use one of several utilities to perform basic tasks:
rbconfig creates a minimal middleware configuration file (broker.bin) that you can use as a starting point for further development.
rbboot activates a Panther application.
rbshutdown deactivates a Panther application.
Whenever you are done using the application—at the end of the day or for an extended break—remember to shut down the application. This is good practice, since it frees up system resources that others might require.
 Deactivate from the menu bar on the Deactivate button from the toolbar.
This shuts down all components of the Panther application, including any active servers.
When you want to resume the tutorial (or run your application), repeat the following procedures (described in Steps 27 through 31 above):
setup.sh.
To skip to the Lesson 1 summary, refer to page 1-29.
To continue the tutorial
Windows Application Server |  |
Before beginning this lesson, you need to know the following:
C:\Prolifics\Panther; this is the location referenced in the steps in this tutorial.)
Panther is installed at: ______________________
C:\Prolifics\Panther\licenses\license.dat.)
For the tutorial, it is recommended that you create the application directory as a new folder under your root directory. You will work in that directory, copying all the necessary files for the tutorial application to that location. In practice, the application directory is located in a central location that is accessible to the development team.
Create an application directory
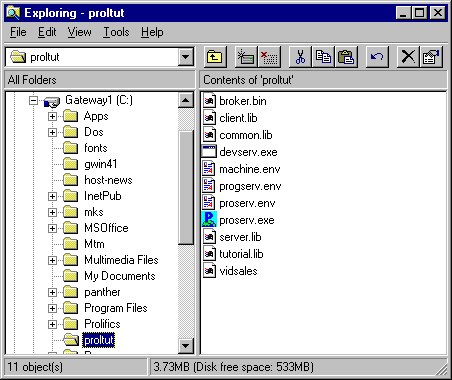
C:\) and name it proltut.The Panther newapp directory contains three standard application libraries and three server environment files; all must be copied to the proltut directory. The libraries will include all components used by the application such as screens and menus. The three environment files provide environment settings for Panther servers.
C:\Prolifics\Panther\Samples\newapp directory to the application directory (C:\proltut). This copies the standard application libraries (client.lib, server.lib, common.lib) and the server environment files (progserv.env, pros erv.env, machine.env) to the proltut directory.More About Libraries
All Panther application components such as screens and menus reside in libraries. The three standard application libraries listed below are installed with Panther software; you can add other libraries to your application as needed.
The Panther tutorial directory includes a tutorial-specific library and the JDB data base vidsales. (JDB is a single-user SQL database provided with Panther; it is described in Lesson 6.) You need to copy these to the application directory.
C:\Prolifics\Panther\Samples\Tutorial directory to your C:\proltut directory.
This copies the tutorial library (tutorial.lib), the JDB database (vidsales), and two initialization files to the proltut directory.
In the tutorial, you run executables that are associated with two server types: proserv.exe for standard servers, and devserv.exe for file access servers. When these servers are activated, they read the environment files proserv.env and/or machine.env.
Edit the environment files (use any ASCII text editor such as Notepad) so that each server can find the Panther installation and knows which libraries to open.
SMBASE setting in the machine.env file. It should be set to the Panther installation directory (as noted on page 1-16 ).$SMBASE\licenses\license.dat), set LM_LICENSE_FILE to the license file's full path name (as noted on page 1-16 ).In order for your server executables to be able to read the application's settings in the environment files, you need to copy the server executables from Panther's util directory to the tutorial's application directory.
proserv.exe and devserv.exe from the C:\Prolifics\Panther\util directory to the application directory (C:\proltut).
More About Panther Servers
Panther supports three types of application servers to handle requests from clients:
A configuration file is required for Panther's middleware, JetNet, which manages communication between clients and servers. You create this file through JetMan, the JetNet manager.
Note:
In the Oracle Tuxedo version, JetNet configuration files can be used with—and are accessible to—all Oracle Tuxedo utilities, including xtuxadm. Thus, you can use the JetNet manager to create a configuration file, then edit and enhance it for use with Oracle Tuxedo later on. The alternative option is to use Oracle Tuxedo's own configuration files; in which case you would not use JetNet at all.
 Panther Application Server
 Utilities
 Local JetMan.
The opening screen of the JetNet manager displays:
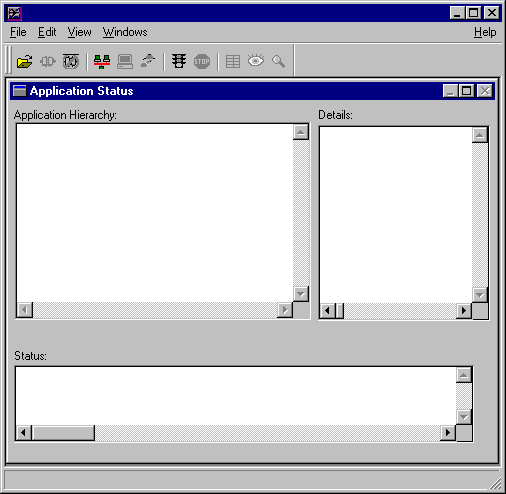
JetMan integrates all the facilities you need to configure and manage the middleware component of a Panther application. With it, you create and edit a binary Jet Net configuration file—by default, broker.bin, in the current directory.
 New
New Application.
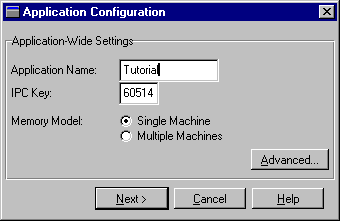
JetMan displays the Application Configuration dialog.
All components of a Panther application—servers, clients, and services—are identified to your system through the name that you enter in the configuration file's Application Name property:
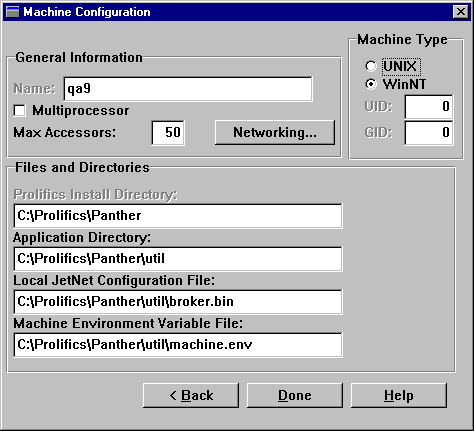
The Machine Configuration dialog contains two properties that you use later to set environment variables SMRBHOST and SMRBCONFIG:
Name:_____________________________________________
(SMRBHOST)
C:\proltut).broker.bin in the proltut directory (for example, C:\proltut\broker.bin). Make a note of this property setting for later reference:
Local JetNet Configuration File:________________________
(SMRBCONFIG)
proltut directory (for example, C:\proltut\machine.env).
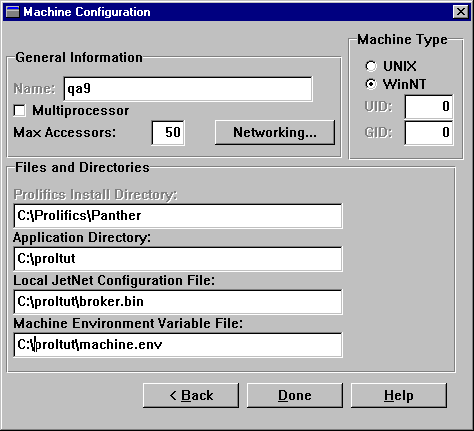
It is likely that you use your own workstation, not the server machine, to develop applications and to run JetNet manager for most application configuration tasks. In both cases, a workstation establishes a client connection to the server machine via the machine's name and workstation listener port.
You obtained the host machine's name in the previous section; now get the value of its workstation listener port, which you use later to set the client environment variable SMRBPORT.
The Machine Networking dialog displays:
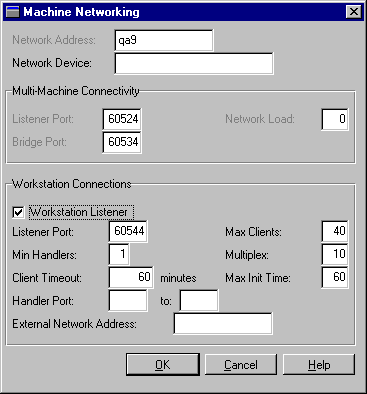
Port:____________________________
(SMRBPORT)
It takes a few moments as the JetNet manager creates a configuration file for the Tutorial application and displays its components in the Application Status dialog:
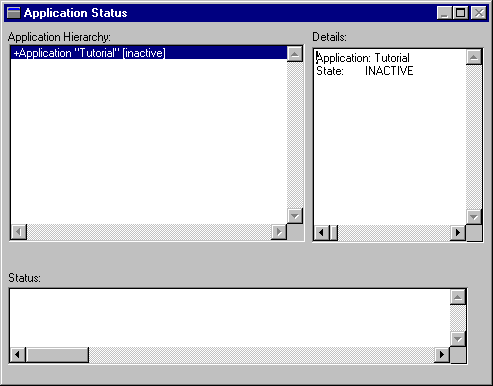
 Exit.
Exit.The name and location of the configuration file broker.bin must be defined in the server environment through the SMRBCONFIG variable.
SMRBCONFIG variable:
Open up the file jetman32.ini in the Windows directory (C:\WINDOWS). Add the variable and the value for SMRBCONFIG exactly as it is shown in the JetNet manager (as you recorded above in Step 17).
SMRBCONFIG=C:\proltut\broker.bin
Note:
If your Windows server is running a production application and you cannot change SMRBCONFIG in jetman32.ini, you can use the Select Application option within JetMan.
Now you can start your application with the JetNet manager. Run the following utility each time you want to start up your Panther application.
 Select Application. Browse to the \
proltut\ directory, highlight broker.bin, and choose Open.
More About JetNet Manager
If you run the JetNet manager from a native client (one that runs on the same machine as the server), the dialog displays the application but shows incomplete information about its components, as shown above. If you run the utility from a workstation client (one that runs on a different machine from the server), the dialog is initially empty.
 Activate from the menu bar on the Activate button from the toolbar.
This starts the application. The status window indicates success or failure for each attempt to activate an application server. A successful boot of all servers starts your Panther application.
Note:
If you have problems starting the application, refer to Appendix B on page B-1. Before trying to restart the application, first shut it down by selecting the Application item from the hierarchy list and choosing Edit Deactivate. This shuts down all components of the Panther application, including any active servers.
More About Panther Utilities
Instead if using the Jet Net manager to create and manage an application, you can use one of several utilities to perform basic tasks:
rbconfig creates a minimal middleware configuration file (broker.bin) that you can use as a starting point for further development.
rbboot activates a Panther application.
rbshutdown deactivates a Panther application.
To view all components of an active application, you must connect to the JetNet manager as a client. If your user name is set in your environment, the connection window displays it.
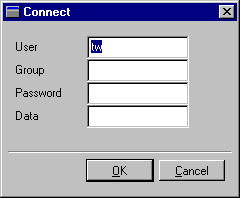
The information required by the Connect dialog differs for native and workstation clients:
Note:
In this tutorial, user name and password are not needed; however, a deployed application typically requires, at a minimum, this level of security. You can set a password in the JetNet manager through the application's Application Password property (refer to page 3-12 in JetNet Guide/Oracle TuxedoGuide).
All components of the tutorial application now display in the Application Status window.
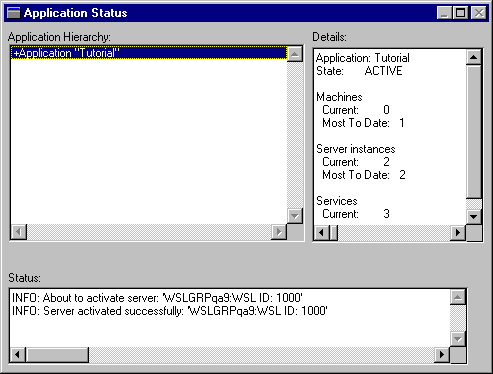
Whenever you are done using the application—at the end of the day or for an extended break—remember to shut down the application. This is good practice, since it frees up system resources that others might require.
 Deactivate from the menu bar on the Deactivate button from the toolbar.
This shuts down all components of the Panther application, including any active servers.
When you want to resume the tutorial (or run your application), repeat the following procedures (described in Steps 22 through 26 above):
 Panther Application Server
 Utilities
 Local JetMan.
In this lesson, you performed these tasks:
What did you do?
proltut, where, for this tutorial, you store all necessary files, perform all server-related tasks and boot your application. In practice, this directory should be in a central location that is accessible to the entire development team.
You learned:
What did you learn?
UNIX: Windows: /usr/prolifics
C:\Program Files\Prolifics\Panther
broker.bin, and view and edit configuration file settings. Some of these settings were applied elsewhere in the setup procedure.


