


| Getting Started-JetNet | |
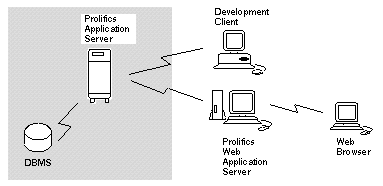
After you activate your Panther application, you need to define and configure its servers. The information you supply to the JetNet manager is added to the binary middleware configuration file, broker.bin that you created in Lesson 1.
In this lesson you learn how to:
You need to add two servers to the tutorial application: a standard server and a file access server.
First, add and configure a standard server—a server that advertises and executes JIF-defined services, and performs remote processing of reports. After adding this server, you configure it by setting properties that define its functionality.
More About the JIF
The JIF is a file that stores information about services used by your application-that is, functions performed by a server at the request of a client or another server. The JIF tells clients and servers what parameters and information to use when they process service calls. When you create a service component that has service routines, you must also define in the JIF the service that it provides. You learn more about the JIF in lessons 3 and 6.
 NewServer.
The Server Configuration dialog box opens.
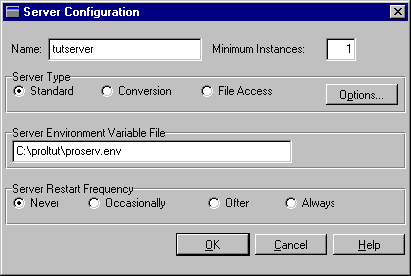
tutserver as the name of the server.The Standard Server Details dialog box opens.
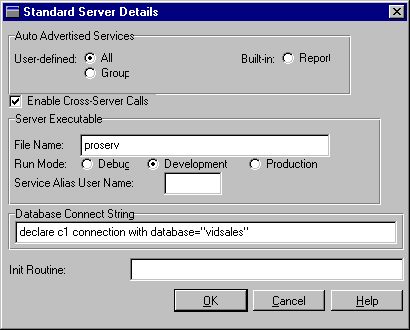
In the Standard Server Details dialog, you set properties that are specific to a standard server, such as which JIF-defined services it advertises, whether it runs in a development or production environment, and which database it connects to.
proserv executable in the server machine's proltut directory.)DECLARE c1 CONNECTION WITH DATABASE="vidsales"
When you activate the server, it automatically connects to the specified database vidsales.
The Server Configuration dialog box redisplays.
The Application Status window redisplays.
tutserver.Next, you need to add a file access server to the application. This server offers clients shared access to libraries and repositories across the network and provides file transfer services at runtime; it also facilitates remote processing of reports that are transferred back to the client.
NewServer.
The Server Configuration dialog opens.
tutaccess as the name of the server.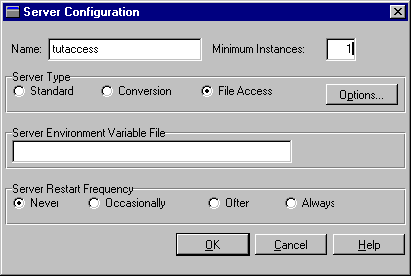
In the Application Status window, both the tutaccess and tutserver servers are included in the Application Hierarchy list.
Now start both servers.
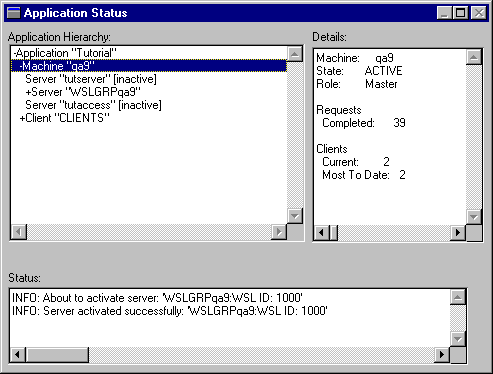
tutserver server in the Application Hierarchy list.Activate.
The status window indicates the server's successful activation.
tutaccess server and repeat step 21.
If you have problems activating servers, refer to Appendix B on page B-1.
Exit.
A dialog box opens, prompting you to confirm that you wish to terminate the session.
If you take a break, remember to shut down the application to free up the system resources.
Deactivate from the menu bar (or the Deactivate button from the toolbar).In this lesson, you performed these tasks:
You learned:
What did you learn?
Among the properties you specify for a standard server are: