


| Getting Started-JetNet | |
In general, this lesson provides additional ideas and methods for enhancing screen wizard-generated JPL procedures and extending the application's database interaction capabilities.
In this lesson you learn how to:
item_total) to the detail section (in the grid widget) of the screen that derives its data from database values.
lesson15.clt and lesson15.svr from tutorial.lib. Use either the Library TOC or menu bar (File OpenScreen).
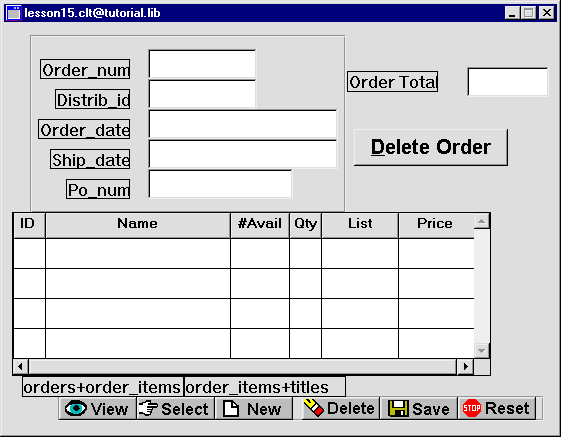
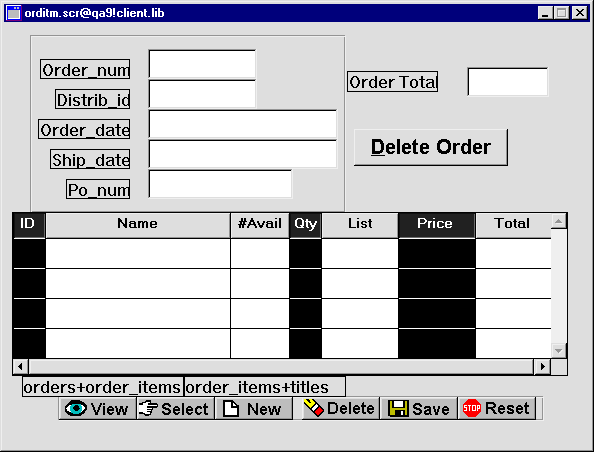
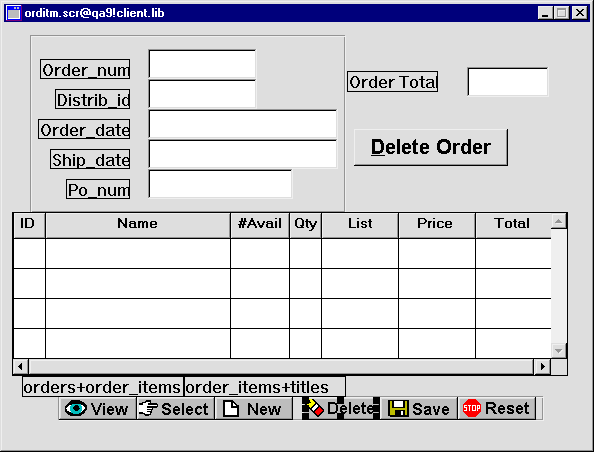
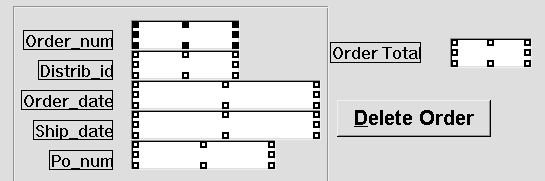
lesson15.clt includes a single-record master section, an Order Total label and corresponding data entry widget, a Delete Order push button, a grid display detail section, and wizard-generated push buttons.
Save AsLibrary Member and save:lesson15.clt as orditm.scr in the client.lib library on the application server.
lesson15.svr as orditm.scr in the server.lib library on the application server.
This overwrites the
Note:
If you prefer not to overwrite the original orditm.scr screen and service component that you created in Lesson 15.
orditm.scr client screen and service component,, open them and save them under different names before saving the new versions of orditm.scr.
Enhance the Order Item Detail screen so the grid widget shows a total for each order item. You do so by adding a column to the grid widget.
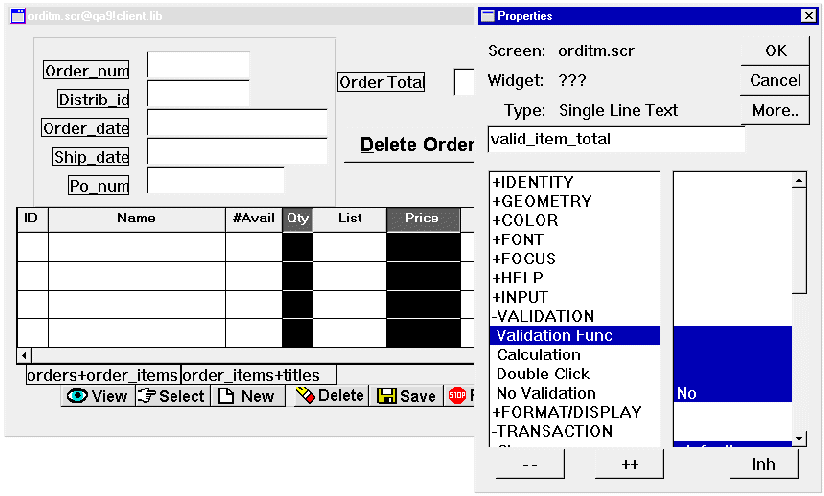
orditm.scr client screen.Single Line Text and click inside the grid widget.
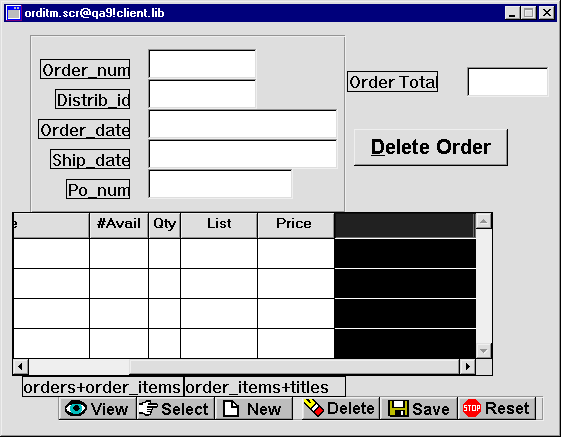
A new, default-sized grid member is added at the rightmost position of the grid widget (next to the Price grid member).
item_total
This property displays a column title in the grid widget's first row.
8
This changes the onscreen size of the widget, so it is the same length as the Price grid member.
Note:
Use the grid's horizontal scroll bar to view offscreen columns. Or resize the grid to display all seven columns: select the grid widget and under Geometry, set the Onscreen Columns property to 7.
To display totals in currency format, set the Data Formatting property.
item_total grid member still selected, under Format/Display, set its Data Formatting property to Numeric.
Numeric format subproperties are displayed. The Format Type property specifies Local currency. This specifies to display the data in the form $0.00.
More About Data Formatting Options
A variety of formatting options let you control how widget data appears. You can choose from ten predefined date/time formats and ten numeric formats. You can also create custom formats for both data types. The format is automatically applied when data is entered into fields that have their format properties set accordingly.
You want the new item_total widget to display the total value of each order. This value can be calculated by multiplying values in two other widgets: qty*price. You can direct the transaction manager to perform this calculation via the SQL that it generates. To do this, you must set item_total's Use In Select property so it is included in the select list of the generated SQL SELECT statement, and provide the appropriate math expression.
Because the server actually performs this processing, the necessary settings for item_total must be defined on the service component, where they are accessible to the transaction manager. However, you can set all the properties on the client screen and copy the widget to the service component later. In most cases, redundant property settings are ignored.
Related subproperties are displayed.
qty*price.
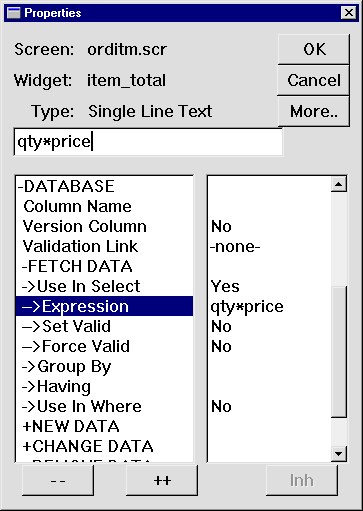
The expression uses the values from both widgets belonging to the order_items table to yield a calculated result.
The transaction manager includes item_total in the SQL generation only if the widget is part of the appropriate table view—in this case, order_items. Widgets that are outside a table view are excluded from SQL generation.
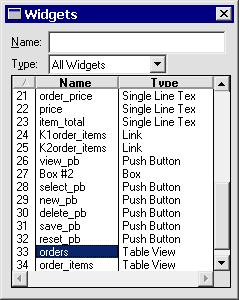
The next few steps show how to identify widgets that are table view members and how to change table view membership. To do so, you must select the order_items table view widget via the DB Interactions window or the Widget List and access its properties.
Widget List.
The Widget List opens and lists all the components on the current screen: the widget's name in the right-hand column and its type in the left column.
More About the Widget List
You can use the Widget List as another way to select widgets. All widgets on the current screen are listed in the Widget List, including invisible widgets, such as selection groups, synchronization groups and table views.
When you select an item from the list, the widget on the screen is also selected. The Properties window displays the properties common to the widgets that are currently selected, or of the screen if no widgets are selected.
You can select multiple contiguous widgets in the list with a click+drag or Shift+click; Ctrl+click to toggle membership in the selection set or to select non-contiguous items.
order_items table view from the list of names.
If the Properties window displays table view properties, it confirms the table view is selected.
GroupSelect Members.
All members of the order_items table view are selected: ID (title_id), Qty (qty), and Price (price).
More About Groups and Group Membership
Widgets can belong to several types of groups. Each group type has its own set of properties that control group behavior:
item_total (Total) grid member to the selection set:
GroupUpdate Group Members.
The Update Group Members dialog opens.
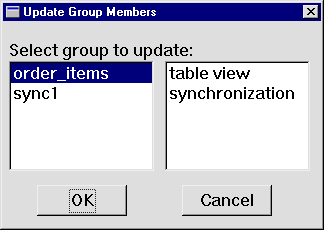
The Update Group Members dialog lists all groups to which the selected widgets belong.
order_items as the group to update and choose OK.
All members are deselected.
Note:
To confirm the new membership, repeat steps 11 and 12. The Total grid member should be selected along with title_id, qty, and price. If it is not, repeat steps 13-15.
The transaction manager generates SQL statements on the server. Therefore, you need to copy the item_total widget to the orditm.scr service component so its SELECT expression is used. Maintaining the same property settings on both the client and its service component ensures that the client screen and its service component remain synchronized.
item_total) grid member on the orditm.scr client screen.Copy, then paste it (EditPaste) on the orditm.scr service component.
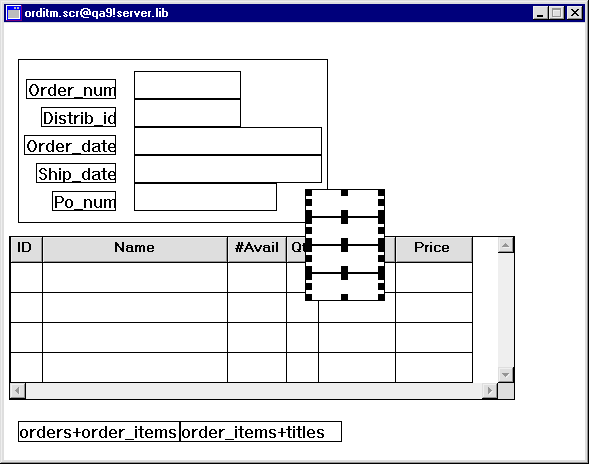
An array of single line text widgets is pasted onto the screen.
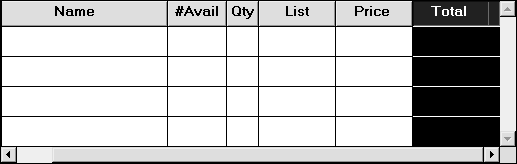
The Total column appears as the rightmost column in the grid widget.
orditm.scr service component.Order entry screens often include a grand total as well as item totals. In order to display grand totals, the orditm.scr client screen has a single line text widget order_total and a corresponding Order Total label. The value in order_total is calculated from the sum of all values in the item_total column. The procedure that performs this calculation must be called on three occasions:
orditm.scr client screen (deselect all widgets).The JPL edit window opens. It currently contains the screen entry procedure enter_screen, which behaves like the screen entry procedure that you implemented on the dstord.scr client screen. It receives the order identification number (order_num) from the calling screen (dstord.scr) and executes a sm_tm_command("SELECT") to fetch the specified order.
upd_order_totals procedure is read into the JPL edit window:
proc upd_order_total()
{
	order_total = @sum(item_total)
	return 0
}
This procedure calculates the order's total with the aggregate function @sum.
The grand total in order_total needs to be updated whenever the transaction manager performs a SELECT or SAVE command. To do this, attach a transaction manager hook function to the client screen's root table view.
evnt_ord_clt.jpl from tutorial.lib. The tm_events_clt function is read into the JPL edit window:
proc tm_events_clt(event_id)
{
	if (((event_id == TM_POST_SELECT) || (event_id == \
		TM_POST_SAVE)))
	{
		call upd_order_total()
	}
	return TM_PROCEED
}
The tm_events_clt procedure determines whether a SELECT or SAVE transaction manager command has executed. If either condition is true, it calls the upd_order_total procedure. The TM_PROCEED return value tells the transaction manager to resume processing.
tm_events_clt in the Function property.
The root table view now has tm_events_clt set as its hook function. The transaction manager executes this function when it starts traversing the screen's table views.
The screen wizard-generated Delete button was copied and renamed delete_order_pb on the lesson15.clt screen. Its label was changed to Delete Order and its Pixmap properties were removed. However, its behavior remains the same: it calls a wizard-generated procedure that deletes the master and related details.
To allow a user to delete a single order item instead of the entire order, modify the Delete button at the bottom of the orditm.scr client screen: rename the button and assign a new control string to invoke the appropriate procedure.
orditm.scr client screen.
delete1_pb.do_delete1("title_id").
When a user chooses the Delete push button, ^do_delete1 is called and is passed the argument title_id, the name of a widget to use in the procedure.
orditm.scr client screen.delete1.jpl from the tutorial.lib library.
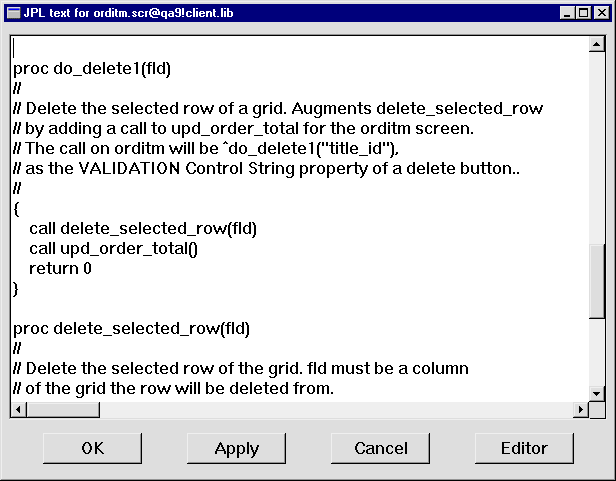
The delete1.jpl library member is read into the JPL edit window. It contains two procedures: do_delete1, which calls delete_selected_row:
proc do_delete1(fld)
{
	call delete_selected_row(fld)
	call upd_order_total()
	return 0
}
proc delete_selected_row(fld)
vars grid_name occ
{
	grid_name = @widget(fld)->grid
	occ = @widget(grid_name)->grid_current_occ
	call sm_i_doccur(fld, occ, 1)
	return 0
}
do_delete1 first calls delete_selected_row.
delete_selected_row deletes the selected row from the detail grid as follows:
title_id's grid property, which returns the name of the grid in which title_id is member.
After the grid row is deleted, delete_selected_row returns to do_delete1, which next calls upd_order_total. This procedure recalculates the value in order_total.
When the user saves changes to the database by choosing Save, the record in order_items that corresponds to the deleted grid row is deleted.
Item totals and the grand total must be recalculated whenever a value in quantity or price changes. To detect changes in either column, you need to set their Validation Func property. The function that this property specifies executes whenever an occurrence in either column loses focus—for example, the user presses TAB.
More About Widget Validation
When a widget loses focus at runtime (the user presses TAB for example), Panther calls the widget's validation function, then its exit function, and finally the automatic field function.
Validation functions are also called under the following conditions:
CLICK HERE for more information about screen and field validation, and group and grid validation
qty) and Price (price) grid members.valid_item_total in the Validation Func property.
order_valid.jpl from the tutorial.lib library.
The order_valid.jpl library member is read into the JPL edit window and includes the procedure valid_item_total:
proc valid_item_total(field_no, data, occ, context)
{
	item_total[occ]=price[occ] * qty[occ]
	if (!(context & K_SVAL) || \
		occ == @widget("Detail")->num_occurrences))
	{
		call upd_order_total()
	}
	return 0
}
The valid_item_total procedure updates item_total for the selected item using the expression price[occ] * qty[occ]. The if command checks the context in which the procedure is invoked. It also specifies two conditions, one of which must be satisfied to execute the if statement block, which calls upd_order_total:
The order_total widget is not derived from a database table so it is not included in transaction manager transactions. Therefore, when you add a new order, delete an existing one, or choose the Reset button, the content of the order_total widget doesn't clear. To clear order_total when these transaction manager events occur, you must add this widget to the screen's root table view orders.
GroupSelect Members.
All members on the screen that belong to the orders table view are selected.
order_total single line text widget to the selection group (Shift+click).
GroupUpdate Group Members.
The order_total widget is now controlled by the same display styles and transaction behavior as other widgets that belong to the orders table view.
orditm.scr to client.lib on the application server.Test it out! When you go into test mode, the orditm.scr screen entry procedure executes a SELECT command and displays the first order record in the database.
The first order record is displayed.
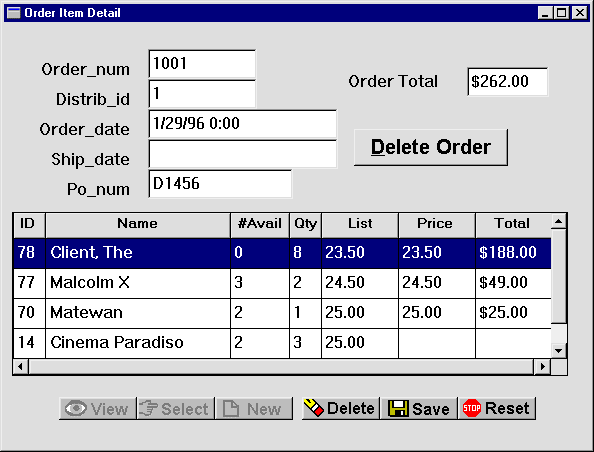
Item totals and the order total are calculated on screen. Rows that lack quantity or price data also omit total data.
The totals are immediately updated when you tab out of the field.
 .
.
The row data clears and the order's total is adjusted. The total is recalculated from the client screen's current values and so does not require any database transaction.
 .
.
The database is updated with the changed data in order 1001.
 .
.
All fields including order_total are cleared of data.
order_num field and choose  .
.
The order associated with distributor 6 displays.
The video displays and the cursor advances to the qty field.

The totals are immediately recalculated.
.To connect the orditm.scr (Order Item Detail) screen with the dstord.scr (Distributor Orders) screen created in Module 3, you must include the send_order_data procedure on the dstord.scr client screen. The send_order_data procedure calls the orditm.scr screen.
dstord.scr client screen from client.lib.send_order.jpl from tutorial.lib.
proc send_order_data()
{
	vars occ
	occ = Detail->grid_current_occ
	if (order_num[occ] == "")
	{
		msg emsg "First select an order."
		return 1
	}
	send DATA order_num[occ]
	call sm_jwindow("(+5,+5)orditm.scr")
	return 0
}
The send_order_data procedure is called when you double-click on a specific order on the Distributor Order screen (you implemented this behavior in Lesson 14). The data required to execute the appropriate SQL is sent and the orditm.scr screen opens.
You enhanced the order entry screen to display totals for each item in the order and a grand total for the entire order. You did this by performing these tasks:
order_items table view so the transaction manager can build a SQL SELECT statement using the appropriate math expression on the service component. As a result, when the Order Item Detail screen first opens, the total for each item in the order is tallied and displayed in the grid widget.
You learned:
What did you learn?

 .
.