

 | Developer's-Panther WebSphere |     |
This chapter describes the process for configuring the machines that work with your Panther software components:
How to Set Up the Application Server Engine |  |
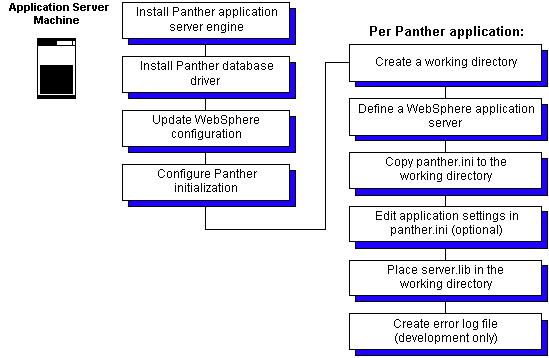
The following flowchart illustrates the process for setting up the Panther application server engine on a machine running WebSphere Application Server:

The Panther for IBM WebSphere Installation Guide describes the process for installing Panther software on application server machines for UNIX and Windows platforms.
SMBASE environment variable.Your application server machine should already have installed:
After installing Panther, certain settings in WebSphere must be changed to recognize the Panther software.
How to Update Your WebSphere Configuration
JAVA_HOME environment variable.$JAVA_HOME/bin in the PATH environment variable.WAS_HOME environment variable.
On Windows systems, a typical setting is C:\WebSphere\AppServer.
$WAS_HOME/bin in the PATH environment variable.classpath to include $SMBASE/config/pro5.jar and $SMBASE/servlet/proweb.jar. For Windows systems, the installer performs this step.
($SMBASE/config/pro5.jar contains Panther's Java classes. $SMBASE/servlet/proweb.jar contains Panther's Java servlet classes.)
LD_LIBRARY_PATH:
LD_LIBRARY_PATH=$LD_LIBRARY_PATH:$SMBASE/lib
LIBPATH:
LIBPATH=$LIBPATH:$SMBASE/lib
SHLIB_PATH:
SHLIB_PATH=$SHLIB_PATH:$SMBASE/lib
C:\Winnt\System.
On UNIX systems, the shared libraries ( On Windows systems, the DLLs (PanDmEJB.so, PanSmEJB.so and PanTmEJB.so) are located in the lib directory.
PanDmEJB.dll, PanSmEJB.dll and PanTmEJB.dll) are located in the bin directory.
$SMBASE/util in the PATH environment variable. This utilities directory provides access to Panther's license and makeejb utilities.
For Windows, the installer copies the license DLL (lmgr325.dll) to the Windows system directory.
Each Panther/WebSphere application has an initialization file, panther.ini. The default file, located in the config directory, contains three sections:
EJB Global] – Specify settings common to all Panther/WebSphere applications. For more information, refer to "EJB Global Settings."
EJB Class] – Specify settings for a particular EJB class, which would include all deployed EJBs in that server process. For more information, refer to "EJB Class Settings."
databases] – Specify which databases are installed and, if it is more than one, specify which database is the default. The database settings are applied as part of the global initialization. For more information, refer to "Database Settings."
How to Edit Global Panther Settings
$SMBASE/config/panther.ini. Since all Panther/WebSphere applications must share the same global settings, edit the default file.EJB Global] to new values.databases] section, enter the database settings for your application.
Note:
For Windows, the installer updates the global settings in panther.ini.
The EJB Global section of panther.ini contains the following configuration settings, listed alphabetically.
LM_LICENSE_FILE
$SMBASE/licenses/license.dat. (Mandatory)
native or workstation, for native or workstation clients respectively.
client_init command.
SMVARS file.
The EJB Class section of panther.ini contains the following configuration settings, listed alphabetically.
server.lib, located in the same directory as panther.ini. (Mandatory)
The databases section of panther.ini specifies which database drivers to load with your Panther applications. List the database drivers to load in the installed section, by database keyword:
installed=DB2_6
If more than one database driver is needed, you must also specify the default driver. For example:
default=DB2_6
installed=DB2_6, oracle8iProC
WebSphere documentation recommends that you create a new application server for each application. Within that application server, you must also create a container for your EJBs. (In WebSphere, the name of the default application server is server1.)
CLASSPATH.The application server's Working Directory must contain the files necessary to deploy Panther-built EJBs:
How to Set Up the Panther Application Files
$SMBASE/config, copy panther.ini and check the following settings:
server.lib.You can send server messages to a log file. Because of performance considerations, this is not suggested for application deployment, only for application testing.
server.log in the application server's working directory.command or its C equivalent sm_log.The following sample log file illustrates some server messages:
Mon Jun 21 22:06:30 2016: Component cCustomers
	Created.
Mon Jun 21 22:06:44 2016: Component cCustomers, Method GetCustomer
	Searching on S
Mon Jun 21 22:06:50 2016: Component cCustomers
	Destroyed.
Mon Jun 21 22:07:03 2016: Component cCustomers
	Created.
Mon Jun 21 22:08:07 2016: Component cCustomers
	Destroyed.
How to Set Up the Development Client |  |
There are three type of development clients:
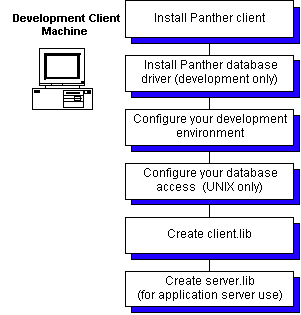
The following flowchart illustrates the process for setting up development clients:
The Panther for IBM WebSphere Installation Guide describes the process for installing Panther software for development clients and database drivers on UNIX and Windows platforms.
Installing Panther client software allows you to run the Panther editor where you build your client screens and EJBs and store them in Panther application libraries.
Installing a database driver allows your development clients running the editor to make direct connections to the database. Direct connections are required for creating a repository and are also helpful for testing purposes.
As part of the installation process, certain environment settings must be specified.

Installing Panther Software
Configuring Your Panther Client Environment
How to Configure Your Panther Client Environment
A UNIX/Linux example:
export SMJVMOPT="\"-Dcom.ibm.CORBA.ConfigURL=$WAS_HOME/properties/sas.client.props\"
\"-Dcom.ibm.SOAP.ConfigURL=$WAS_HOME/properties/soap.client.props\"
-Dcom.ibm.CORBA.RasManager=com.ibm.websphere.ras.WsOrbRasManager
-Dwas.install.root=\"$WAS_HOME/\"
-Djava.ext.dirs=\"$WAS_HOME/java/jre/lib/ext:$WAS_HOME/java/lib:$WAS_HOME/classes:$WAS_HOME/lib:$WAS_HOME/lib/ext:$WAS_HOME/web/help:$WAS_HOME/deploytool/itp/plugins/com.ibm.etools.ejbdeploy/runtime:/opt/mqm/java/lib:/opt/wemps/java/lib\"
-Djava.security.auth.login.config=\"$WAS_HOME/properties/wsjaas_client.conf\"
-Djava.naming.factory.initial=com.ibm.websphere.naming.WsnInitialContentFactory
-Xbootclasspath/p:\"$WAS_HOME/java/jre/lib/ext/ibmorb.jar:$WAS_HOME/java/jre/lib/ext/ibmext.jar\""
A Windows example:
set SMJVMOPT="\"-Dcom.ibm.CORBA.ConfigURL=%WAS_HOME%\properties\sas.client.props\"
\"-Dcom.ibm.SOAP.ConfigURL=%WAS_HOME%\properties\soap.client.props\"
-Dcom.ibm.CORBA.RasManager=com.ibm.websphere.ras.WsOrbRasManager
-Dwas.install.root=\"%WAS_HOME%\\"
-Djava.ext.dirs=\"%WAS_HOME%\java\jre\lib\ext;%WAS_HOME%\java\lib;%WAS_HOME%\classes;%WAS_HOME%\lib;%WAS_HOME%\lib\ext;%WAS_HOME%\web\help;%WAS_HOME%\deploytool\itp\plugins\com.ibm.etools.ejbdeploy\runtime;\opt\mqm\java\lib;\opt\wemps\java\lib\"
-Djava.security.auth.login.config=\"%WAS_HOME%\properties\wsjaas_client.conf\"
-Djava.naming.factory.initial=com.ibm.websphere.naming.WsnInitialContentFactory
-Xbootclasspath/p:\"%WAS_HOME%\java\jre\lib\ext\ibmorb.jar;%WAS_HOME%\java\jre\lib\ext\ibmext.jar\""
corbaname:iiop:machine:2809#cell/nodes/machine/servers/server
prol5w32.ini. For UNIX platforms, this is set in the environment.client.lib and server.lib. For Windows platforms, this is set in prol5w32.ini. For UNIX platforms, this is set in the environment.CLASSPATH setting:
LD_PRELOAD. For example:export SMJAVALIBRARY=$JAVA_HOME/jre/lib/PA_RISC/libjava.sl
export LD_PRELOAD=$JAVA_HOME/jre/lib/PA_RISC/libjava.sl
Note:
If WebSphere is to be started and stopped in the same environment, make sure For more information on client runtime configuration, refer to "How to Set Up the Development Client."
LD_PRELOAD is set to nothing before issuing the command.
On UNIX systems, in order for the Panther editor to connect to the database during development, you must configure database access in prol5unix.ini.
$SMBASE/config/prol5unix.ini.Installed= line. Panther for IBM WebSphere has the following database keywords available on UNIX:
| Keyword | Description |
|---|---|
|
DB2_6 |
DB2 |
|
oracle8iProC |
Oracle 8i for ProC |
|
oracle8iOCI |
Oracle 8i for OCI |
default= line and specify the default driver.SMPATH to include the directory with the prol5unix.ini location, by default $SMBASE/config.The Panther distribution includes two application libraries, client.lib and server.lib in the config directory. However, it is recommended that you create your application libraries outside of your Panther distribution.
If you are a native or local development client, you can create the application libraries in the application server's working directory.
How to Set Up the Web Application Broker |  |
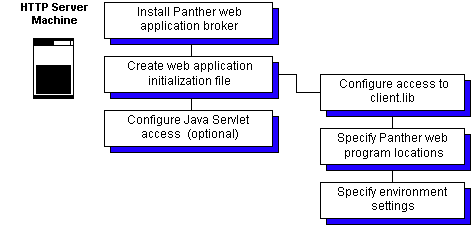
The following flowchart illustrates the process for setting up HTTP servers.

The Panther for IBM WebSphere Installation Guide describes the process for installing Panther software for HTTP server machines on UNIX and Windows platforms.
The HTTP server for most development configurations is on the same machine as WebSphere Application Server. Therefore, the WebSphere files will already be available. In this case, install the Panther web application broker in the same location as the Panther application server engine.
If WebSphere is not on the HTTP server machine, you must install WebSphere Developer's Client Files.
The Panther web application broker acts as an application client. Therefore, it will need access to the client application libraries, such as client.lib. If WebSphere Application Server and the HTTP server are on the same machine, use the application server's working directory for the client files.
Panther web applications have an initialization file containing the web application's environment settings and file locations. In that initialization file, you need to specify the location of your application files, of your Panther web application broker executables, and the environment settings for the web application.
This initialization file specifies the runtime environment for the Panther web application broker; settings are not read from the environment.
Note: Web initialization files must contain the full path name for Panther, WebSphere and Java installations. Environment variables cannot be expanded.
LD_LIBRARY_PATH to include $SMBASE/lib, $WAS_HOME/bin, and the JVM shared libraries.PATH to include:
JAVA_HOME to the location of the JDK installation.
WAS_HOME to the WebSphere installation.
iiop://hostName:portNumber.
$WAS_HOME/lib/urlprotocols.jar
$WAS_HOME/lib/namingclient.jar
PantherInstallDir/config/pro5.jar
PantherInstallDir/servlet/proweb.jar (for Java servlets)
~proweb/ini on UNIX servers and the Windows directory (for example, C:\Winnt) for Windows servers.Instead of using the CGI protocol to access a web application, you can configure the web application to run as a Java servlet. For this configuration, WebSphere Application Server needs to know the location of the Panther classes for Java servlets.
If WebSphere Application Server and the HTTP server are on the same machine, this was done as part of the application server configuration (see Step 4.).
If the HTTP server is on a separate machine, you will need to update the machine's CLASSPATH variable.
proweb.jar, to the CLASSPATH variable for WebSphere. For example:
	UNIX   CLASSPATH=/usr/panther/servlet/proweb.jar
	Windows CLASSPATH=C:\Panther\servlet\proweb.jar
proweb.jar, to the CLASSPATH variable for Panther's web application broker. (In the previous section, see Step 4.)


