


| Using the Editors | |
In Panther, you can create ActiveX control containers in your application screens to be deployed in your Web or Windows applications. ActiveX is part of Microsoft's COM (Component Object Model) technologies, which were derived from the OLE and OLE 2 specifications. COM defines a standard for application object interaction by specifying a set of common interfaces. An interface, which is a set of related functions or methods, is not allowed to change after it is published, thereby ensuring that any components referencing the interface will always find the same functionality. Since COM is a binary standard, components written in different programming languages can work together in the same application.
ActiveX controls are software components using COM technologies to interact with other COM objects and services. Being only a software component, not an application, an ActiveX control must be placed in a control container in order to operate.
The author of an ActiveX control typically uses a programming language, such as Visual C++, to write the control and define the following:
To qualify as an ActiveX control, a control needs support for the IUnknown interface and the ability to self-register—to create an entry in the system registry when requested to do so.
Since ActiveX controls, unlike Java applets, have the ability to write and modify data on your system, Microsoft developed the Authenticode technology to digitally sign ActiveX controls. This digital signature identifies the software company that manufactured the control and checks to see if the control was tampered with since it was signed. However, a digital signature does not guarantee that an ActiveX control is safe; it merely identifies the manufacturer. If you are developing Internet applications, you should digitally sign any ActiveX controls that you write and distribute.
Embedding ActiveX Controls in Application Screens |  |
The ActiveX option is available on the toolbar and on the editor Create menu, in the Extended Widgets section. This option creates an ActiveX control container on your application screen; you must then specify the ActiveX control that will occupy the container.
First, you must obtain the ActiveX control you want to place in your application. You can write the control yourself, use a distributable control, or obtain a development license from a control vendor.
Note: You cannot use the transaction manager to access an ActiveX control.
Under ActiveX, there are properties identifying the ActiveX control in addition to properties of the ActiveX control itself. Once you select an ActiveX control that is registered on your system, the properties belonging to the ActiveX control will be displayed in the Properties window.
Even though the Control Name property is used to select an ActiveX control that is registered on your system, the CLSID, which stands for class identifier, is globally unique and is used to identify the ActiveX control.
Under ActiveX, select the Control Name from the option menu. The CLSID property is automatically filled.
Under ActiveX, enter the CLSID for the ActiveX control. The CLSID is in the following format, with # being any hexadecimal digit (0-9, A-F):
########-####-####-####-############
After you specify the ActiveX control, you can specify the properties belonging to the ActiveX control.
Expand the Control Properties category. If the ActiveX control is registered on your system, all settable properties and their initial values are displayed.
Under Control Properties, select Other Properties which opens a window where you can enter properties and their values. Each property is on a separate line, in a name=value format. For example:
BlankIfZero = 1
The author's documentation of the ActiveX control should inform you of all properties, events, and methods. Panther also provides the ActiveX Viewer which displays all the ActiveX controls that are registered on your system and their properties, events, and methods, including the read-only properties. For more information, refer to page 18-13, "Using AxView, the COM Control Viewer."
For information on properties, refer to "Setting Properties at Runtime."
Some ActiveX controls require valid runtime licenses. When these controls are created, they check for a runtime license to verify that they are licensed to run on the current computer. If a runtime license is not supplied, these controls check the registry for a license.
Panther supports runtime licensing for ActiveX controls. At runtime, if the Runtime License property exists and the control supports runtime licensing, the control will be created using the license.
Some ActiveX controls return their licenses when the Control Name or the CLSID is provided. If the runtime license is not returned automatically, and the control requires runtime licensing, you can enter the value.
Under ActiveX properties, in Runtime License, enter the value of the license.
Colors are implemented differently for each ActiveX control. Some controls use the color of the control container; some controls have their own color properties, such as BackColor.
In Panther, you can set the color of the control container in the Color properties. If a control is set to use ambient properties, which are the properties of the control container, the color will be reflected in the ActiveX control.
For any of the ActiveX color properties needing an OLE_COLOR value, you can enter a hex or decimal value or select a color from the color selection box, available with the More button. The color selection is converted to an RGB format, with slashes separating the amount of each color. The following formats can be entered in the Properties window:
rr/gg/bb
&H00bbggrr or &Hbbggrr
&H800000ii
Note:
System colors do not get converted to RGB values in the Properties window.
Interacting with ActiveX Controls | |
With ActiveX controls, you have the abilities to set property values, to call methods specified for the control, and to program an event handler for the control.
Depending on the deployed platform, properties of an ActiveX control can be viewed or changed at runtime using JPL, C, or Java.
For Windows applications, use the JPL property syntax or the C functions sm_obj_get_property and sm_obj_set_property. For Web applications, use the JPL property syntax, call the C functions sm_obj_get_property and sm_obj_set_property, or set the properties on the browser-side using JavaScript or VBScript.
To use the JPL property syntax with ActiveX controls, you must prepend ax_ to the property name. This ensures that there are no conflicts between Panther properties and ActiveX control properties. For example, the following JPL statement uses the JPL property syntax to set the value property of the PrlSpinner Control:
spinner->ax_Value = 55
You could also use sm_obj_set_property in a C function or JPL procedure to set the property value, as the following JPL statement illustrates:
call sm_obj_set_property (spinner->id, "Value", "55")
Properties can specify the appearance as well as the data in an ActiveX control. The sample calendar control has a ShowDateSelectors property to display and hide the month and year option menus at the top of the control, which is set in the following JPL procedure:
proc show_date_sel
{
	if calendar->ax_ShowDateSelectors == 0
	{
		calendar->ax_ShowDateSelectors = 1
		toggler = "Hide Date Selectors"
	}
	else
	{
		calendar->ax_ShowDateSelectors = 0
		toggler = "Show Date Selectors"
	}
	return
}
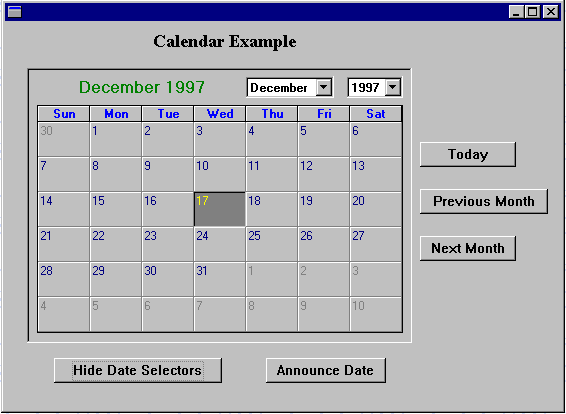
Figure 18-1 In the calendar control, the month and year option menus and the label on the push button are controlled at runtime with a JPL procedure.
In Web applications, data can be transferred to the ActiveX control using JPL procedures, C functions, JavaScript, or VBScript to set the appropriate properties. For information on setting property values using JPL or C functions, refer to "Setting Properties at Runtime."
Note: In this release, the transaction manager cannot be used to access an ActiveX control.
For JavaScript and VBScript, the ActiveX control is accessed as document.
form_name.control_name. form_name is specified at screen level by setting the NAME attribute in the Web Options Custom HTMLForm Attributes property.
control_name is specified for the ActiveX control container in the IdentityName property.
In the following examples, the The following JavaScript Here is the same function in VBScript. In VBScript, the function named In Web applications, any data submitted to the Web application server must be in an input field. Since ActiveX controls have no input fields, data must be transferred from the ActiveX control to Panther input variables using JavaScript or VBScript before the screen is submitted back to the Web application server. For more information, refer to "Submitting Data to the Web Application Server" in Web Development Guide.
The author of an ActiveX control specifies what methods can be used to access the control and the arguments needed for those methods. Those methods can then be called in Windows applications using sm_obj_call and in Web applications using VBScript or JavaScript.
In the Windows application containing the calendar control, the following JPL procedures use
The following example specifies the first level of a treeview control by using VBScript to call the control's methods. Again, the control is accessed as document. f The author of an ActiveX control specifies what events are applicable for the control. An event handler can then be written for those events using sm_com_set_handler in Windows applications and VBScript functions in Web applications.
In the Windows calendar application, the screen entry JPL procedure specifies an event handler for the DblClick event. When a user double clicks on any part of the ActiveX control, a message listing the selected date is displayed. The screen entry procedure and the JPL procedure called on the DblClick event are as follows:
The following VBScript function is hooked to the Refer to the Panther Gallery for additional JavaScript and VBScript samples.
NAME attribute for form_name is specified as main.
Data Transfer Using JavaScript
onLoad function, called when the screen is loaded into the Web browser, sends data from the hidden Panther variables to each instance of the PrlSpinner Control. This function is included in the screen's JavaScript property and specified for the OnLoad browser event.
function onLoad()
{
	document.main.PrlSpinner1.value =
			parseInt(document.main.i_1_len1.value);
	document.main.PrlSpinner2.value =
			parseInt(document.main.i_1_len2.value);
	document.main.PrlSpinner3.value =
			parseInt(document.main.i_1_len3.value);
}
Data Transfer Using VBScript
window_unLoad is automatically called on screen entry so you do not have to specify the function name in the OnLoad property.
Sub window_onLoad
	document.main.i_1_PrlSpinner1.value =
			document.main.i_1_len1.value
	document.main.i_1_PrlSpinner2.value =
			document.main.i_1_len2.value
	document.main.i_1_PrlSpinner3.value =
			document.main.i_1_len3.value
End Sub
Submitting Data to the Web Application Server
Calling ActiveX Methods
sm_obj_call to call the control's methods:
proc goto_today
call sm_obj_call(calendar->id, "Today")
return

proc goto_prev_month
call sm_obj_call(calendar->id, "PreviousMonth")
return

proc goto_next_month
call sm_obj_call(calendar->id, "NextMonth")
return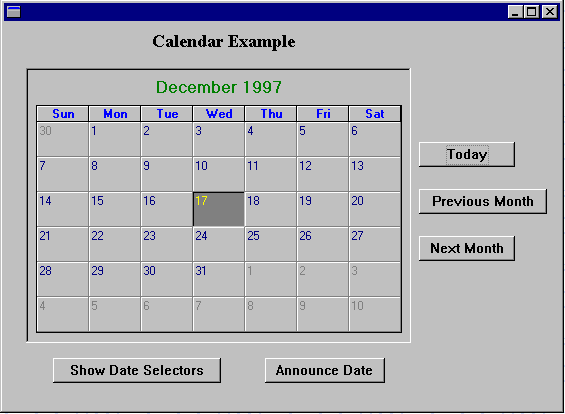
Figure 18-2 The methods for the ActiveX control can be called through a JPL, C, and Java in Windows applications and through JavaScript or VBScript in Web applications.
Calling Methods Using VBScript
orm_name.control_name, and the NAME attribute in the Form Attributes property is specified as main.
Sub BuildTree
Dim parent
Dim child

Rem  Set up attributes for the TreeView control.

Call document.main.i_1_TreeView.SetStyle
	(false, true, true, true)

Rem  Associate a pixmap with the treeview. This is a .bmp
Rem  file containing two images: one for root nodes and one
Rem  for child nodes.

Call document.main.i_1_TreeView.BitmapURL = "pixmap_URL"

Rem  Add first root node.

parent = document.main.i_1_TreeView.InsertNode
	(0 "Parent1", "Parent1", 1,1)

Rem  Add children for the first root.
Rem  Note the use of the return value from the previous
Rem  statement to supply the object ID needed for this
Rem  method invocation.

child = document.main.i_1_TreeView.InsertNode
	(parent, "Child1","Parent1.Child1", 2,2)
child = document.main.i_1_TreeView.InsertNode
	(parent, "Child2","Parent1.Child2", 2,2)

End Sub
Specifying an ActiveX Event Handler
proc onentry
call sm_com_set_handler \
	(calendar->id, "DblClick", "get_value")
return
proc get_value
vars date = sm_obj_get_property(calendar->id, "Value")
msg emsg "The selected date is" date
return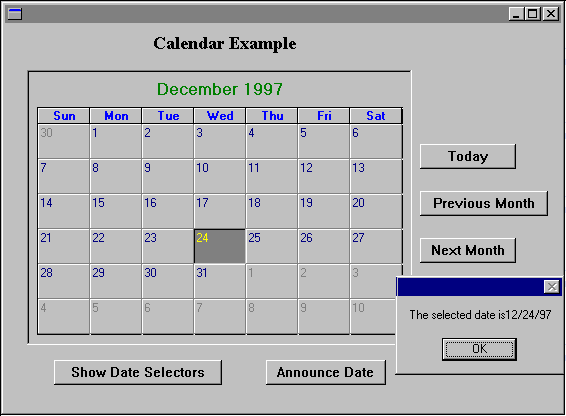
Figure 18-3 An event handler for the ActiveX control can be called through a C function in Windows applications and through JavaScript or VBScript in Web applications.
Using VBScript for Event Handling
URLSelected event for the treeview control. It keeps the Panther input field i_1_selection (which would typically be hidden) updated with a value corresponding to the node currently selected in the treeview control. When this screen is posted back to the Web application server, Panther can determine which node the user selected.
Sub i_1_TreeView_URLSelected (node)
	document.main.i_1_selection.value = node
End Sub
Using AxView, the COM Control Viewer | |
AxView, which is available for Windows development, displays the COM controls (which includes ActiveX controls) that are registered on your system. The controls are listed alphabetically by Control Name along with the path location, ProgID (programmatic identifier), and CLSID (class identifier) for each control. ActiveX controls are also identified.

Figure 18-4 The main window lists the COM controls in the system registry as well as the path location, ProgID—if available, and CLSID for each control.
From the main window, you have the following options:
For additional information about a control, refer to the documentation provided by the author of the COM control.
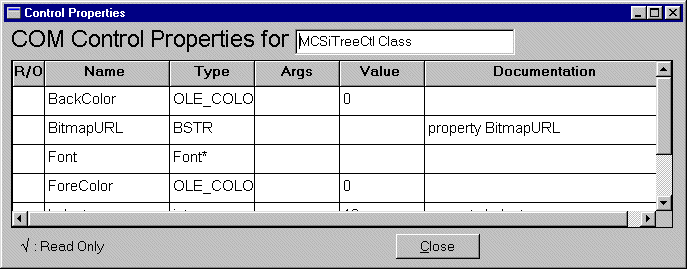
Figure 18-5 The Properties button lists the properties specified for the selected control.

Figure 18-6 The Methods button lists the methods for the selected control.

Figure 18-7 The Events button lists the events specified for the selected control.