


 | COM/MTS Guide |     |
A COM component built in Panther consists of a DLL file and a Panther service component having the same name. COM components are developed in the Panther editor, just as client screens and reports are, by:
Creating Service Components |  |
To create a service component, choose File New
New Service Component. A blank service component appears in the editor.
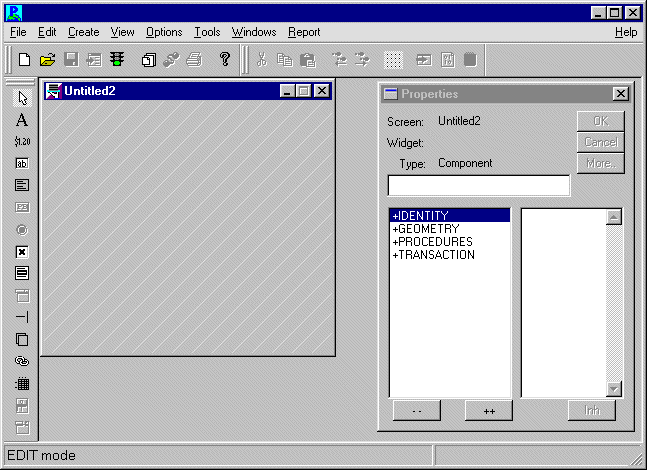
Figure 3-1 A service component is differentiated in appearance and in the number of editor properties in addition to their functionality.
For COM components, you must:
Defining the Component's Interface |  |
COM components must have an interface defined. This interface consists of a list of the properties and methods supported by the component, together with information about those properties and methods, such as data types, parameter lists, and so on. This interface definition is the public face of your component, and interactions with any application client will use the properties and methods defined in this interface.
To define the component's interface, choose View Component Interface.
The Methods section of the Component Interface window displays the methods currently defined for the component. Each row in the grid corresponds to a method. The first column shows the method's return type, the second the method's name, and the third the method's parameters, prefixed by their kind and type.
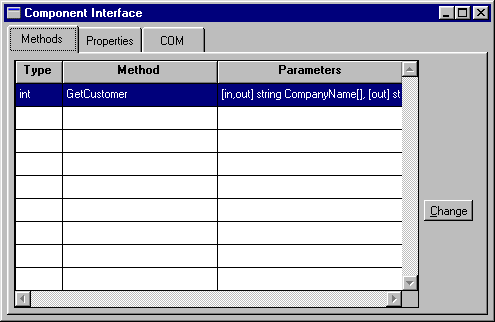
Figure 3-2 The Methods window allows you to view and define the component's methods.
Methods correspond to the actions to be performed by the component. The code to implement the service component's methods can be written in JPL, in C, or in Java. The procedure or function must be in scope at runtime, and the name must match the method name. For more information, refer to "Implementing Methods."
Choosing Change displays the Change Methods dialog where you can add a new method, copy an existing method, or edit a method. The New Methods column displays the JPL procedure names defined in the screen-level JPL Procedures property of the service component.
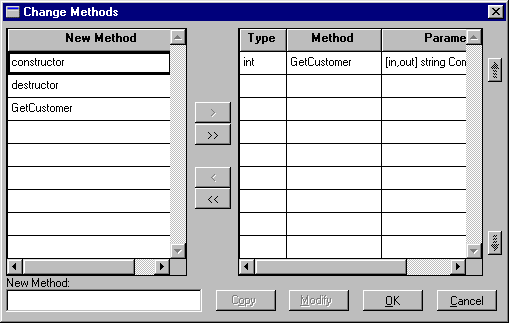
When you add a new method, or modify an existing method, you can edit the method name and specify the return type at the top of the Change Parameters dialog:
The return type for the method can be Void, String, Int, Bool, Double, or Object. The JPL return value for the method will be converted to the appropriate type and returned to the client.
The method's return cannot be an array. If this functionality is needed, the data should be returned in a parameter.
On the Change Parameters dialog, the Service Widgets column displays the names of the fields on the service component. Select the widget names and use the arrow buttons to add parameters to the grid. If the widgets are arrays, the array specification is selected for the parameter.
To the right, the grid displays the list of parameters for the method. Each row in the grid corresponds to a parameter. The order of the parameters is important; it is the order clients will use when calling the component.
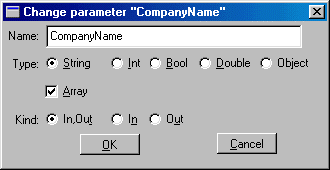
Choosing Modify (or double clicking on a parameter name) opens the Change Parameter window, which contains four fields:
Specifying the Return Type

Specifying the Parameters
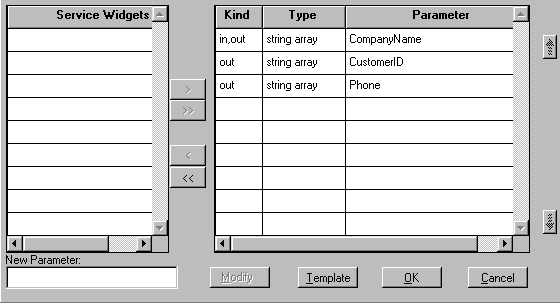
Choose the desired options for each parameter.
On the method's Change Parameters dialog, choosing Template generates a JPL procedure for the method and its parameters in the Windows clipboard. This generated JPL template can then be pasted into the screen-level JPL procedures or a file.
In the COM samples, the Template option generated the following JPL for the The Properties section in the Component Interface window displays a grid that shows the properties supported by the component. Often, properties are defined to contain information about the application state.
Each row in the grid corresponds to a property. The grid's columns correspond to the attributes of each property: Type, Name and Read-only. The order in which the properties appear in this grid is irrelevant to the functionality of your component.
Choosing Change opens the Change Properties dialog where you can add new properties or modify current properties. The New Property column displays the widget names found in the service component. You do not have to choose one of the names on this list. You can enter the name of a global JPL variable or the name of a field that you will create later.
Implementing the Method
GetCustomer method:
proc GetCustomer
{
	receive_args (CompanyName)
	return_args (CompanyName, CustomerID, Phone)
}
Defining Properties
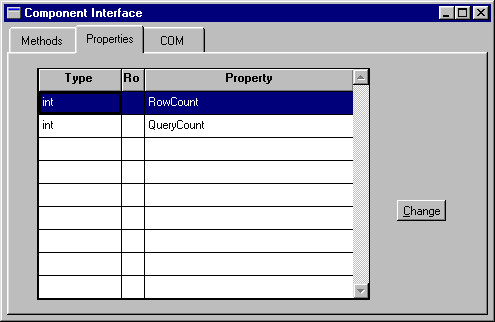
Figure 3-3 The Properties card allows you to add, modify, and delete a component's properties.
How to Add a New Property
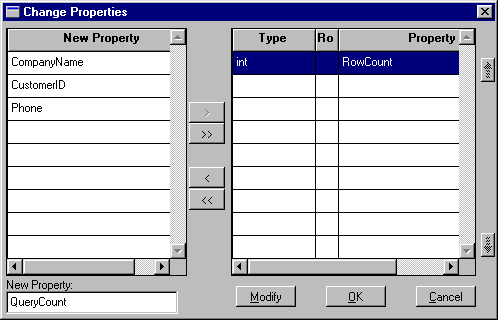
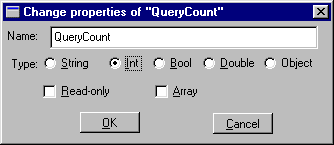
Highlight the property name in the grid and choose Modify to display the Change Properties dialog.
A COM component written with Panther consists of a DLL file and a Panther component screen that have the same name. In the COM section, you can specify:
Defining the COM Settings
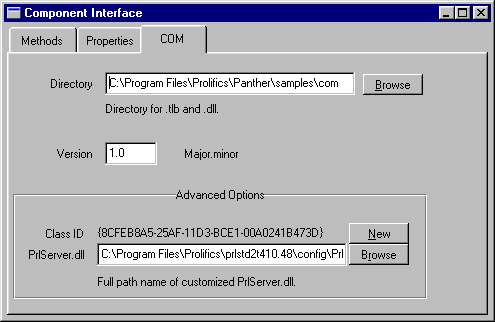
Figure 3-4 The COM card contains the CLSID and DLL information for the component.
The application directory will contain the COM component's DLL, its type library, and client registry initialization file. Since the application needs to locate the server's application library, place For more information on files in the application directory, refer to "Create an Application Directory."
You can provide a version number for the component. At runtime, a client application can ask for a specific version of a component; asking for the component without a version number gets the latest version.
When you append new methods or properties to the component, you can update the version number (without generating a new CLSID). You can then register the new version of the component on the server. The old entry is still in the registry for clients calling for the old version, but since all versions have the same CLSID, all versions of the component will use the new DLL.
The COM card also displays the Press the New button to generate a new Application Directory
server.lib in this directory.
Version Number
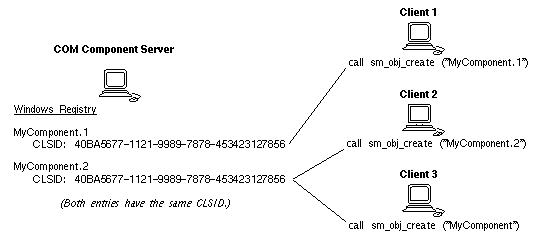
Figure 3-5 By having both entries in the registry, application clients calling for version 1 of the component can still access it, even though there are new methods or properties.
CLSID
CLSID (Class ID) to be generated for the component.
CLSID if:
When a service component is saved in the editor, a template DLL, by default named If you need to customize The source code for If you customize the DLL template, give it a new name to distinguish it from the distributed Other files in the DLL Template
PrlServer.dll, is used to create a new DLL whose name matches the name of the Panther service component. Its installed location is:
PantherInstallDir\config\PrlServer.dllPrlServer.dll in order to add your own C code, the distribution contains the source file for PrlServer.dll. In this file, you can add custom code by adding a func_data structure and calling sm_install (sm_PrlSvcInstall in the latest version) in order to install your own C functions.
PrlServer.dll is located at:
PantherInstallDir\comlink\PrlServer.cPrlServer.dll.
comlink directory are:
makefile —Makefile for running nmake
Implementing Methods |  |
A method supported by a component is a piece of work that a client can request the component to perform. The component implements each of its methods by means of a function (written in C, JPL or Java) that has the same name as the method's name.
To implement a method in JPL, the JPL procedure must be in scope when the service component is open at runtime. The simplest way to do this is to use the Template option on the Change Methods dialog to write a JPL procedure to the clipboard and then paste that procedure in the screen-level JPL (under Procedures JPL Procedures). However, the procedure could also be written in a separate JPL module and made available with
 include or public commands.
A JPL procedure that implements a component's method gets no parameters passed directly to it. To gain access to the method's in and in/out parameters, as sent by the client making the method request, use the receive_args command. For example, a sample JPL implementation of a component's method would be:
proc my_method()
{
	vars id, name
	receive_args (id, name, address, city, state, phone)
	. . .
}
The JPL command receive_args is followed by a list of targets. The values of the in and in/out parameters from the method call are placed in these target locations. The out parameters are skipped, therefore if a given method call has two out parameters, the first and third, only the values of the second, fourth and following parameters would be copied into the target list for the receive_args command.
The items in the target list must have a valid JPL syntax. In the example above, the first two items on the target list are variables declared locally in the procedure. For the target list to be valid, the latter four items on the target list must correspond to fields on the screen, to JPL global variables, or to JPL variables declared in the screen's unnamed JPL. Since any valid JPL syntax can be used, you could copy an incoming parameter into a property by using the property API.
The client that made the request for a method is expecting values passed back to it in the in/out and out parameters. It also expects a return value for the method as a whole, and it might also be checking for error codes, to determine whether some error has occurred while attempting to perform the method. To send these values back to the clients code like the following would be used:
proc my_method()
{
	. . .
	return_args (id, name)
	raise_exception -2
	return 0
}
For information on calling methods from a client screen, refer to "Accessing the Component's Methods."
The return_args command works similarly to the receive_args command. The values of the JPL variables in the list will be written to the in/out and out parameters of the method, based on the order of the parameters in the method's definition.
The raise_exception command is used to send an error code back to the client. The client's error handler can then decide what to do based on the value sent. Microsoft has defined a set of exception codes for use in COM programming.
The JPL return command is used to provide the return value for the method.
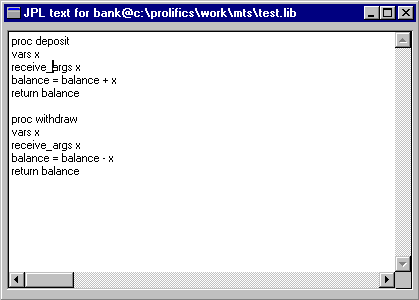
Figure 3-6 This sample screen-level JPL module implements the component's methods.
JPL variables declared in the component's unnamed procedure are only available in the component-level JPL; they will not be in scope for widget-level JPL or for calls from the client. To increase the scope of the variables, use the JPL global command.
In C, rather than the JPL commands receive_args, return_args, and raise_exception, you would use the following functions:
As in JPL, the functions To make your C code accessible at runtime, your code must be prototyped and installed in Panther by customizing the DLL template, The sm_receive_args and sm_return_args take a list of Panther variables as a single string. The variables can be comma or space-delimited and can include the use of the property API syntax to refer to properties of fields on the component.
PrlServer.dll. For more information, refer to "DLL Template."
Implementing Methods in Java
ComFunctionsInterface contains methods for log, receive_args, return_args, and raise_exception. This interface also contains methods for a series of C functions that implement some of the MTS methods for properties, security checking, and database transactions.
Saving as a COM Component |  |
A COM component developed by Panther consists of the following pieces: a Panther service component, a DLL, a type library, and an .inf file.
The Panther service component and the DLL have the same name, such as my_component.dll and the service component my_component. The DLL lives in a particular directory; the library containing the corresponding service component must also be in the same directory. During development, the DLL is stored in the directory specified on the COM card of the Component Interface window.
To name a service component, choose File Save As
 Library Member, enter a name, and choose the library to save it in, generally
 server.lib.
When you save a service component, you are asked whether to generate a DLL for it. When you generate the DLL, you also generate the type library and a .inf file for the COM component. If you have changed the interface definition for the component since the last time the component was saved, you should choose Yes. Otherwise, you can choose No. Choosing Yes if the component's interface hasn't been changed will have no ill effects; the new type library and .inf file will be the same as the old ones.
Once the DLL and the service component are complete, you are ready to deploy your COM component. For more information, refer to Chapter 5, "Deploying COM Components."
You can view the contents of a type library using Microsoft tools, such as OleView.
Logging Server Messages |  |
You can send server messages to a log file. Because of performance considerations, this is not suggested for application deployment, only for application testing.
Place a file named server.log in the application directory, along with server.lib and the COM component's DLLs. Messages are automatically written to this file when a component is created and destroyed and when an error message is generated. You can write additional messages to this file using the JPL log command or its C equivalent sm_log.
The following sample log file illustrates some server messages:
Mon Jun 21 22:06:30 1999: Component cCustomers
	Created.
Mon Jun 21 22:06:44 1999: Component cCustomers, Method GetCustomer
	Searching on S
Mon Jun 21 22:06:50 1999: Component cCustomers
	Destroyed.
Mon Jun 21 22:07:03 1999: Component cCustomers
	Created.
Mon Jun 21 22:08:07 1999: Component cCustomers
	Destroyed.
Calling Other COM Components |  |
A COM component can also instantiate other COM components and, in a Panther application, open Panther screens. Each component operates in a different context; each component also has its own form stack. This means that the property API cannot be used to pass information between COM components; instead, you must use the C functions that call methods and get/set properties.
Programming Component Events |  |
For Panther-built COM components, the Procedures category on the Properties windows contains properties for two events:
During entry processing, it cannot yet be determined whether a component is deployed under MTS or under COM or DCOM. On entry, the If there is initialization processing that is dependent on the component running under MTS, you must create an initialization method and call it after the component has been created.
COM components deployed under MTS can call C functions to access MTS features, such as:
in_server application property returns PV_SERVER_COM for all COM components. After the MTS object context has been defined, the in_server property returns PV_SERVER_COM for COM/DCOM and PV_SERVER_MTS for MTS.
Programming for MTS Deployment
Sample COM Components |  |
The Panther COM Gallery contains sample COM components. One of those components, cCustomers, fetches a list of restaurant names according to the user's search parameters. The service component looks like this in the Panther editor:
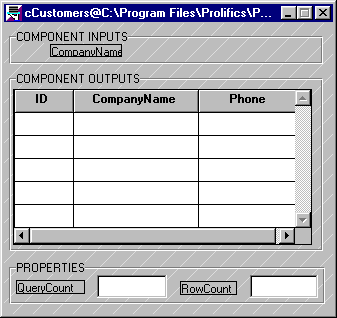
The Component Inputs box contains the names of the input parameters. In this component, the name is listed for reference only; it serves no functional purpose since it is an in/out parameter. The Component Outputs box contains the grid with the widgets designated as in/out and out parameters. The Properties box contains fields to hold the property values.
The screen-level JPL for this component consists of three procedures:
constructor—This procedure is run on component instantiation through the Entry Function property. It connects to an existing ODBC data source on the workstation.
proc constructor
{
DBMS with engine odbc DECLARE c1 connection for \
	DATASOURCE 'Restaurants'
}destructor—This procedure is run when the component is destroyed and is set through the Exit Function property. It closes the database connection.
proc destructor
{
DBMS CLOSE_ALL_CONNECTIONS
}GetCustomer—This procedure implements the GetCustomer method by receiving the input parameters from the client screen, selecting data using the transaction manager, setting the variable for the RowCount property to the number of fetched rows, and passing the parameters back to the client.
The Since it is the position of the parameters that determines how the client will receive the data, the parameter list in the return_args command must match the client's invocation of the method.
For information about viewing the Panther COM Gallery, refer to Appendix B, "COM Samples."
log command has been commented out, but was used during testing to send messages to server.log.


