


| Application Development | |
SQL commands are generated by the SQL generator during normal transaction manager processing. The transaction models used by the transaction manager call the SQL generator to create the appropriate SQL statements at runtime. This chapter briefly discusses the transaction manager commands corresponding to the major SQL statements.
In addition, this chapter discusses:
For basic information about SQL and SQL construction, refer to Chapter 3, "Introduction to SQL," in the JDB SQL Reference.
For information about how Panther reads data from the database, refer to Chapter 29, "Reading Information from the Database," and for information about how Panther writes data to a database, refer to Chapter 30, "Writing Information to the Database."
Guidelines for Automated SQL Generation |  |
Panther uses information it gathers about your database to provide the SQL generator with the information it needs to build the appropriate SQL statements. It gathers this information via property specifications. These guidelines describe the types of information that reside in specific widgets.
Table view widgets contain most of the database table information. The following guidelines describe how Panther interprets database tables:
The widgets in each table view generally correspond to database columns. The Database properties provide information to the SQL generator that it uses to construct the appropriate SQL statements. The following guidelines apply to database columns:
Specifying Columns
column_name) property under Database should correspond to the database column name. The column name is assigned automatically as a result of the import process.
When you use the transaction manager, the SQL statements are automatically generated from the various property settings. To control or change the generated SQL, you can change the properties associated the widgets representing the database tables and their columns, or you can add event functions to handle certain transaction manager requests. For more information on writing event functions, refer to Chapter 32, "Writing Transaction Event Functions."
The SQL generator uses Database properties to construct
Many of these properties are automatically defined and set via the import process and by the screen wizard when you use it to build screens for your application. In general, Database, Transaction, and Service (JetNet and Oracle Tuxedo only) property specifications are used by the transaction manager to effect SQL generation.
The Database properties listed in Table 33-2 are associated with table views and provide the SQL generator with information it needs to generate the appropriate SQL statement for a specific table view.
Table 33-3 lists service properties, used with the JetNet/Oracle Tuxedo middleware adapter, that specify the service to carry out each of the corresponding transaction manager commands. These Service properties are automatically set for Master table view widgets on client screens and selection screens (if any) when you use the screen wizard to generate screens.
To illustrate SQL generation, many of the examples in this chapter use the following database tables which are part of a database called vacation. The database includes three database tables:
Note:
The SQL examples might not match the SQL generated by Panther, because the SQL might be for a specific database engine, or the sequence of items in the statements might reflect the order in which widgets are added to a screen. However, the order should not affect the results.
The examples describe which properties you need to set for each widget and table view in order to produce the necessary SQL. Most of these properties can be set in the Properties window.
Generating SQL in the Transaction Manager
SELECT, INSERT, UPDATE, and DELETE statements. The transaction manager, via table view's and widget's Transaction property specifications, tells the SQL generator which of these statements to generate. Table 33-1 outlines which transaction manager commands are needed to generate the different types of SQL statements.
Sample Tables
vacations, customers, and cust_trips.
CREATE TABLE vacations
(
	destination    CHAR (30)    NOT NULL,
	num_days       INTEGER,
	type_id        CHAR (10),
	travel_costs   FLOAT,
	hotel          FLOAT,
	meals          FLOAT,
	PRIMARY KEY (destination)
)
CREATE TABLE customers
(
cust_id INTEGER NOT NULL,
first_name CHAR (20),
last_name CHAR (25),
phone CHAR (15),
PRIMARY KEY (cust_id)
)CREATE TABLE cust_trips
(
cust_id INTEGER NOT NULL,
destination CHAR (30) NOT NULL,
paid_flag CHAR (1),
paid_date DATETIME,
PRIMARY KEY (cust_id, destination),
FOREIGN KEY (cust_id) REFERENCES customers (cust_id),
FOREIGN KEY (destination)
REFERENCES vacations (destination)
)
Generating SELECT Statements | |
The SQL generator generates one SELECT statement per server view. A server view consists of a table view and all other table views linked to that table view with a server link. Therefore, a master-detail situation, which requires a sequential link, generates at least two SELECT statements, one for the master (parent) table view, and one for the detail (child) table view.
The SELECT statement retrieves data from a database and returns it to the user in the form of query results. The following is an example of the syntax of the SQL SELECT statements that can be generated by the SQL generator:
SELECT [distinct-keyword]select-listFROMtable-list[WHEREwhere-condition]
[GROUP BYgroup-by-list]
[HAVINGhaving-condition]
[ORDER BYorder-by-list]
Setting widget properties determines how each element of the SQL statement is, in fact, generated.
Table 33-4 lists the major elements of a SQL SELECT statement, and briefly describes what properties trigger generation of those elements. Table 33-5 lists additional SQL elements that can be generated via property specifications, event functions, or with calls to specific functions. More detailed information about SQL SELECT elements is presented in the sections following the tables.
If a desired SQL statement cannot be generated automatically, you can write a transaction event function either to supply the custom SQL or to call the SQL modification functions. For more information on writing transaction event functions, refer to Chapter 32, "Writing Transaction Event Functions."
The select-list is a list of columns, expressions or aggregate functions whose values you want to fetch from the database. The select-list is derived from all of the widgets in the server view whose Use In Select property is set to Yes. Each of these widgets contributes one item to the select-list—either the value of the widget's select Expression property, if set, or the widget's Column Name.
To have the widget be a part of the select-list in a SELECT statement, set the widget's Use In Select (use_in_select) property, under Fetch Data, accordingly:
SQL SELECT statement. The value in the Column Name (column_name) property is used unless a select Expression is defined (select_expression).
If the widget's Column Name is used, it appears in the SQL statement in the following format: Additional tableviewName.columnName
SELECT-specific subproperties are available.
SELECT statement.
A subproperty under the Use In Select property when Use In Select is set to Yes. Include an expression in the select list instead of the column name. The expression calculates the value to be included in the query results. The expression can be specific to a particular database engine. If you do not include an expression, the column name associated with the selected widget is used as a select item. A select expression can be, for example, an aggregate function. If you include an aggregate function, the SQL generator automatically builds a In this example, you want the total cost of each vacation. The desired SQL is:
Figure 33-1 includes five widgets, all of which are members of a table view associated with the vacations table. Widget #5, named Implementing a SELECT expression
GROUP BY clause based on the column associated with the selected widget.
Controlling How Data Is Selected
SELECT destination, travel_costs, hotel, meals,
	travel_costs+hotel+meals
FROM vacationstotal_cost, is a derived column (that is, it is not represented in the database, but derives its data from other database columns). Widget #5 has the following property settings:
SELECT statement.
There are two properties you can set which will effect what happens when data are written to a widget as the result of a Validating Data
SELECT statement:
The Set Valid ( The valided property, when set to If you use the Set Valid property in conjunction with the Force Valid property, it is executed before Force Valid.
Set the widget Force Valid ( Consider a client screen that fetches phone numbers from the database. You want to display those numbers in a particular format (with parentheses and hyphens, for example). By default, validation on this widget is only invoked when a user exits the field or when the screen closes. So, the format (or Keystroke Filter property specification) won't be applied to the widget's content until the user enters or exits the widget. By writing a JPL procedure that imposes a format (and specifying the procedure in the widget's Validation Function property) and setting the Force Valid property to Yes, you force the validation function, and in this case, the format, to be applied to the data when it is written to the widget.
When the select-list of a Set the table view's Distinct (distinct) property, under Database, to Yes. Panther supplies the correct keyword for your database, The table-list is a comma-separated list of all table views in the server view. The list comprises the all Table (table) property specifications. For each table, a correlation name, or alias, pairs the database table with its associated table view name.
For many databases, when a database table is imported to the repository by a user who is not the owner of the table, two table view properties, Name (under Identity) and Table (under Database), also list the owner name. In this case, the owner name appears in the table list in the format: The where-condition is derived from the widgets whose Use In Where property is set to Yes. A where-condition compares data in the widget with data in the database column—specifying the rows that you want to retrieve. The Use In Where property defines how the database column associated with a selected widget is treated when the In addition, when a widget's select Expression ( To have a widget participate in the WHERE clause of a SELECT statement:
Setting the Widget's Contents as Valid
select_set_valid) property is a subproperty under the Use In Select property when Use In Select is set to Yes. If the Set Valid property is set to Yes, when the SELECT statement fetches data to the widget, Panther sets the widget's runtime valided property. This can ensure that the content of the widget is not revalidated upon screen exit.
PV_YES, indicates to Panther that the widget has passed its validation tests. This occurs when the data is written to the widget, not when it finishes writing the row.
Forcing Validation of the Widget's Contents
select_force_valid) property to Yes, a subproperty under the Use In Select property if Use In Select is set to Yes. This specification tells Panther to call the field validation function sm_fval after data is written to the widget. If validation displays messages, the errors are ignored and the SELECT statement is allowed to continue. If this property is used in conjunction with the Set Valid property, Set Valid is executed first.
Eliminating Duplicate Rows in a Result Set
SELECT statement includes the primary key of a table, every row of the result set is unique (because the primary key has a different value for each row). However, if the primary key is not included in the result set, duplicate values can be returned.
How to Implement the DISTINCT or UNIQUE Keyword
DISTINCT or UNIQUE, and applies it to the server view, thereby eliminating duplicate values from the query results.
Determining What Tables to Select From
owner.tableName
Defining the Where Condition
SQL SELECT statement is constructed and whether it is included in the statement's WHERE clause.
select_expression) property contains an expression and its Column Name property is blank, then the SQL generator uses the expression in the where-condition. This enables the where-condition to contain comparisons involving computed columns.
How to Define a Widget's Participation in the WHERE Clause
use_in_where) property (under Fetch Data) accordingly:WHERE clause. Related subproperties are displayed.
WHERE clause of the SELECT statement.
where_operator) subproperty to the desired operator to use in the WHERE condition. The default operator is = (equal to). The supported operators are:
where_use_if_null) subproperty to desired setting to define how null values should be treated:
he column name is derived from the widget's Column Name (column_name) property. The comparison operator is the value specified in the Operator (where_operator) property when Use In Where is set to Yes.
If the widget is an array, the value used for the operator must be entered in the first occurrence of the array, except for the in operator. The in operator uses the data in all of the array occurrences to construct the IN clause.
For example, to get the total cost for a particular destination, the desired SQL is:
SELECT destination, travel_costs, hotel, meals,
	travel_costs+hotel+meals
	FROM vacations
	WHERE destination = destination
Using Figure 33-1, Widget #1 (associated with the column destination) has its Use In Where property set to Yes and the Operator set to =. This allows a user of the application to enter a desired destination, execute a SELECT or VIEW command, and as a result fetch only those rows from the vacations table where the destination column data matches (or equals) the value entered in Widget #1, destination.
If you specify the Operator property to be like%, you can use the pattern matching capability of the database to search for the desired destination. Changing the example for using the = operator to like results in:
SELECT destination, travel_costs, hotel, meals,
	travel_costs+hotel+meals
	FROM vacations
	WHERE destination LIKE destination%
This allows the user to enter a partial string in Widget #1, for example Lon. When the SELECT or VIEW command is executed, all destinations beginning with those letters are fetched from the database.
If you specify in for the where Operator, and change the single line text destination widget to an array greater than one, a series of destinations can be entered for database searches. Your query tests whether the database values match one of the listed values in the WHERE clause.
SELECT destination, travel_costs, hotel, meals,
	travel_costs+hotel+meals
	FROM vacations
	WHERE destination IN (destination, destination, ...)
The user can enter a destination in each occurrence before executing the SELECT or VIEW command, and the fetched data will be for all specified destinations.
Normally, widgets whose Null Field property is set Yes and whose data are blank or null do not contribute to the where-condition. To force widgets containing null data to contribute, set the Use If Null (where_use_if_null) property to Yes. Blank, or empty data are treated as null database values and a WHERE clause is generated.
The text of the WHERE clause depends on the setting for the Operator property. To test for a null value, the operator should be set to = (equal to), then the query checks for NULL values and builds that WHERE clause as: WHERE column IS NULL. To query for those rows that do no contain null values, set the operator to <> (not equal to), the SQL generator builds the WHERE clause as: WHERE column IS NOT NULL.
List those rows where a hotel cost has not be determined. The desired SQL is:
SELECT destination, travel_costs, hotel, meals,
	travel_costs+hotel+meals
	FROM vacations
	WHERE hotel IS NULL
To ensure that all rows are returned in the result set, including those where hotel costs are not specified, the widget corresponding to the database column hotel should have its Use In Where property set to Yes, the Operator property set to =, and the Use If Null property set to Yes.
The SQL generator automatically builds a GROUP BY clause if any widget's select Expression (select_expression) property uses one of the aggregate functions: AVG, COUNT, SUM, MIN, MAX (no other aggregate functions are automatically detected). When an aggregate function is detected, the group-by-list automatically includes the column name of every widget in the server view whose Use In Select (use_in_select) property is set to Yes and select Expression does not implement an aggregate function.
Warning: If any one widget contains an automatically detected aggregate function, and a second widget on the screen contains an undetected aggregate function, then Panther adds the second widget's column name to the group-by-list. To prevent this from happening, clear that widget's Column Name property.
Get the average travel, hotel and meal costs, grouped by type of trip. The desired SQL is:
SELECT type_id, AVG(travel_costs), AVG(hotel), AVG(meals)
	FROM vacations
	GROUP BY type_id
Figure 33-2 includes four widgets, all are members of a table view associated with the table vacations. The table view's Updatable (updatable) property is set to No to prevent update and insert attempts to that database table. Widgets 2, 3, and 4 all implement an aggregate function (AVG), therefore, they are included in the select_list and the remaining column is automatically included in the GROUP BY clause.

Figure 33-2 TheSELECTstatement groups the results bytype_id, since the other three widgets specify a select Expression that use theAVGaggregate function.
When the SQL generator cannot detect the presence of an aggregate function in one of the widgets' select Expression property, you must set a widget's Group By (group_by) property, under Fetch Data. Enter the names of the columns whose values are to be used to group the data.
For example, get the standard deviation of the total cost, grouped by type of trip. The desired SQL is:
SELECT type_id, STDDEV(travel_costs+hotels+meals)
FROM vacations
GROUP BY type_id
Consider an application screen that contains two widgets, both are members of a table view associated with the vacations database table. The table view's Updatable (updatable) property is set to No to prevent updates and inserts to the database table. One widget on the screen, named standard, simply displays the standard deviation of the total cost of a trip. It does this by having a select Expression setting of STDDEV(travel_costs+hotel+meals). The widget associated with the type_id column has its Use In Select property set to Yes, and must also have its Group By (group_by) property explicitly set to type_id, because widget standard contains an aggregate function that is not automatically detected by the SQL generator.
To group query results based on the contents of two or more columns, specify multiple column names in the Group By property. You can also designate columns not included in the SELECT statement's select-list.
For example, get the average total cost of each destination, grouped by their travel costs and their type. The desired SQL is:
SELECT travel_costs, AVG(travel_costs+hotel+meals)
FROM vacations
GROUP BY travel_costs, type_id
Consider an application screen that contains two widgets: travel_costs and travel_total; both are members of the table view associated with the vacations database table. The travel_costs widget has its Use In Select property set to Yes; it will be included in the group-by-list of the SELECT statement. The travel_total widget also has its Use In Select property set to Yes and a select Expression defined as AVG (travel_costs+hotel+meals). Even though Panther detects the presence of an aggregate function (AVG), the Group By property on this widget needs to be set to type_id, because none of the widgets in the table view correspond to the type_id column. The column associated with the travel_total widget will not be included in the group-by-list, but its group-by specification is.
The having-condition of the SELECT statement applies an additional search condition once the result rows have been determined. Generally, the HAVING clause appears in conjunction with a GROUP BY clause.
The having-condition is derived from the widgets in the server view whose Having (having) property is set. If more than one widget in the server view has this setting, the AND keyword is used to join these conditions.
Get the average vacation cost, grouped by type and only report those types whose average cost is below 1000. The desired SQL is:
SELECT type_id, AVG(travel_costs+hotel+meals)
	FROM vacations
	GROUP BY num_days
	HAVING AVG(travel_costs+hotel+meals) < 1000
The widget that will display the total results has its Having property, under Fetch Data, set to AVG(travel_costs+hotel+meals) < 1000.
The order-by-list sorts the result rows according to the values in specified columns. The order-by-list is built from the table view's Sort Widgets (sort_widgets) property.
Under Database, in the Sort Widgets property, enter a list of widget names and an optional order specifier (case-insensitive), one per line. The order specifier should be separated from the widget name by a space. Valid order specifiers are:
DESC—Descending orderASC—Ascending order
When the SQL is generated, Panther specifies the sorting order in a manner acceptable to the database engine. If no order specifier is entered, the results display in ascending order. The SQL generator uses the widget name to determine the associated column or select expression to be sorted.
Get the total cost of each vacation and order the costs in ascending order. The desired SQL is:
SELECT destination, travel_costs, hotel, meals, total_cost
	FROM vacations
	ORDER BY total_cost ASC
The screen illustrated in Figure 33-3 includes widgets in a grid that represent four database columns: destination, travel_costs, hotel, and meals. The screen also includes a widget (total_cost) that derives its data from its select Expression (travel_costs+hotel+meals). All five widgets have their Use In Select property set to Yes and are members of the vacations table view which has its Sort Widgets property set to total_cost desc. The result set lists all vacations, by cost, in ascending order—the least expensive listed first.

Figure 33-3 Results to the query can display the total_cost in descending order.
In general, joins are built by comparing pairs of columns from two joined tables by testing the data from both columns for equality or other comparisons. Sometimes these joins have a one-to-one relationship while others have a one-to-many relationship. Most common multi-table queries use parent/child relationships created by primary keys and foreign keys. Via the link widget's properties, Panther lets you define the join relationship and the join type between table views. The Relations property specifies the columns or widgets that connect two table views and the Join Type property (for server links) lets you define the type of join: inner, right or left outer, or full outer.
The number of SELECT statements issued by the SQL generator depends on the type of link specified in the link widget properties. For instance, table views that are joined by server links cause Panther to issue a single statement with a join in the WHERE clause of the SELECT statement. For table views that are connected by sequential links, Panther issues multiple statements using values fetched in the parent table view to create the where-condition in the child table view.
The database column or columns needed to construct a SQL join for the two table views are defined by three link widget properties: Type, Join Type (a subproperty of the Type property, and Relations property.
rel_parent) and Child (rel_child) column names (column names are case-sensitive). The column specifications are used to build the SQL join condition in the WHERE clause.
Choose Help to display and select from a list of columns associated with parent and/or child database tables.
For sequential links, if the column specified in the Parent list of the Relations property is represented by more than one widget in the table view or on the screen, the widget's name is used instead of the column name; using the following format (including the square brackets and the literal +0):
::widgetName[+0]
This ensures that the value returned to the named widget (belonging to the parent table view) is used in the SQL statement for the child table view.

Figure 33-4 The Relations dialog box lists the parent and child relationships for the selected link.
rel_op) list of the Relations dialog box. The only relationship that can be specified for joins is the word join. The WHERE clause of the statement will include for each join relation specified, one expression of the form:
widgetData_in_parentTableview = childTable.childColumn
parentTable.parentColumn = childTable.childColumn
If there are multiple joined columns, then the expressions are connected by the keyword For equi-joins, joins where the operator is = (which includes self-joins), the link between the joined table views specifies Server as the type of link and Inner has the join type. The Relations property contains the names of the columns included in the Join each customer's name and trip destination. The desired SQL is:
In Figure 33-5, the screen contains three widgets, all of which are members of the The link (tview1+tview2) between the two table views has a Type property setting of Server. The Relations property sets
List each customer's trip destinations. The desired SQL is:
When the link's Type property is specified as Sequential, Panther generates one SQL The link's Relations property must specify both a column in the child table view, and a widget or column in the parent table view.
In Figure 33-6, the screen contains three widgets, all of which are members of the The link (tview1+tview2) between the two table views has a Type property setting of Sequential. The Relations property sets
A join operation combines information from two database tables by forming pairs of related rows. Since the matching columns in each table must be specified in the where-condition, you can only specify a join type (that is, a Join Type property value) if the link widget is defined as a Server type.
The link's Join Type (
Notes:
Support of outer joins is dependent, and varies, on each database engine. In addition, some databases define outer joins in the To illustrate the differences between the join types, consider two database tables, T1 and T2; each have two columns (Name and State):
Alice
NY
Joe
MA
Joan
ME
Fred
NY
Paula
MA
Paul
CT
Lynn
NY
Mike
NH
A SELECT statement that joins the two tables where T1.State=T2.State would produce different results depending on the join type.
An inner join (default) compares two tables and fetches all possible pairs, but excludes those rows that do not meet the matching column condition for the join. For example, in Figure 33-5, the results will include only those customers who have actually specified a destination; that is, the results do not include those customers where a corresponding In the example of joining tables T1 and T2, the results would be:
Alice NY
Fred NY
Paula MA
Joe MA
Lynn NY
Fred NY
A full outer join treats both database tables in the where-condition equally. While an inner join would result in only those rows that have a match, an outer join includes rows from both tables even if when there is no (NULL) match.
Given tables T1 and T2 where the SELECT statement specifies a full outer join, the results include all rows from both tables and substitutes NULL values for those rows that do not have a match:
Alice NY
Fred NY
Joan ME
NULL NULL
Paula MA
Joe MA
NULL NULL
Paul CT
Lynn NY
Fred NY
NULL NULL
Mike NH
A left outer join specification makes the left database table (the table referenced on the left of the equal sign in the where-condition) dominant. It compares the two tables, fetches all possible pairs and also those rows from the left table having no matching value in the right database table ( In the example of joining tables T1 and T2 where the Alice NY
Fred NY
Joan ME
Paula MA
Joe MA
Lynn NY
Fred NY
A right outer join specification makes the right database table (the one on the right of the equal sign in the where-condition) dominant by fetching all possible pairs and including unmatched rows from the rightmost database table using In the example of joining tables T1 and T2 where the Alice NY
Fred NY
Paula MA
Joe MA
Paul CT
Lynn NY
Fred NY
Mike NH
Automatically generated SQL statements might require additional modifications that cannot be set with widget, table view, or link properties. You can write a transaction event function to provide the desired SQL.
For SQL SELECT statements, you can also use the C functions Panther provides, listed in Table 33-6.
For more information on each function, refer to the Programming Guide. For more information on writing transaction event functions, refer to Chapter 32, "Writing Transaction Event Functions."
AND. If more than one table view in the server view represents the same database table, the SQL generator automatically supplies table alias names as needed. Therefore, self-join expressions are automatically handled.
Specifying Joins in the Where Condition
WHERE clause. Specify the relationship between the parent and child columns as join. For each join relation specified, the where condition includes one expression of the formparentTable.parentColumn = childTable.childColumn
Implementing an Equi-join: one-to-one relationship
SELECT customers.cust_id, first_name, last_name, destination
	FROM customers, cust_trips
WHERE customers.cust_id = cust_trips.cust_idtview1 table view which is associated with the customers database table: cust_id, first_name, and last_name. A fourth widget, destination, belongs to the tview2 table view which is associated with the cust_trips database table.
cust_id in the parent table view is to be joined with cust_id in the child table view. The result of these specifications causes a single SELECT statement to be generated which populates both the parent and child table views. Therefore, for every customer ID, a destination is displayed.
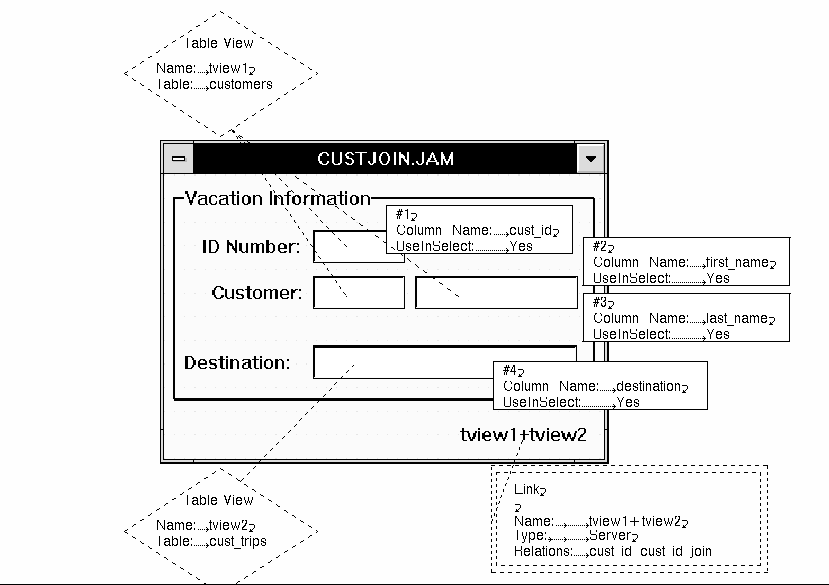
Figure 33-5 A server link defines a one-to-one relationship between two table views.
Generating Multiple SELECT Statements: One-to-many Relationship
SELECT cust_id, first_name, last_name, phone FROM customers
SELECT destination FROM cust_trips
WHERE cust_trip.cust_id = value in customers.cust_id
SELECT statement for the parent table view, and one for the child. Sequential links must be specified for master-detail screens where there are several detail rows associated with one master row. For sequential links, the SQL for the child's where-condition contains an expression similar to:widgetData-in-parentTableview = childTable.childColumn
tview1 table view which is associated with the customers database table: cust_id, first_name, and last_name. A fourth widget, destination, is grid widget that displays more than one occurrence, and belongs to the tview2 table view which is associated with the cust_trips database table.
cust_id in the parent table view is to be joined with cust_id in the child table view. The result of these specifications causes a single SELECT statement to be generated for the parent table view which populates the parent table view, and given that result, uses the value returned to generate the next SELECT statement to populate the child table view. Therefore, for every customer ID, all destinations associated with that customer ID are displayed.
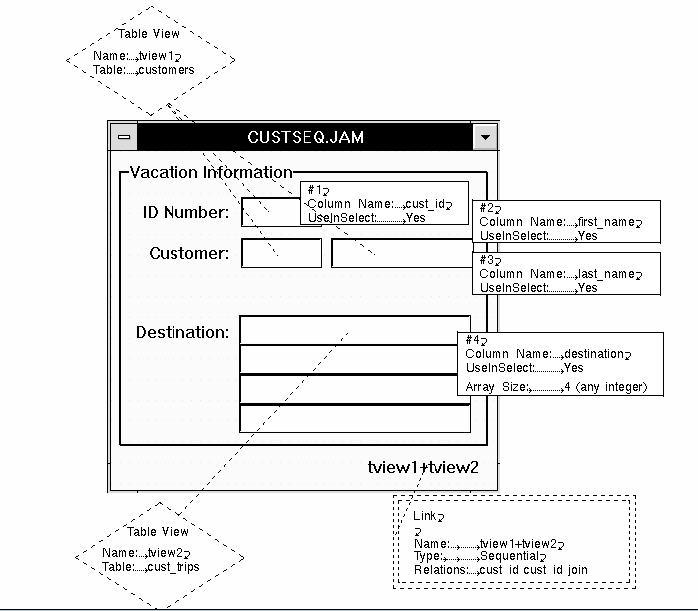
Figure 33-6 A sequential link defines a one-to-many relationship between two table views.
Specifying the Join Type
join_type) property lets you define: inner, left outer, right outer, and full outer joins. Each type returns some or all rows that meet the where-condition of the SELECT statement. These results can be particularly useful for calculations and aggregate functions.
FROM clause and some in the WHERE clause. If the database engine does not support the specified join type, Panther's database driver returns an error.
Table T1:
Name
State
Table T2:
Name
State
Implementing an inner join
cust_trip record does not exist.
Implementing a full outer join
Implementing a left outer join
NULL values are used). If the link's Join Type is set to Left Outer, the screen illustrated in Figure 33-5 will display all customer records, even those that have not named a destination. In other words, there is no matching customer ID in the cust_trips database table, and therefore the destination field will be blank for some customers.
SELECT statement specifies a left outer join, the results include all rows from the T1 table that have a match in T2 as well as those rows that do not—substituting NULL values for those rows that do not have a match in table T2:
NULL NULL
Implementing a right outer join
NULL values if no match is found in the left table.
SELECT statement specifies a right outer join, the results include all rows from the T2 table that have a match in T1 as well as those rows that do not—substituting NULL values for those rows that do not have a match in table T1:
NULL NULL
NULL NULL
Modifying SELECT Statements
Generating INSERT Statements | |
An INSERT statement enters a new row into a database table. The SQL generator executes an INSERT statement for a single table, and only for table views that are updatable (updatable property is set to Yes).
If a screen contains more than one table view, the link's Insert Order (insert_order) property determines whether the statement for the parent table view or the child table view is generated first.
The INSERT statement can be generated; the SQL elements are specified in various widget and table view properties. If a certain SQL element is not supported, you can write a statement to utilize that element as part of a transaction event function.
INSERT INTOtableName[ (column-list) ] VALUES (value-list)
The column-list determines which database columns will have data entered into the database. To be included in the column-list, the widget's Use In Insert property must be set to Yes and its database column listed in the Column Name property (it cannot be blank).
Set the widget's Use In Insert (use_in_where) property (under New Data):
INSERT statement and, therefore, its datum is added to the database table with which it is associated. An Expression subproperty is displayed.
If the selected widget is in a non-updatable table view, the Use in Insert specification is ignored.
INSERT statement. Its datum is not add to the database.
If a column is included in the column-list, a value is entered for that column in the value-list. The value is taken from the current widget data unless an insert Expression property is defined.
A subproperty under the Use in Insert property when Use In Insert is set to Yes. You can define an expression that is included in the value list of an An insert expression can be used, for example, to insert the current time, as determined by the database server. The expression can be any SQL expression that is valid for the database engine and for the database column into which data is being inserted.
Figure 33-7 illustrates how data values can be inserted into the customers and The screen in Figure 33-7 includes four widgets in the master section all belonging to the table view associated with the customers table: The detail section of the screen includes three widgets who are members of a table view (
Inserting Specific Values
Expression (insert_expression) Property
INSERT statement. If you do not include an expression, the widget's data is used in the value list of the generated SQL statement.
Inserting Data Using an INSERT Expression
cust_trips tables. To provide an example of an insert expression, the paid_flag widget's data will always be entered as Y. The desired SQL is:
INSERT INTO customers (cust_id, first_name, last_name, phone)
	VALUES (cust_id, first_name, last_name, phone)
INSERT INTO cust_trips
	(cust_id, destination, paid_flag, date_paid)
VALUES (cust_id, destination, 'Y', date_paid)cust_id, first_name, last_name, and phone. Since data is to be inserted into the database table, the table view (tview1) must have its Updatable property set to Yes, and the widgets corresponding to the table's primary keys (cust_id) must be on screen.
tview2) associated with the cust_trips table. Since data is to be inserted into the database table, the table view must be updatable and the widgets corresponding to the primary keys (cust_id and destination) must be on screen. All widget's in the detail section have their Use In Insert property set to Yes. The data entered at runtime will be inserted into the database. However, the paid_flag widget Expression property specifies that its value is "Y."
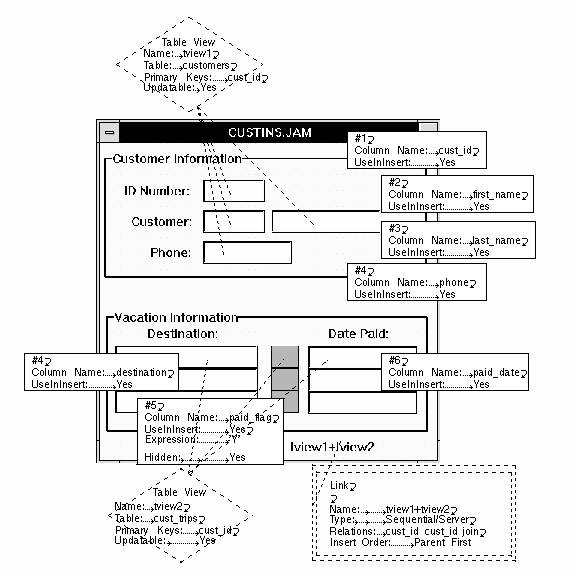
Figure 33-7 Property settings used to insert data into the database
Generating UPDATE Statements | |
An UPDATE statement updates column values in a database table. The standard models in the transaction manager generate UPDATE statements for each updatable table view if widget data in that table view has been changed.
If a screen contains more than one table view, the link's Update Order property determines whether the statement for the parent table view or the child table view is generated first.
The UPDATE statement can be automatically generated; the SQL elements are specified via various widget and table view properties. If a certain SQL element is not supported, you can write a statement to utilize that element as part of a transaction event function.
UPDATEtableNameSETcolumnName=value[ , ... ]
WHEREprimary-key=before-image-data
The UPDATE statement modifies existing data in the database; a SET clause specifies the column or columns to update and an expression. The columns listed in the SET clause of the statement are derived from all of the widgets in the table view whose Use In Update property, under Change Data, is set to Yes. The SQL generator uses the named table view's primary key to build the WHERE clause.
The SET clause of an UPDATE statement specifies the column or columns to update.
Set the widget's Use In Update (use_in_update) property:
SET clause of an UPDATE statement. If the selected widget is in a non-updatable table view, the Use in Update specification is ignored.
The A subproperty under the Use In Update property when Use In Update is set to Yes. Define an expression that is used in the The primary-key is derived from the table view's Primary Key ( For example, to update the phone number for a given customer, the desired SQL is:
When updating records, the screen must contain the widgets that represent each member of the primary key specification. In this example, the screen needs a minimum of two data widgets: one for the customer ID (columnName in the SQL statement is derived from the widget's Column Name. The new-value is the value currently in the widget, unless an update Expression property is set. If the Expression is set, it overrides the value in the widget.
Expression (update_expression)
SET clause of the UPDATE statement. An update expression can be any SQL expression that is valid for the database engine and for the database column being updated.
Specifying the Record to Update
primary_key) property. The primary key (or combination) listed in the property is included in the WHERE clause of the UPDATE statement.
UPDATE customers SET phone = new_phone,
WHERE cust_id = cust_idcust_id), the primary key, and one for the customer's phone number. It also needs the table view widget associated with the customers database table.
Generating DELETE Statements | |
A DELETE statement removes rows from a database table. The SQL generator executes a DELETE statement only for updatable table views.
If a screen contains more than one table view, the link's Delete Order property determines whether the statement for the parent or child table view is generated first.
The DELETE statement can be automatically generated; the SQL elements are specified via various widget and table view properties. If a certain SQL element is not supported, you can write a statement to utilize that element as part of a transaction event function.
DELETE FROMtableNameWHEREprimary-key=before-image-data
Refer to the element details for generating UPDATE statements.
Implementing Optimistic Locking | |
Applications, which access a multi-user database, use locking to solve concurrence problems, ensure data integrity, and data consistency. A lock is a mechanism that prevents destructive interaction between users accessing the same data. For example, two users of the application select the same customer record. The first user modifies some data and then saves the changes. The second user, unaware that the customer record has changed, makes other changes and saves those edits. Without proper locking, the second user's changes overwrite the first user's changes. To solve this problem, applications typically use one of the following locking styles:
Using an exclusive lock prevents concurrent transactions from overwriting a user's changes, but it also prevents read-only transactions from viewing data. This can cause performance degradation if many users are trying to access and use the same data. An optimistic lock requires some additional setup, but it improves access and performance.
There are several ways to implement optimistic locking. Typically, as a database designer, you assign a special column to each table that will use optimistic locking. The column maintains a version number which is updated each time a row is changed. A version number is usually an integer, float, or character string, and is supported by any database. Other database-specific data types, such as time-stamping, can be useful for optimistic locking.
Refer to the Database Drivers for your database's information on data types.
The transaction manager provides automatic support for numeric version columns. When you set the Version Column property on a widget, Panther ensures when any of the following transaction manager statements are executed, optimistic locking is implemented as described:
INSERT statement for the widget's table view initializes the version column to 1.
If another user has just updated the same customer record, the version_id would have incremented to 2 for that update transaction. So, the preceding UPDATE statement would fail, because the version_id 1 no longer exists.
DELETE statement for the widget's table view includes the version number in the WHERE clause.
When you import database columns from the database, the version column is also imported and is represented as a widget, just like any other widget, on your screens. Make the following changes to those widgets in repository entries that represent the database version column:
Implementing Optimistic Locking using the Version Column Property
If the column is of another type, refer to the Database Drivers for your database's information on data types.
version_column) property to Yes.Another method of optimistic locking would be to set the In Delete Where property to Yes. With this method, the value in the widget is included in the WHERE clause of the SQL DELETE statement. However, the widget acting as the version column must have its Version Column property set to No.
Notes: Since users will not modify the version number, consider setting the Hidden property (under Identity) to Always.
If used with the transaction manager, the default class setting for the version column is updatable and the styles corresponding to this class are applied.
The following example, describes the customers table, which has a defined version column:
CREATE TABLE customers (
	cust_id        INTEGER     NOT NULL,
	first_name     CHAR (20),
	last_name      CHAR (25),
	phone          CHAR (12),
	version	        INTEGER,
	primary key (cust_id) );
In SQL INSERT statements, if a widget's Version Column is set to Yes, the database column corresponding to that widget is included in the column list and in the VALUES clause. The column's value is automatically set to 1.
When inserting data into the customers table, the generated SQL statement would be:
INSERT INTO customers(cust_id, first_name, last_name, phone, version)VALUES (cust_id, first_name, last_name, phone, 1)
In SQL UPDATE statements, if the widget's Version Column is set to Yes, the database column corresponding to that widget is added to the SET clause and to the WHERE clause. In the SET clause, the column value automatically increments 1. In the WHERE clause, the previous value of the column is listed. Therefore, if someone else has updated or deleted the row, the version column in the WHERE clause would no longer match the database value and the statement fails.
The generated SQL statement would be:
UPDATE tableName SET columnName = value [ , ... ],
	version-column = before-image-value + 1
	WHERE primary-key = before-image-value
	AND version-column = before-image-value
Updating values in the customers table, generates the following SQL:
UPDATE customers
	SET first_name = first_name, last_name = last_name,
	phone = phone
	WHERE cust_id = cust_id AND version = version
In SQL DELETE statements, if the widget's Version Column is set to Yes, the database column corresponding to that widget and its before image value are included in the WHERE clause. Therefore, if someone else has updated or deleted the row, the version column in the WHERE clause would no longer match the database value and the statement fails.
The generated SQL statement would be:
DELETE FROM tableName
	WHERE primary-key = before-image-value
	AND version-column = before-image-value
Deleting a record from the customers table, generates the following SQL:
DELETE FROM customers
	WHERE cust_id = cust_id AND version = version
Viewing the SQL Statements | |
You can view the statements made by the SQL generator by:
 Trace On option in test mode. This option is less flexible, but is quicker and is often sufficient.
The examples in this section provide sample SQL and the actual SQL from the SQL generator. These statements were prepared for JDB, and might appear differently for other database engines.
The following example selects rows where the column destination matches a value entered on the client screen:
The SQL generator declares a cursor for the Then, an Finally, it executes the The following example inserts rows into both the parent and child table views:
The SQL generator first declares a cursor for the first Then, the SQL generator executes the In the The following example updates a customer's phone number. The desired SQL is:
The SQL generator first declares a cursor for the Then, the SQL generator executes the Viewing SELECT Statements
SELECT destination, travel_costs, hotel, meals,
	travel_costs+hotel+meals
	FROM vacations
WHERE destination = destinationSELECT statement. The where-condition is specified using a binding parameter (:w0) so that the value is supplied when the cursor is executed, not when it is declared.
declare dm_jdb1_19 cursor for select tview1.destination,
	tview1.travel_costs, tview1.hotel, tview1.meals,
	travel_costs+hotel+meals
from vacations tview1 where ((tview1.destination = :w0))ALIAS statement matches the column name with the widget name. If the widget is not named, the widget number is used in the ALIAS statement. The following statement matches widget #1 with the first column in the SELECT statement, tview1.destination, etc.
with cursor dm_jdb1_19 alias #1, #2, #3, #4, #5
SELECT statement. The value of the binding parameter w0 is set to be data currently in the first occurrence of widget destination.
with cursor dm_jdb1_19 execute using w0 = destination[1]
Viewing INSERT Statements
INSERT INTO customers (cust_id, first_name, last_name, phone)
	VALUES (cust_id, first_name, last_name, phone)
INSERT INTO cust_trips (cust_id, destination, paid_flag,
paid_date)
VALUES (cust_id, destination, 'Y', paid_date)INSERT statement. The values-list is specified using binding parameters that have a prefix v_ preceding the column name (for instance, :v_cust_id).
declare dm_jdb1_18 cursor for insert into customers
	( cust_id, first_name, last_name, phone )
	values ( :v_cust_id, :v_first_name, :v_last_name,
:v_phone )INSERT statement. The value for the parameter v_cust_id is the data currently in the first occurrence of widget cust_id.
with cursor dm_jdb1_18 execute using v_cust_id = cust_id[1],
	v_first_name=first_name[1], v_last_name=last_name[1],
v_phone=phone[1] INSERT statement for the second table view, binding parameters are only needed for three of the columns. The value for the third column is provided by its insert Expression property.
declare dm_jdb1_18 cursor for insert into cust_trips
	( cust_id, destination, paid_flag, paid_date)
	values ( :v_cust_id, :v_destination, 'Y', :v_paid_date)
  with cursor dm_jdb1_18 execute using v_cust_id = cust_id[1],
	v_destination = destination[1], v_paid_date = paid_date[1]
Viewing UPDATE Statements
UPDATE customers SET phone = new_phone
WHERE cust_id = cust_idUPDATE statement. The bind parameters for where-condition use the prefix w_ and the parameters for the SET clause use the prefix s_. Bind parameters are used so that the values are supplied when the cursor is executed, not when it is declared.
declare dm_jdb1_2 cursor for update customers
	set phone = :s_phone
where cust_id = :w_cust_idUPDATE statement. The value for the parameter s_phone is set to be data currently in widget new_phone. The values for the parameter w_cust_id is in the before image data for this row, indicated by @bi. In the following statement, @bi(#1)[1] indicates that the parameter's value is in the before image data, from widget #1, in occurrence 1.
with cursor dm_jdb1_2 execute using
	s_phone = new_phone[1],
	w_cust_id= @bi(#1)[1]
Validating Input Data against the Database | |
The screen in Figure 33-8 includes a validation link that checks data entry for a valid price category. The Validation Link property on the pricecat widget identifies the link that joins the titles and pricecats table views. At runtime, when a new video title is entered and a valid price category is entered in the pricecat widget, the description of that category is displayed in the pricecat_dscr widget. The child table view (in this case, pricecats) is non-updatable, ensuring that only valid data are entered in the titles table.
A validation link enforces a foreign key integrity constraint. When a link widget is to used to enforce a foreign key, the parent table view "references" the child table view. The parent table view is updatable; the child table view must be non-updatable.
Figure 33-8 A validation link on Pricecat checks for a valid entry and displays information in the Pricecat_dscr data widget.
Use a link widget on your screen to specify a validation link for the contents of a data entry widget. The validation link lets a user of your application enter or update data in a widget, and ensures that the SQL generator builds a SQL statement to look up that value in the linked database table. If the value exists, it displays data for any widgets in the child table view. If the value does not exist, it displays an Invalid Entry error.
The named link is used to validate the data in the selected widget.
If you want to implement a validation link in an array, set the link's Link Type property to Server. If the Link Type property is Sequential, SQL generation assumes a one-to-many (1:n) relationship instead of a one-to-one (1:1).
Validation link processing is only performed in new and update modes, as part of the NEW, COPY, COPY_FOR_UPDATE, or SELECT commands, when entering or updating data. And only after all other widget-level validation have been performed. Therefore, Panther executes the widget validation function and widget-level JPL before it calls the validation link processing.
A foreign key in a table references the primary key columns of another table. For example, the titles table contains the column pricecat; the pricecat column is a foreign key that references the pricecat column in the pricecats table. This ensures that no new value, or nonexistent value, is entered for pricecat in the titles table unless the value already exists in the pricecats table.
The first step verifies that the value in the widget (pricecats) with the validation link is valid. To test it, the following statement is generated and executed:
DBMS DECLARE cursor CURSOR for SELECT 1 FROM pricecats
	WHERE ((pricecats.pricecat == ::l0))
DBMS WITH CURSOR cursor ALIAS @dmtmp
DBMS WITH CURSOR cursor EXECUTE USING l0 = pricecat[1]
DBMS CLOSE CURSOR cursor
If the value in the widget pricecat[1] exists, @dmrowcount is set, and the transaction manager knows the value is valid. The transaction manager deliberately avoids selecting any data to the application, so that the data entry widget is not cleared if no data are found. Instead, it fetches to @dmtmp, and does not overwrite the user's data entry.
If the first select is successful, a second select is generated and executed which populates any widgets belonging to the pricecats table view:
DBMS DECLARE cursor for SELECT pricecats.pricecat_dscr
	FROM pricecats WHERE ((pricecats.pricecat == ::l0))
DBMS WITH CURSOR cursor ALIAS pricecat_dscr
DBMS WITH CURSOR cursor OCCUR 1 MAX 1
DBMS WITH CURSOR cursor EXECUTE USING l0 = pricecat[1]
If the first select fails, Panther displays an Invalid Entry error.
A validation link might also, optionally, select columns from the referenced table to widgets in the updatable table view. This allows the validation link to supply some suggested values for other widgets belonging to the updatable table view.
The link's Relations (rel_op) property can specify Lookup as well as a Join as a type of relation. With this setting, a widget in the child table view can supply a suggested value for a widget in the parent table view. When you execute a validation link in the transaction manager, the widget in the parent table view is supplied with the suggested data. This suggested value can then be edited, if necessary, in order to save the correct information to the database. The Lookup specification is used only when adding (INSERT) and updating (UPDATE) database records; lookup relations are ignored when executing VIEW and SELECT operations.
Note: The parent and the child table views must relate to each other directly, without any table views between them when specifying Lookup as a relations type.
Optionally, you can lookup a child column in the database based on a value the user enters into the widget associated with the Parent column. The lookup is based on the relationship that you define for server or sequential links.
widget_name[+0]rel_opproperty) column of the Relations dialog box. 
Figure 33-9 This lookup specification uses the customer id entered by the user to find the corresponding last name in the database table.
For example, consider that the titles table contains a preview_days column. A value for rental_days (number of days video can be rented) is stored in the pricecats table, but the video store wants to allow the store manager to alter the number of rental days for very popular new titles without changing the title's price category. The store uses the preview_days value to override the default number of rental days. When the store manager enters a new title, the application gives the manager an opportunity to supply a new value (for preview_days), but fetches the current pricecats value as the suggested value. To support this, the application must modify the Relations (relations) property for the link widget named in the validation link to include a lookup relations type specification:
(titles.)pricecat join (pricecats.)pricecat
should be changed to
(titles.)pricecat  join  (pricecats.)pricecat
(titles.)preview_days lookup (pricecats.)rental_days
The following SELECT statements are generated to enforce the foreign key:
DBMS DECLARE cursor CURSOR for SELECT pricecats.rental_days
	FROM pricecats WHERE ((pricecats.pricecat == ::l0))
DBMS WITH CURSOR cursor ALIAS preview_days
DBMS WITH CURSOR cursor OCCUR 1 MAX 1
DBMS WITH CURSOR cursor EXECUTE USING l0 = pricecat[1]
DBMS CLOSE CURSOR cursor
Instead of fetching to @dmtmp, the transaction manager selects the price category's rental days to the preview_days widget in the updatable table view titles. If it is successful, it continues with the select to populate the non-updatable table view pricecats:
DBMS DECLARE cursor for SELECT pricecats.pricecat_dscr
	FROM pricecats WHERE ((pricecats.pricecat == ::l0))
DBMS WITH CURSOR cursor ALIAS pricecat_dscr
DBMS WITH CURSOR cursor OCCUR 1 MAX 1
DBMS WITH CURSOR cursor EXECUTE USING l0 = pricecat[1]
The store manager can use the suggested value or change the value in preview_days. When the title information is saved, the preview_days value is saved in the titles table, not in the pricecats table, where the values remain unchanged.
