


| Using XMLink Universal Gateway | |
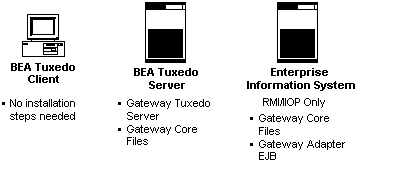
For XMLink Universal Gateway, you need to install software on your Tuxedo server and, in the case of RMI/IIOP configurations, on the Enterprise Information System (EIS), such as an IBM WebSphere system.
Before installing XMLink Universal Gateway, you need to know the Delivery Agent:
In this manual, configurations using SOAP-RPC are called SOAP implementations and configurations using RMI/IIOP are called RMI/IIOP implementations. Configurations interacting directly with the business logic EJBs are called EJB implementations.
Contents of the Installation Package |  |
Hardware and Software Requirements | |
XMLink Universal Gateway requires a maximum of 2.2 MB of disk space, of which approximately 1.4 MB is for online documentation. Portions of the product are installed on the Tuxedo server machine and on the EIS machine.
In addition to XMLink Universal Gateway, you need:
Installing XMLink on UNIX and Linux | |
Once they are installed, the files distributed with XMLink Universal Gateway should not be modified except under special circumstances. To prevent inadvertent changes to the files, we recommend that write-access to them be limited to a system administrator or a specially created prolifics login, and that general users be allowed only read-access.
Two suggested ways of implementing the above recommendations are:
root to install the files. After installation is complete, set the permissions so that only root can modify the files but all others can read and/or execute them. See chmod in your system manual, or type man chmod for information on setting permissions.
After deciding who is going to own the XMLink Universal Gateway files ( where Installing XMLink Universal Gateway on UNIX and Linux requires you to copy the distribution from the delivered media.
Determining File Location
root or a dummy login ID), determine where they will be installed. Do not change this directory once it is set up because users are likely to embed the directory name in makefiles, shell scripts, and so forth. The default installation directory on UNIX is /usr/prolifics. On Windows the default directory is:
C:\Program Files\Prolifics\XMLink Universal Gateway
C is the letter of the drive where you are installing XMLink Universal Gateway.
How to Install from CD-ROM
root or with the login you created for the installation.mkdir /usr/prolifics
/usr/prolifics directory by typing the following.
cd /usr/prolifics
/dev/cdrom./usr/prolifics, to uncompress and extract the contents of the Panther distribution, type the following.
zcat < /dev/cdrom/CompressedTarFilename | tar -xvf -
For XMLink Universal Gateway 2.3, the tar file name is XUG230.tar.Z.
When XMLink Universal Gateway software is loaded, your regular prompt is displayed.
Installing XMLink on Windows | |
XMLink Universal Gateway is supplied in compressed form on CD-ROM along with a Windows-based setup program.
 Run. In the Run dialog box, type
 d:\setup (where d is the letter of the drive from which you are installing).