

 | Getting Started-2-Tier |     |
This tutorial gives an overview of two-tier and web application development, and offers a general methodology for enhanced client/server application development. Whether you are new to Panther software or are already a Panther user, a novice or experienced programmer, you can build this mini-application to learn about Panther's application development process. You can also can use the tutorial's examples, principles, code, and concepts as a template for your own applications.
About this Tutorial |  |
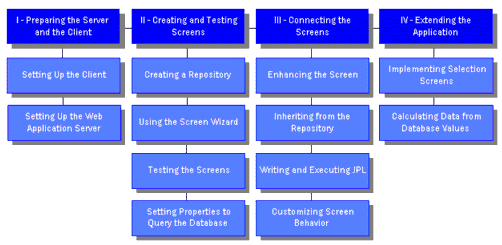
The tutorial is organized into four modules plus a wrap-up and is designed to be followed in sequence. Each module begins with an introduction that describes the basic concepts to be learned in it and what you can expect to accomplish on completion. Each module has two or more lessons, for a total of 12 lessons.
You start by setting up the client/server environment. In practice, a system administrator would probably set this up for the development team—the intent here is for you to become familiar with the process of setting up a development environment.
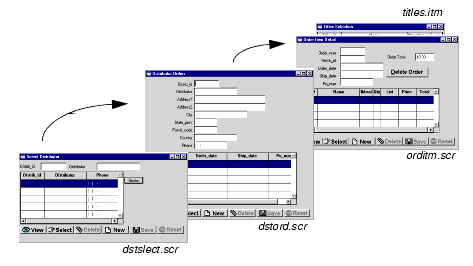
After the environment is set up, you start building an application that, on completion, consists of three screens that can be used to view and update video distributors and their orders.

The tutorial uses a JDB database, provided with the distribution, that contains distributor and order data. It also accesses a tutorial library, which contains the client screens and JPL modules that are used in the lessons.
You can click on any of the lessons in the following figure to access that lesson.

The lessons in Module 1 show how to set up the Panther environment to develop an application and to run a client-server application on the web. Typically, a system administrator sets up the web server environment for the development team. The purpose of this module is to acquaint you with this process.
The first lesson introduces you to the Panther development environment. In the second lesson, you set up a Panther web application server.
In the process of setting up the environment, you are introduced to the following concepts:
Module 2 contains five lessons that lay the groundwork for your application—one that implements the functions used to view and update a list of video distributors and their orders. In these lessons, you perform these tasks:
Module 2: Creating and Testing Screens
vidsales database provided with the tutorial.
Module 3 consists of four lessons that show you how to improve the appearance, capabilities, and flow of your application. In these lessons, you:
Module 3: Connecting the Screens
When you have completed the lessons in this module, you will have a second screen, which you will use to query the database for distributors using either their name or ID, and to invoke the screen you created in Module 2.
In Lesson 9, you add JPL procedures to your screens. These procedures are provided in In the process of creating the query screen, you will be introduced to the following concepts:
tutorstd.lib, and their contents are described in the lesson. If you have additional questions about the code, you can refer to the comments in the actual JPL procedure, since the comments are not included in the lesson text.
Module 4 consists of two lessons that guide you through the process of adding a third screen to your application. The screen and an order entry interface are created using the screen wizard. It allows the user to add a new order and update existing ones for a selected video distributor.
In the process of developing this portion of the application, you will be introduced to the following concepts:
Module 4: Extending the Application

Hints for Completing the Tutorial |  |
Before You Start |  |
Before you start the tutorial, be aware of the following requirements:
If you do not have an HTTP server, you can skip Lesson 2. Follow the instructions for testing the screens in GUI.
For more information on configuring systems to run the tutorial, refer to Appendix A, "Setting Up the Tutorial."
Starting the Tutorial From the Beginning |  |
If you have already started the tutorial, and wish to start it over from the first lesson, delete the files from the tutorial working directory, proltut, and copy the files over from the tutorial directory, tutorial. Both directories are in the samples directory of the Panther software installation.
For More Information... |  |
As you progress through the tutorial or after you complete it, you might have questions about a specific area of Panther. Listed below are places you can look for more information.


