Panther JCO Application Server Engine for Web Services
Chapter 1. Overview
Panther JCO Application Server Engine adds the following capabilities to Panther:
· The ability to generate JAX-WS (POJO) based Web Service applications from Panther Service Components.
· A Panther JCO (Java Component) framework and runtime engine for working with Panther service components as Java objects.
Panther JCO Application Server applications can be developed with all editions of Panther Client. All editions of Panther Client can now create Panther service components, from which a Panther JCO Web Services application can be automatically generated. A Panther JCO Web Services application requires a server that supports JAX-WS. This is typically a JEE Application Server, but it need not support EJB technology. Panther JCOs are POJOs, not EJBs. The Panther JCO runtime engine supports Panther application logic and transactional database functionality, allowing for the business logic of existing Panther Client/Server applications to be migrated into a web services application. Such applications can be deployed in almost any JEE Application Server, allowing them to enjoy the scalability, security and manageability offered by the JEE environment.
Additionally, Panther Java Component technology (Panther JCO) allows one to call Panther Service Component methods from any external Java application, without the need for an EJB Container or any JEE technology. The Panther JCO Framework provides its own Service Component container with fully configurable Service Component pooling that is based on open source Apache technology.
What is a Web Services Application?
The term Web Services is used here to mean the standards-based technology using SOAP and WSDL for application integration over the web. It should not be confused with other technologies that can provide web-based services, as REST. SOAP is an XML based message protocol for transferring data, usually over HTTP, while WSDL is an XML based language used for describing the services that are available. A Web Services application is a server-side application that can receive and respond to HTTP requests that use the SOAP protocol. Various languages, technologies, and frameworks can be used to build and deploy such applications. Java and the JEE Application Server is just one example of a programming language and framework that can be used to implement and deploy a Web Services application.
What is a JEE Application Server?
JEE (or Java EE) stands for "Java Enterprise Edition." It was formerly known as J2EE (Java 2 Enterprise Edition). JEE is a Java based framework consisting of reference classes and specifications that describe how various Java technologies should be implemented and interact with each other in order to build various kinds of software applications and the software platform for hosting them. The host platform provides various middleware services as well.
The host platform is an implementation of a JEE Application Server. Several such implementations are freely available to download and use. Some provide more extensive capabilities and are not free. The following are examples of JEE Application Servers that provide free use:
· WebSphere Application Server Liberty Profile (limited free use)
· Apache TomEE
What is JAX-WS?
JAX-WS (Java API for XML Web Services) is a Java technology in which web services can be implemented in Java using ordinary Java methods. This technology works with Plain Old Java Objects (POJOs), as well as Enterprise Java Beans (EJBs). JAX-WS is the successor to JAX-RPC. The Java Community Process specification for JAX-WS is dependent upon other Java specifications, such as JAXB (Java API for XML Binding), and is part of the JEE platform.
Support for JAX-WS is provided in Java SE version 6 and later, but without a JEE Application Server the technology cannot be used with EJBs. POJOs can be used with the JAX-WS RI (Reference Implementation), provided by Java SE, which includes a lightweight HTTP server and API (the Endpoint class) that can be used to deploy JAX-WS web services. A JEE application server is not needed. Not even a servlet container is required. It just runs in a plain JVM from Java SE. Panther JCO Application Server for Web Services can be used with Java SE, but Panther EJB based web services be used only with a Java EE (JEE) Application Server.
Coding for JAX-WS requires only the inclusion of special Java annotations that declaratively specify how a Java class or interface, and its methods, implement a web service. The JAX-WS runtime system automatically handles the conversion of the API calls and responses to and from SOAP messages. Utilities are provided with the Java SE Development Kit that can automatically generate client proxies as well as initial endpoint interfaces given a WSDL contract. Also, WSDL documents can be automatically created given an annotated Java implementation of a web service endpoint. Panther relies on this later capability of the Java SE Development Kit in order to help generate web services from Panther service components.
How Does the Panther JCO Framework and JEE Work Together?
The Panther JCO Framework consists of Java classes, provided in pro5.jar and jco.jar, and the Panther JCO runtime engine. The Panther JCO runtime engine consists of Panther DLLs (or shared libraries) that open and close Panther Service Components and execute Panther Service Component Interface methods implemented as JPL procedures or prototyped C functions. Panther JCO Framework classes use JNI to interact with the Panther JCO runtime engine and also manage the life cycle of the Panther Service Components (i.e. Panther JCO instances).
Panther JCO Application Server provides a utility, makejco, that can generate the Java code and other artifacts needed to build a JAX-WS based Web Services application, making use of the Panther JCO Framework classes. It also produces a batch file (or shell script) for creating a WAR file (Web Application Archive) or EAR file (Enterprise Application Archive) for use in deployment to a JEE Application Server.
You may use the JAX-WS RI server instead of a JEE Application Server, or you may write your own Java code that uses the JCO Framework classes and choose a different Java technology for your Web Services implementation. You may even provide some other type of non Web Services (and non-JEE) interface to your Panther Service Components in Java. However, a successful custom implementation using the JCO Framework requires that you understand the Panther Service Component life cycle and thread-safety requirements.
In general, JAX-WS supports Web Services that are constructed from EJBs (Enterprise Java Beans) or from simple POJOs (Plain Old Java Objects). JAX-WS EJB based Web Services can be built using Panther’s makews utility and they can be deployed using Panther EJBs with the Panther for WebSphere edition of Panther. The makejco utility for Panther JCO Application Server Engine creates only JAX-WS POJO based Web Services, as the Panther JCO Framework is not designed for use with Panther EJBs. Note that a POJO generated for JAX-WS is what we've referred to as a Panther JCO (Panther Java Component), which may be thought of as a Panther Service Component wrapped in a Java class.
Both utilities, makejco and makews, are provided with all editions of Panther Client. However, the right Panther Application Server Engine product and its runtime license are needed in order to enable the generated Panther Web Services application for use.
Also, note that there are several styles of SOAP messages that can be used for Web Services. The generated Panther JCO Web Services applications use the document/literal, wrapped, style, which has become more popular than SOAP-RPC in recent years.
Licensing
The Panther license required to run Panther JCO Application Server must contain the license feature, "prolifics-jco-server," and it must indicate how many server processes will be running the application. You may request node locked licenses for each server machine on which you will deploy your application, or you may use a single license along with a license server. (Note that a license server that runs on a different processor architecture and/or type of Operating System than the purchased Panther JCO Application Server may require additional product and/or licensing costs.)
Chapter 2. Designing the Application
Techniques for Use of Panther Web Services?
SOAP and WSDL are part of the industry standard Web Services specifications for XML based communication between applications over the web. Web Services is an ideal technology for reusing the robust assets developed for a legacy 2-tier JAM or Panther application within a non-Panther web or mobile application.
Even if you plan to continue using the JAM or Panther application, you may still want to expose some of its functionality as web services. Some Panther customers have already implemented this in production. As an example, you might use a Panther application's procedure that searches for a part or other item in your inventory. You can expose this functionality as a web service that can be seamlessly integrated into your non- Panther web application for processing orders. The WSDL interfaces you create for your Panther based web services can be readily used within your SOA.
There are several ways to build web services from Panther artifacts. One is to convert screens or business logic in your application into Panther COM components, and then create web services from those. Another is to use Panther Web with templates that produce XML, and an ESB that provides a mediation to and from SOAP. A third technique is to create Panther EJBs from Panther service components, and then create web services from the EJBs. A utility, makews, is provided with Panther to facilitate the use of that technique. The EJB technique requires Panther for WebSphere. IBM WebSphere Application Server is not specifically required with Panther for WebSphere, however. Any JEE Application Server providing an EJB container will do.
The fourth technique is to use Panther JCO Application Server Engine for Web Services, new for Panther 5.50, and the new utility, makejco. This documentation focuses on the JCO technique using the makejco utility.
(Note that throughout the following section we will use the term "Service Component" in the context of a Panther Service Component which is developed visually in the Panther Editor, much like a Panther Screen. We do not mean the Service Component of the SCA specifications.)
As there are two phases to the Panther Web Services design process, the following discussion will be presented in two parts. The first part will discuss how to use Panther Client 5.50 to create Panther Service Components from 2-tier artifacts, such that those service components are suitable for use in Panther web services. The second part of the discussion will focus on how to generate web services using the new Panther tooling, how to work with the generated code in Eclipse or RAD 8, and how to install and deploy the web services application to IBM WebSphere Application Server or Apache Tomcat (or TomEE).
Creating Panther Service Components from 2-tier Artifacts
(The following discussion applies equally well to Panther web services built from Panther EJBs or from POJOs that use Panther JCO Application Server Engine for Web Services.)
The first challenge will be to decide what functionality in the JAM/Panther application can and should be exposed as web services.
The two most important considerations are that the functionality chosen must be stateless and thread safe. If it is not already so, then you must make it so. For statelessness, even something as mundane as a requirement to log into the application before using it must be taken into consideration. The solution may be as simple as combining the login function and target function into one procedure. It may, however, require piecing together application initialization code and initialization code from several other screens and getting it all to execute automatically and properly just before the new Service Component is opened by the Panther JCO runtime engine. The best way to accomplish this is to leave a button on the Service Component screen that executes the method to be used as a web service. If you can open the Service Component screen in Test Mode of Panther’s Screen Editor as the first screen, and successfully execute the method by clicking the pushbutton, then the method should work properly in the Panther JCO runtime engine under the same configuration.
Thread safe code is required, because your service method will need the capacity to be executed simultaneously from multiple threads of the JEE Application Server's JVM. You may find that the application function you need for your service method is already thread safe. Panther uses thread-local storage for built-in application properties and global JPL variables, making thread-safety likely for JPL functions you already have. On the other hand, if the function was written in C and uses non thread-safe versions of standard C library functions, global buffers, etc., then the effort involved in thread-safing may be a major hurdle. Note that it may be possible to work around the thread safety issue if the back-end component is implemented as a Singleton that serializes all requests to it, but this would seriously impact scalability, and would not be recommended. It is also not the style of code that is generated by Panther's makejco (or makews) utility, so you would need to rework that code in Eclipse.
Bear in mind that your application screens, which were designed for presentation to the end user, may not correspond to an appropriate interface to your back-end functionality. Think in terms of the MVC pattern. You may already have a set of business logic functions in your application that provide an API that is close to what you want for your Web Services interface. Ideally, your service components should provide logical groupings and their exposed methods should use parameter types that may not be present in your existing business logic interface. Makejco will generate POJOs that use Java beans as parameters. Returning the contents of a grid, for example, requires that you specify the arrays within the grid as multiple output parameters in your Service Component method. Your web service will then return a single complex schema type. However, makejco will not reuse the same bean for different methods that have the same parameters. This is of no concern so long as the POJOs are being used for only web services. However, if you wish to use the generated Java code to invoke the methods directly from other Java methods, you may wish to rework the generated input and output bean classes to consolidate them.
You'll want to create a Panther Service Component for each category of methods. You'll have one Panther Service Component for each POJO, from which you'll end up with a WSDL Port Type per POJO. The generated web service methods are simple wrappers around business logic that you may implement in JPL. Therefore, you can edit JPL without changing the web service application at all. You don't even need to reinstall it. If you are using component pooling, you just stop the application so that the existing POJO (JCO) instances are purged. Then, simply edit the JPL, and then restart the application. If you are not using component pooling, you need not even stop the application.
If you're just creating a couple of web services from procedures attached to pushbuttons, your design process may be as simple as converting an existing Panther screen into a Panther Service Component. You can then add a component method that wraps the procedure that is called from a push-button. You can even leave on the widgets that are unused by the procedure you choose. They won't hurt anything. This technique may even work well with screens that were created using the Panther Screen Wizard. Such screens typically have an object oriented usage, and have buttons that invoke business logic or simply access the data model. On the other hand, if you're exposing lots of functions from a business logic layer that has little in common with particular screens, you'll need to create these Panther Service Components from scratch in the Panther Editor. Panther Service Components are edited visually, like screens, so this technique is fairly straight forward.
New for Panther 5.50, all editions of Panther Client now come with the ability to create and work with Panther Service Components in the development environment. You simply choose File->New->Service Component, or change the Screen Type property of an existing screen, in the IDENTITY section of the Properties Window, from Screen to Component. When you save your Service Component, give it a different name than your original screen, so as not to overwrite it. It is best to capitalize the first letter of the name, and to not use any extension (like .jam). It works better that way with the utility that generates Java code.
Widgets needed for the input and output data are dropped onto the Service Component "screen," and method prototypes are described in the Component Interface window. The widgets may come from a repository, or they may be created by doing a database import. The Service Component methods may be implemented in the screen JPL module of the Service Component, and their implementations may simply wrap procedures that are defined elsewhere.
In the Panther Editor, templates for JPL method wrappers that include special code for parameter passing can be created automatically using the Template button that is on the Component Interface screen, where you define the parameters to your method.
After creating a Service Component in Panther, you may choose Tools->Generate Java Component from the menu bar if you wish to create web services from it directly within the Panther editor. Or, simply save the service component into a Panther library without electing to generate anything. Later you will run the Panther utility, makejco from a command prompt, in order to generate what is needed for web services.
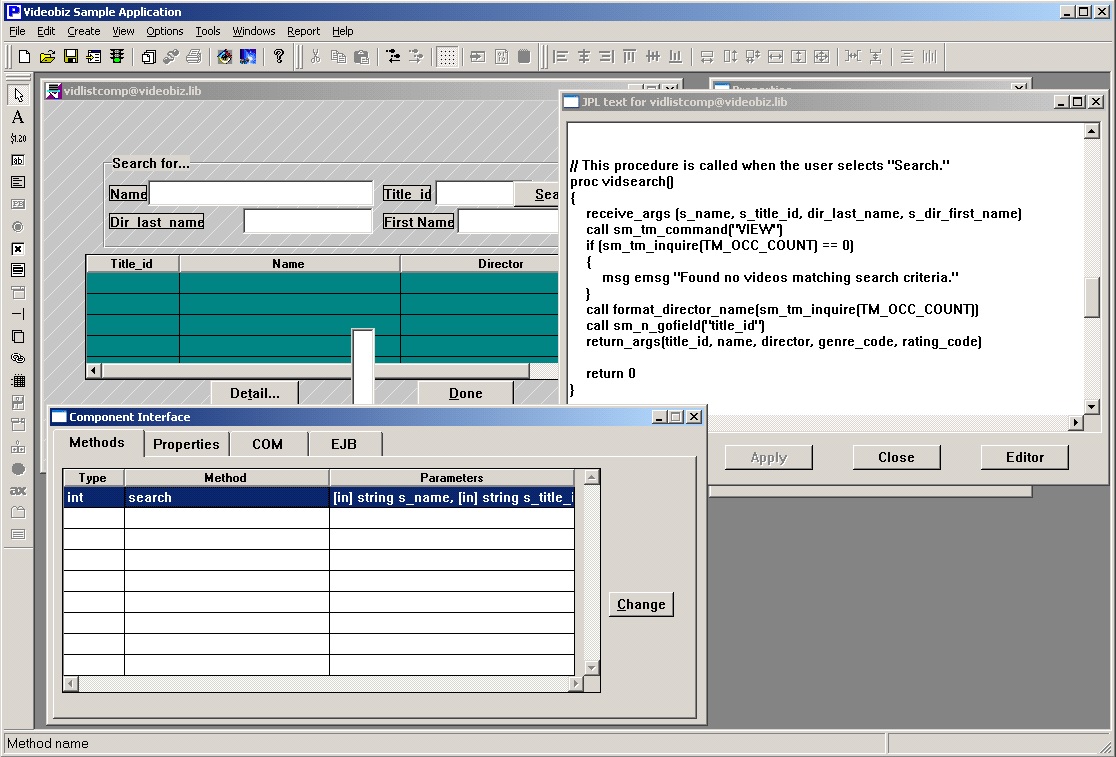
Figure 1: Panther’s Editor being used to build a Service Component method for the vidsearch() procedure of the 2-tier sample application, Vidstore is provided with Panther.
(For further details on creating service components in the editor see Chapter 5, Building Enterprise JavaBeans in the book, Panther for IBM Developer's Studio.)
Chapter 3. Creating Web Services from Panther Service Components
Introducing the Bottom-up Panther JCO Web Service Generator
A Panther JCO (Java Component) is a Panther Service Component that can be used as a POJO (Plain Old Java Object). Starting with Panther 5.50, all editions of Panther provides a utility for generating bottom-up POJO based Web Services from Panther Service Components. The utility is makejco (makejco.exe). It produces Document/Literal style (wrapped) web services, based on POJOs and JAX-WS technology. All of the generated code and artifacts is merely a facade around application methods that are implemented by Panther Service Components in JPL or other languages supported by Panther. These application methods should be implemented so that they are stateless, and if application C code is used, that code must be thread-safe.
Usage for the new Utility
The new utility has the following usage:
Usage: makejco [-v] [-i] <library> [<library> ...]
-v List service components being processed.
-i Generate one web application per service component.
The '-i' option causes makejco (makejco.exe) to create a directory for each service component, and sets up the directory structure such that multiple WAR files can be created, one for each service component. Within each subdirectory it creates the Java files, as well as a script (batch file). The script is used for compiling the Java classes that were generated for each POJO, and for running the wsgen utility for each one. There is one POJO for each service component.
(Note that wsgen is a utility that is provided by the JDK. It generates additional Java classes, which it compiles, as well as WSDL and XSD schema files.)
Within each directory for a service component, the script (or batch file) for that component generates a WAR file. All content for the WAR file is retained under the current directory, in the same hierarchy as in the WAR file itself.
If '-i' is not used, there is one directory hierarchy (for each Panther library) containing all generated Java code in appropriate directories for their packages under WEB-INF\classes\. There is also one script (batch file) that compiles all of the Java code and runs wsgen for each POJO. In this case, one WAR file is created for all POJOs and web services.
Regardless of whether '-i' is used, there is a separate directory structure generated for each Panther library that is passed to the makejco (makejco.exe) utility.
The Generated Java Code
At least four Java classes are generated for each component.
1. A POJO class containing methods analogous to those defined for the Panther Service Component (ex. BaseComponentName.java)
2. One or more wrapper bean classes to hold each method's 'in' arguments (ex. MethodNameIn.java)
3. One or more wrapper bean classes to hold each method's 'out and 'in/out' arguments. (ex. MethodNameOut.java)
4. A Service Endpoint Interface class. (ex. BaseComponentName_SEI.java)
The POJO Class
The POJO class uses an @WebService annotation for use with JAX-WS. Each POJO method is defined to take one input parameter and return one output parameter. The parameters use wrapper classes that are generated by makejco. This style is necessary for use with Web Services so that they can return all of the intended data from a method with multiple out or in/out arguments. If you wish to modify the generated POJOs for some other use, all can be done within Eclipse or RAD. The generated code is easy to work with.
The Method Argument Wrapper Classes
The generated wrapper classes are simple beans that hold properties that are simple Java types or arrays of simple Java types. The property names are the same as defined in the service component for the method argument names, but the names are made camel case if they are not already in that style. There is one additional property to hold the return value from the Panther method. This property's name is simply the name of the method for which it is to be used. Thus, there are unique bean input and output classes for each method.
The Service Endpoint Interface
The Service Endpoint Interface class is a Java Interface that the POJO class refers to in its @WebService annotation. This style of JAX-WS use is not strictly necessary, as the POJO class can be used directly as the service endpoint, but it is preferred. Both the annotation and the SEI class that are generated by makejco are the same as is produced by using IBM's WebSphere Developer Tools plugin for Eclipse when creating a "Bottom up Java bean Web Service" from an existing Java class.
The Batch File
Each script (batch file) that is created can create an EAR file in addition to a WAR file. The options supported by the generated scripts (batch files) are as follows:
Usage: <library-or-component-name>Build.bat [-nowsgen] [-nowar] [-noear]
-nowsgen Do not run the wsgen utility.
-nowar Do not create a WAR file.
-noear Do not create an EAR file.
The generated batch files must be run manually. The batch file checks for the presence of JAVA_HOME and SMBASE in the environment. SMBASE should be set to the location where Panther is installed. This is necessary so that the Java compiler can put '%SMBASE%\config\pro5.jar' into the classpath.
JAVA_HOME should be set in the environment to a directory containing the JDK (J2SE). It is needed in order to locate 'javac.exe', 'wsgen.exe', and 'jar.exe' in '%JAVA_HOME%\bin\'. You may use J2SE version 1.6, or later. You may download it from http://www.oracle.com/technetwork/java/javase/downloads/index.html. Be sure to use a version that produces classes and JAR files that are compatible with your JEE Application Server. You may also set CLASSPATH and/or JAVAC_EXTDIRS in the environment if you your classes need any external JAR files in order to compile.
The Generated JEE Application
The WAR files that are created by running the generated batch files may be deployed directly. If your App Server requires an EAR file rather than a WAR file, use the generated EAR files instead.
If using a WebSphere Liberty test environment with Eclipse, you may import the WAR file directly, creating an Enterprise Application in the process. You may generate an EAR deployment descriptor in this case in order to run the Enterprise Application. You will need one for non-Liberty editions of WebSphere Application Server, as will be discussed later. You can create an EAR deployment descriptor in Eclipse, and then export your own EAR from Eclipse.
Note that within the generated WSDL files, the location attribute of the soap:address element in the binding for a service will say, "REPLACE_WITH_ACTUAL_URL". It is ok to leave this in the WAR file as-is. If you import the WSDL into a tool like SoapUI, once you know where you deployed the application, you can fill in the actual location then. Also, in the WebSphere Application Server Admin Console, you can publish the WSDL file, which will produce a zip file that you can download. The WSDL files contained in the zip file will have their location attribute set properly for the deployed application. Usually, if your Panther Web Services application has been deployed properly, the URL to access it will be shown in stdout on startup of the JEE Application Server, or in the corresponding log file for stdout. This should not be confused with the URL for the web application, which may also be shown. Look for a log entry that indicates that it is the endpoint address for a web service.
Working with Eclipse
It may be helpful to import the code generated by makejco (makejco.exe) into Eclipse in order to make customizations. The following steps may be followed in order to get started:
1. Install Eclipse 4.5 (Mars) along with the WebSphere Developer Tools
2. Install IBM WebSphere Liberty Profile.
See https://developer.ibm.com/wasdev/downloads/liberty-profile-using-eclipse/ and https://developer.ibm.com/wasdev/downloads/liberty-profile-using-non-eclipse-environments/ for techniques to accomplish steps 1 and 2, above.
Note that for earlier versions of IBM WebSphere Liberty Profile, such as version 8.5.5.5, it was necessary to install the "extended content" in order to obtain support for JAX-WS and EJB Lite. Starting with version 8.5.5.6, one may choose the "Full Platform" edition of Liberty, in order to obtain a full JEE implementation, or simply install the jaxws-2.2 feature into a "Web Profile" edition of WebSphere Liberty.
3. Within Eclipse's Servers View you should have "WebSphere Application Server Liberty Profile at localhost" as your default server. If not, create a new server in the Servers View, and select the Liberty server that was installed in step 2.
4. Change the Liberty Server runtime in Eclipse to a JDK if it is set to a JRE. Use a version of the JDK that matches what you intend to use for the JRE in your production Liberty environment. Do not use a version less than 1.6. Note that a JDK is needed rather than a JRE in order to run wsgen from Eclipse. Eclipse runs wsgen using the selected server's JVM. Note that wsgen is the utility that generates the JAX-WS artifacts.
[wsgen (wsgen.exe) actually comes with the JDK, and is also implemented as a Java program. Liberty provides a batch file (script) to run it. Eclipse runs the batch file, which runs another JVM to execute 'ws-wsgen.jar'. One reason the batch file is needed is to ensure that the desired arguments are passed to the utility, such as the argument that says where to put the output files. Panther's makejco utility must also specify certain arguments to pass to wsgen in its batch file.]
5. In Eclipse, change the Java Compiler Compliance level in Eclipse Preferences to the version of Java chosen for the Liberty server. For example, if using J2SE 1.6 for Liberty, change the Java Compiler Compliance level to 1.6.
6. Import the WAR file created by the batch file produced by Panther's makejco utility. (File->Import, then select "WAR File") During the import process, select "Add Project to an EAR, and enter an EAR Project name. You may also import an EAR file generated by the batch file, instead.
7. In Eclipse, add a Library to the WAR project build path that contains 'pro5.jar', 'jco.jar', and 'commons-pool-1.6.jar'. This technique is necessary in order for wsgen to find classes in these JAR files when it is run from Eclipse. Other techniques for putting these JAR files into the classpath don't seem to work, at least for this purpose. (See the section, Adding the Shared Library, below, for instructions.)
8. Verify that the new Eclipse project builds properly.
Adding the Shared Library for pro5.jar, jco.jar, and commons-pool-1.6.jar
Initially, Eclipse may not find the required classes when it runs wsgen when re-creating a web service for your POJO. For compilation of your POJO, you can simply add the JAR files as external JAR files on the WAR project's build path. However, that doesn't work for wsgen, when you re-create a "Bottom up Java bean Web Service" from the POJO within Eclipse. Neither does adding the JAR files to the list of runtime JARs used by the runtime JVM for the server. The only solution appears to be to add a Library to the WAR project build path that contains the required JAR files.
Note that you must add the shared library into the project build path of the Web Application, not the project build path of the EAR. This can be accomplished as follows:
1. Right click on the WAR project
2. Properties
3. Java Build Path
4. Add Library
5. Select 'User Library'
6. Next
7. "User Libraries"
8. New
9. Give a name (PantherLib) - OK
10. Add External JARs...
11. Browse to the config directory in the Panther JCO Application Server installation, and add pro5.jar, jco.jar, and commons-pool-1.6.jar. (Hold the Ctrl key while selecting all three files, in order to add all of them at once.)
12. OK
13. Finish
14. OK
15. Project->Clean... (This may be necessary if you've already had several failed web service creation attempts.)
16. Now generate your web service. In the Enterprise Explorer panel, select the Java source module for your POJO. It should be named <service-component-name>.java Right click and select Web Services->Create Web Service. It should show "Bottom up Java bean Web Service" as the Web Service Type. Select other configuration options and choose Finish.
Top Down Approach
Panther's makejco utility was designed mainly for use in a bottom-up approach, whereby one starts with Panther service components, and then generates web service interfaces based upon the Panther methods and their arguments. However, some projects require that a web services interface be defined first, and then the implementations for the defined services be done afterwards. A predefined interface may use complex schema types that have many nested levels of structure to them. Panther fields and variables have no complex structure, making it difficult to work with such types in JPL.
If the Panther implementation for the service is to be fully in JPL, one might use Panther's makejco utility in order to get a basic Java access class, along with the wrapper beans for input and output to the methods. Then, create a Web Service in Eclipse from a custom WSDL, using the "Top Down Java bean" technique, or use 'wsimport' outside of Eclipse to do the same thing. Afterwards, simply add the Java methods generated by makejco to the POJO class generated from the WSDL. Call the Panther methods as needed to fill in the content of the methods generated from the WSDL. The overall effect of this technique is that it is essentially a "meet in the middle" technique, rather than "top down".
Another approach is possible for supporting deeply nested structures in complex schema types used in the WSDL if one doesn't mind coding all or part of the Panther implementation for the methods in Java. One cannot simply use Panther's JNI interfaces directly from the POJO code, but one can use the 'object' type with service component methods in order to pass in Java Objects and return them. Panther service component methods support an 'object' type for the 'in' parameter and can return an 'object' type as an out or in/out parameter. The method itself can return an 'object' type. The objects are represented in JPL by their object id's, which are positive numbers when valid. For example, the following JPL is valid for a service component method that is defined in the Component Interface view of the Panther Editor to take one parameter that is an 'in' parameter of type, 'object' and to also return an 'object':
proc sayHelloObject
{
@app()->current_component_system = PV_SERVER_JAVA
vars in
receive_args (in)
vars name = sm_obj_call(in, "getName")
vars out = sm_obj_create("Greeting.SayHelloOut")
call sm_obj_call(out, "setSayHello", "Hello, " ## name)
return out
}
The JPL above could easily perform much more work, and do it completely in Java code by calling a Java method of some other class to do the work. That method can be passed whatever application data is needed in order to perform its work. One must be cautious, however, about classloaders. Panther may not have a definition for a class that was available to the POJO. Greeting.SayHelloOut and Greeting.SayHelloIn should be located in a JAR file that is in the classpath for the JVM of the JEE Application Server.
The Java POJO implementation method to call the JPL component method shown above is quite simple:
package Greeting;
import javax.jws.WebService;
import java.util.*;
import com.prolifics.jco.*;
@WebService(targetNamespace = "http://Greeting/", serviceName = "GreetingService", portName = "Greeting", endpointInterface = "Greeting.Greeting_SEI", wsdlLocation = "WEB-INF/wsdl/GreetingService.wsdl")
public class Greeting extends PantherSessionBean
{
JCOContainer container = null;
public Greeting() {
super();
container = JCOContainer.getJCOContainer();
}
@SuppressWarnings("finally")
public SayHelloOut sayHello(SayHelloIn in) {
PantherComponent component = null;
SayHelloOut out = null;
try {
component = container.getComponent("Greeting");
if (component == null) {
throw new Exception("Failed to get component, 'Greeting', from ComponentFactory.");
}
component.smAddIn(in);
smAddOut(new SmWSObjectHolder());
@SuppressWarnings("rawtypes")
Vector v = smInvokeStateless("sayHelloObject");
SayHelloOut rv = (SayHelloOut)((SmWSObjectHolder)
((OutParameter)v.elementAt(0))
.holder()).value;
component.release();
return rv;
} catch (Throwable t) {
if (component != null) {
try {
component.destroy();
} catch (Exception e) {
throw new RuntimeException(e);
} finally {
throw new RuntimeException(t);
}
}
}
}
}
package Greeting;
public class SayHelloIn {
private String name;
public SayHelloIn() {
}
public String getName() {
return name;
}
public void setName(String name) {
this.name = name;
}
}
package Greeting;
public class SayHelloOut {
private String sayHello;
public SayHelloOut() {
}
public String getSayHello() {
return sayHello;
}
public void setSayHello(String sayHello) {
this.sayHello = sayHello;
}
}
Note that the 'sayHello' method shown above for the 'Greeting' POJO is not exactly what makejco generates for the Panther method that takes an input 'object' and returns an 'object'. The generated method would wrap the output value within its own wrapper bean class and put it into a bean property of type, Object. It cannot "know" that the specific Java type of the returned value from Panther is a 'SayHelloOut', and without knowing that, a web service with the correct interface cannot be generated. The code above works nicely with wsgen, however, and it can be easily created in Eclipse, by starting with the code generated by makejco, and making a few minor changes.
Chapter 2. Deploying the Panther Web Services Application
Deploying the WAR or EAR file for your Panther Web Services Application
Panther JCO Application Server for Web Services requires an Application Server that supports JAX-WS. Several are freely available:
WebSphere Application Server Liberty Profile
The Liberty profile is free for development, and also free for deployment for applications of a limited scale. See https://developer.ibm.com/wasdev/docs/websphere-application-server-everyone/
If you do not install the Liberty Full Profile, you can still use Liberty with JAX-WS. Simply add the jaxws-2.2 feature to your Liberty installations as follows:
C:\Prolifics\wlp\bin>installUtility.bat install jaxws-2.2
See the example Liberty configuration in the samples directory, along with the server.xml.
Apache TomEE (See http://tomee.apache.org/downloads.html)
TomEE is actually Apache Tomcat plus OpenEJB.
Apache Tomcat + OpenEJB
There are 3 different drop-in WARs for OpenEJB that can effectively turn an existing Tomcat 7.x installation into TomEE. Choose the TomEE plus version of the WAR file, tomee-plus-webapp-1.7.2.war, in order to obtain the JAX-WS support for Tomcat 7.0.54+.
Stand-alone OpenEJB Server
The stand-alone server supports JAX-WS and works with Panther JCO Web Services applications that are deployed as EAR files, even though Panther JCO uses JAX-WS without EJB technology.
General Deployment Guidelines
Copy the following files into a directory that is in the CLASSPATH for the classloader that is loading your application:
jco.jar (May be located elsewhere, where an application specific classloader can find it.)
pro5.jar
commons-pool-1.6.jar
For TomEE or a Stand-alone OpenEJB server, you may copy the files listed above into the lib directory of the JEE App Server. If using Tomcat plus the OpenEJB WAR file, copy them into the lib directory of Tomcat. For WebSphere Liberty, you'll need to configure your application to use a Classloader that specifies a Library (or Library Reference). The Library should contain a fileset that includes the JAR files mentioned above.
For example, you may have sections like the following in your server.xml file for your WebSphere Liberty server:
<enterpriseApplication id="Sample" location="Sample.ear" name="Sample">
<classloader commonLibraryRef="PantherLibraries">
</classloader>
</enterpriseApplication>
<library id="PantherLibraries">
<fileset dir="C:\Prolifics\PantherJCO\config"/>
</library>
Note that in the Design view of the Eclipse editor for server.xml, a Shared library reference is used, which appears as commonLibraryRef, in the XML shown above. If a Library reference is used instead, it will appear as a privateLibraryRef in the XML. In that case your server will not work with multiple Panther web services in different applications, each of which specify a different classloader with the same privateLibraryRef. This is due to restrictions on JVMs regarding the use of native libraries loaded by different classloaders. Some classes used by jco.jar load Panther's native libraries.
If you do not want your fileset to reference the Panther installation, you may create a Shared Resources folder for the application in your Liberty server. Then, place the three required JAR files there, and use a fileset that references the files in that folder. See Appendix A for a complete sample of a server.xml for WebSphere Liberty.
The following Panther files should be placed in the current working directory of the Java process for the JEE Application Server:
panther.ini
server.log (if logging is desired. This may be an emty file to start with)
jco.properties (This file may be located elsewhere, where the classloader for classes of jco.jar can find it.)
(If using a Liberty test server in Eclipse, you can drag and drop the files directly into the server within the Enterprise Explorer view.)
Note that the current working directory for WebSphere Liberty is the directory under /wlp/user/servers/ in which the server for your application is located. This directory may be referenced in Liberty's server.xml file as ${server.config.dir}. For Apache OpenEJB the current working directory is the top level installation directory for that product. For TomEE or Tomcat + OpenEJB, the current working directory is determined by the OS and how you start up Tomcat. So, for example, if Tomcat is started by a Windows shortcut, then the current working directory is the "Start in" directory for that shortcut. Or, if started from a shell or DOS Command Prompt, it is the current directory for that shell or Command Prompt when Tomcat is started.
Depending on the configuration specified in panther.ini, other Panther files may be located in the same directory as panther.ini, or elsewhere. Panther DLLs or shared libraries can be placed in the current working directory, or they may be elsewhere, where the OS can find them. For Linux or Unix, this means in LD_LIBRARY_PATH (LIBPATH for AIX, SH_LIBPATH for HP-UX). For Windows, you may place the directory where the DLLs are located into your PATH.
Set PATH (or LD_LIBRARY_PATH) to contain the Panther JCO Server's util and bin directories, where the DLLs (shared libraries) are located. The installer for the Windows version of Panther JCO Application Server for Web Services will modify PATH in the environment.
Note that PanSmJCO.dll (libPanSmJCO.so) must be in java.library.path for the JVM, but the application server will typically take care of making sure that the usual locations where DLLs or shared libraries should be found by the OS are in java.library.path.
The following are the DLLs or shared Libraries that come with Panther JCO Application Server:
PanSmJCO.dll (or libPanSmJCO.so)
PanDmJCO.dll (or libPanDmJCO.so)
PanTmJCO.dll (or libPanTmJCO.so)
lmgr325c.dll (Windows only)
Additional Panther Database Driver Libraries (i.e. oradm32.dll and tmora132.dll)
Your Panther library containing Panther service components for your application should be in either the current working directory or in a directory specified in SMPATH. SMPATH is specified in panther.ini, and the Panther library name, itself, should be specified in SMFLIBS in panther.ini.
After starting up the Application Server with the changes, as described above, follow the whatever is the usual deployment procedure for your JEE Application Server, using the Panther generated WAR file or EAR file for your Web Services application. Most Application Servers support drop-in WAR files (or EAR files) for deployment. Some support a web-based console that can also be used for deployment.
Configuring panther.ini
The panther.ini file for Panther JCO Application Server is similar to other INI files provided with other Panther products. The [JCO Global] section provides Global settings for the Panther JCO Application Server, including SMBASE, SMINITJPL, LM_LICENSE_FILE, and SMVARS. The [JCO Class] section provides default settings for all server component instances. These include SMPATH, SMINITJPL, SMMSGS, and SMFLIBS. The following sections are used to configure installation of Database drivers:
[databases]
;installed=oracle
[dbms oracle]
;description=Oracle for Windows-32 using OCI
;driver=oradm32.dll
;model=tmora132.dll
In the example above, the four lines commented with semicolons may be uncommented to configure installation of the Oracle OCI DB driver for 32-bit Windows.
Deploying to (non-Liberty) IBM WebSphere Application Server
Deploying a Panther Web Services application to the non-Liberty editions of IBM WebSphere Application Server requires similar steps in principle as for deployment in other JEE Application Servers. You may, however, create a new directory in which to put your application artifacts, and change the Current Working Directory for the JVM to that directory in the WebSphere Admin Console. The content of that directory should be something like this:
MovieList.lib (or whatever Panther library other than server.lib contains your service components)
panther.ini
server.log
Panther DLLs, if not in PATH (or LD_LIBRARY_PATH for Unix/Linux)
The Application EAR File
The WebSphere Admin Console requires that the EAR containing a WAR file generated by makejco also contains the EAR deployment descriptor, application.xml, in the META-INF subdirectory. If you used a generated batch file to create the EAR, it will be correct.
Installing the EAR using the WAS Admin Console
When installing the EAR using the WebSphere Admin Console, we recommend using a Shared Library Reference as follows:
Create the Shared Library Reference before installing the EAR file.
1. In the Admin Console for WAS, select Shared Libraries under the Environment heading.
2. Create a new Shared Library.
a. Set its Classpath to include:
%SMBASE%\config\pro5.jar
%SMBASE%\config\jco.jar
%SMBASE%\config\commons-pool-1.6.jar
%SMBASE%\config\jco.properties
b. Set its Native Library Path to point at a directory where you copied the Panther DLLs.
3. When deploying the EAR in the WAS Admin Console, select "Detailed" rather than "Fast Path".
4. In the "Map Shared Libraries" step assign the Shared Library that you previously created to any applications that are listed.
Other steps during installation of the EAR file in the WebSphere Admin Console can typically be left as shown simply by clicking 'Next', and 'Finish' at the end. You will need to start the application after installing it, and you might need to restart the WebSphere server.
Appendix C. WebSphere Liberty's server.xml
Below is an example of a very simple server.xml file, suitable for use with the 'greeting' sample provided by Panther JCO Application Server Engine for Web Services. WebSphere Liberty provides an extensive set of features and corresponding sections that may be used in server.xml to enhance your application. For example, SSL and WS-Security are available. Consult IBM WebSphere Liberty documentation for further information.
<server description="new server">
<!-- Enable features -->
<featureManager>
<!--
Only the three features shown below are required for Panther JCO Web Applications.
Additional features may require additional sections to be present in this file.
Note that you may need to install the jaxws-2.2 feature if you did not install the
Full Profile. Alternate versions of these features should also work, in case your
version of Liberty provides or supports only different versions of them.
-->
<feature>jaxws-2.2</feature>
<feature>localConnector-1.0</feature>
<feature>servlet-3.1</feature>
</featureManager>
<!-- To access this server from a remote client add a host attribute to the following element, e.g. host="*" -->
<httpEndpoint httpPort="9080" httpsPort="9443" id="defaultHttpEndpoint"/>
<!-- Automatically expand WAR files and EAR files -->
<applicationManager autoExpand="true"/>
<!--
The following section describes Panther's 'greeting' sample application, and assumes
that Sample.ear has been installed for this server. To install it, you may place
Sample.ear in the apps sub-directory for this server, ${server.config.dir}\apps\.
-->
<enterpriseApplication id="Sample" location="Sample.ear" name="Sample">
<classloader commonLibraryRef="PantherLibraries"/>
</enterpriseApplication>
<!--
In order for the <fileset> used in this section to work, you must create
the PantherLibs directory within the ${shared.resource.dir} folder, and
copy the JAR files found in Panther's config directory into the PantherLibs
directory. Alternatively, the fileset could look like this:
<fileset dir="C:\Prolifics\Panther\config"/>
-->
<library id="PantherLibraries">
<fileset dir="${shared.resource.dir}\PantherLibs"/>
</library>
</server>
Appendix B. Common Errors
Web Service Client, such as SoapUI shows an exception indicating that the connection was refused
Typical causes:
Port number or URL is not correct
Check the configuration of your web application. Look in your JEE Application Server's log files to see what port number was assigned to your web service. Your JEE Application Server will listen for HTTPS requests on a different port number than it will listen for HTTP requests. Make sure that you've sent your request to the correct port number for the communications protocol that was chosen.
Web Services Application is not deployed properly
Look in your JEE Application Server's log files to see if the endpoint was deployed, and what URL was given for your web service.
A firewall is preventing access
If remote access fails check your firewall configuration and try to telnet to the port on the remote machine. Try accessing the application from a client on the local machine.
Web Service Client shows an exception
For example, "Error 500: javax.servlet.ServletException: SRVE0207E: Uncaught initialization exception created by servlet"
Typical causes:
Panther's JAR files are not in the classpath of the classloader that loaded the web services application.
Check server.log in the JEE Application Server's working directory. If server.log is empty, or nothing new has been written to it, then the JEE Application Server may not be locating Panther's JAR files. Make sure they are in the classpath for the classloader that is loading the application.
Web Service returns a message body containing an empty response
Typical causes:
PanSmJCO native library has not been loaded
Look in server.log. If this file isn't present, create an empty file with that name in the working directory of the JVM, and restart the JVM (or restart the JEE Application Server). The file, server.log, should contain lines like these at the top:
Wed Jan 27 16:29:14 2016: Starting global initialization
Wed Jan 27 16:29:14 2016: Loaded shared libraries: libPanDmJCO.so libPanTmJCO.so
Also, your JEE Application Server's log file for stdout should show a message that says, "Loaded library: 'PanSmJCO'. If your Java log level is set to INFO (the default) or a level lower than that, you should see this message if the PanSmJCO native library has been loaded. If you don't see any of the messages that say that the Panther DLLs or shared libraries were loaded, make sure that the DLLs or shared libraries can be found.
For Windows, the installer will have copied them into %WINDIR%\system32\ or, for 32-bit Panther installed on a 64-bit Windows machine, the installer will have copied the Panther DLLs into %WINDIR%\SysWOW64\ . These are default locations where Windows will find the DLLs. But, they may be in your PATH, or in the current working directory, which will take precedence.
For Unix or Linux, the shared libraries should be in LD_LIBRARY_PATH (LIBPATH on AIX; SHLIB_PATH on HP-UX). For example, you may set the environment variable, LD_LIBRARY_PATH as follows in bash or ksh:
export LD_LIBRARY_PATH=$SMBASE/lib:$LD_LIBRARY_PATH
Panther cannot find the license file
If Panther cannot find the license file, server.log will show a message like this:
Wed Jan 27 16:29:14 2016: Panther License Manager: Bad server hostname in license file.
Wed Jan 27 16:29:14 2016: Global initialization FAILED
Make sure that LM_LICENSE_FILE is set properly, either in the environment or in panther.ini. For node locked licenses it is set to point at the full path to the license file provided to you by Prolifics. Also, the license file must contain the feature, prolifics-jco-server.
- An exception occurred in Panther while processing the request
Look for the cause of the problem in server.log. For example, server.log may show:
Wed Jan 27 16:35:20 2016: Component Sample (8056:e97ff7a8), Method <Constructor>
Cannot find screen. (Sample)
The error shown above may mean that the service component, Sample, is missing from the Panther Library it is expected to be in, or it may be that the Panther library containing Sample is missing from the definition of the SMFLIBS variable in panther.ini.
The web service implementation has failed to return any data
Check that your JPL code is behaving as expected. Make sure it contains a correct return_args () call at the end of the method.
Web service call fails to return
Possible causes:
Too many parameters to receive args
server.log may show something like this as its last message:
Mon Nov 16 14:37:27 2015: Component mycomponent (2764:617470ac), Method toupper
Calling method.
Service method code in an infinite loop or some sort of deadlock
Service method returns -1
Possible causes:
The service method explicitly returned -1 as a valid value, possibly indicating some sort of error
Check you code.
The JPL in the service method aborted due to an error in a JPL statement
Look in server.log. For example,
Mon Nov 16 14:39:53 2015: Component mycomponent (2764:e42df5d0), Method toupper
Bad field name, #, or subscript. at line 7 in toupper():
'c = '
===>'nonexist'
Remember, unless the service method is defined to return void, there is a return parameter whose name is the name of the service method, and it will contain the return value from the method. JPL procedures return an int, by default, and 0 is returned when there is no return statement and there is no JPL error. The value returned is -1 if a JPL error occurs, and when this happens, the JPL procedure encountering the error is aborted.
If -1 is also a value that your service method may explicitly return and is meant to have a different meaning, you should either use a separate out parameter for the service method's custom return value, or protect against JPL errors that cause an automatic return of -1. You may ensure that any JPL that might cause an error is contained within a separate JPL procedure that is called from within the body of a service method that contains minimal JPL. If the sub-procedure returns -1 due to a JPL error, the parent procedure can then handle it in some custom way. It may, for example, choose to return a different value as the return value of the service method. Also, since JPL errors cause short-circuiting of the remainder of the JPL procedure they are in, it may be necessary to handle such cases with some sort of cleanup code in the parent procedure.
Web Service application throws a Java exception containing the following:
[ERROR ] java.io.FileNotFoundException: componentPool.properties (The system cannot find the file specified)
[ERROR ] SRVE0271E: Uncaught init() exception created by servlet [SampleJCO.Sample] in application [Sample]: java.lang.RuntimeException: java.io.FileNotFoundException: componentPool.properties (The system cannot find the file specified)
Typical causes:
The web services application cannot find the file, 'jco.properties'
Note that 'componentPool.properties' is an alternate name for the same file. If you had placed the file in a path from which your Classloader loads JAR files, try placing it into the current working directory for the JVM.
Appendix C. Component Pooling
Java Properties file for Panther's Java Component (JCO) Container
Panther's JCO subsystem uses Apache Commons Pool v1.6 (commons-pool-1.6.jar) in order to manage service component instances for reuse. The desired values for the component pooling properties should be specified in the file, jco.properties, which should be located where the application specific classloader can find it.
Note that for generated JAX-WS Web Services, a separate pool is used for each type of service component (by name). In other words, the service component's name is the key used for the one pool that will be created for that key in the classloader that has loaded classes in the com.prolifics.jco package.
The following properties and their descriptions are copied from http://commons.apache.org/proper/commons-pool/api-1.6/org/apache/commons/pool/impl/GenericKeyedObjectPool.html. More complete descriptions may be found there.
maxActive (default: 8)
maxActive controls the maximum number of objects (per key) that can allocated by the pool (checked out to client threads, or idle in the pool) at one time. When non-positive, there is no limit to the number of objects per key. When maxActive is reached, the keyed pool is said to be exhausted. The default setting for this parameter is 8.
maxTotal (default: -1, meaning no limit)
maxTotal sets a global limit on the number of objects that can be in circulation (active or idle) within the combined set of pools. When non-positive, there is no limit to the total number of objects in circulation. When maxTotal is exceeded, all keyed pools are exhausted. When maxTotal is set to a positive value and borrowObject is invoked when at the limit with no idle instances available, an attempt is made to create room by clearing the oldest 15% of the elements from the keyed pools. The default setting for this parameter is -1 (no limit).
maxIdle (default: 8)
maxIdle controls the maximum number of objects that can sit idle in the pool (per key) at any time. When negative, there is no limit to the number of objects that may be idle per key. The default setting for this parameter is 8.
maxWait (default: -1, block indefinitely)
maxWait sets the maximum amount of time (in milliseconds) the borrowObject(K)method should block before throwing an exception when the pool is exhausted and the "when exhausted" action is WHEN_EXHAUSTED_BLOCK. When less than or equal to 0, the borrowObject(K) method may block indefinitely.
whenExhaustedAction (default: WHEN_EXHAUSTED_BLOCK)
whenExhaustedAction specifies the behavior of the borrowObject method when a keyed pool is exhausted:
· When whenExhaustedAction is WHEN_EXHAUSTED_FAIL, borrowObject will throw a NoSuchElementException
· When whenExhaustedAction is WHEN_EXHAUSTED_GROW, borrowObject will create a new object and return it (essentially making maxActive meaningless.)
· When whenExhaustedAction is WHEN_EXHAUSTED_BLOCK, borrowObject will block (invoke wait until a new or idle object is available. If a positive maxWait value is supplied, the borrowObject will block for at most that many milliseconds, after which a NoSuchElementException will be thrown. If maxWait is non-positive, the borrowObject method will block indefinitely.
The default whenExhaustedAction setting is WHEN_EXHAUSTED_BLOCK.
testOnBorrow (default: false)
When testOnBorrow is set to true, the pool will attempt to validate each object before it is returned from the borrowObject method. (Using the provided factory's validateObject method.) Objects that fail to validate will be dropped from the pool, and a different object will be borrowed. The default setting for this parameter is false.
testOnReturn (default: false)
When testOnReturn is set to true, the pool will attempt to validate each object before it is returned to the pool in the returnObject method. (Using the provided factory's validateObject method.) Objects that fail to validate will be dropped from the pool. The default setting for this parameter is false.
timeBetweenEvictionRunsMillis (default: -1, meaning eviction is disabled)
timeBetweenEvictionRunsMillis indicates how long the eviction thread should sleep before "runs" of examining idle objects. When non-positive, no eviction thread will be launched. The default setting for this parameter is -1. This means that by default idle object eviction is disabled.
minEvictableIdleTimeMillis (default: 180000)
minEvictableIdleTimeMillis specifies the minimum amount of time that an object may sit idle in the pool before it is eligible for eviction due to idle time. When non-positive, no object will be dropped from the pool due to idle time alone. This setting has no effect unless timeBetweenEvictionRunsMillis > 0. The default setting for this parameter is 30 minutes.
testWhileIdle (default: false)
When true, objects will be validated by the idle object evictor (if any). If an object fails to validate, it will be dropped from the pool.
minIdle (default: 0)
minIdle sets the minimum number of idle objects to maintain in each of the keyed pools. This setting has no effect unless timeBetweenEvictionRunsMillis > 0 and attempts to ensure that each pool has the required minimum number of instances are only made during idle object eviction runs.
lifo (default: true)
lifo determines whether or not the pools return idle objects in last-in-first-out order. The default setting for this parameter is true.
numTestsPerEvictionRun (default: 3)
numTestsPerEvictionRun sets the max number of objects to examine during each run of the idle object evictor thread (if any). When a negative value is supplied, ceil(getNumIdle())/abs(getNumTestsPerEvictionRun()) tests will be run. I.e., when the value is -n, roughly one nth of the idle objects will be tested per run. When the value is positive, the number of tests actually performed in each run will be the minimum of this value and the number of instances idle in the pools.
Special Considerations for use of Component Pooling
Panther application functionality is accessed through Panther Service Component instances. In Java these are instances of com.prolifics.jco.PantherComponent. In the Panther JCO runtime engine, these are open copies of a Panther Service Component. Within the Panther JCO runtime engine, each open Panther Service Component uses thread local storage for the temporary state information required while it is executing. We call this instance data. It provides thread-safety for the Panther library functions that operate on Panther Service Components and their widgets.
While it is possible for each POJO method implementing a web service to open a Panther Service Component by creating an instance of com.prolifics.jco.PantherComponent at the start, and then destroying that instance at the end of the method, it is potentially inefficient. The initialization steps that may not be user specific or connection specific may be extensive and slow to execute. In order to alleviate this problem, the Panther JCO Framework provides a pooling mechanism with extensive capabilities.
To effectively disable Component Pooling for the generated Java code that uses it, make the following changes to jco.properties:
whenExhaustedAction = WHEN_EXHAUSTED_GROW
maxActive = 0
maxIdle = 0
Component Pooling is particularly useful if you have screen entry procedures for your Service Components that take several milliseconds or more to execute. Otherwise, use of Component Pooling may not provide much performance improvement to warrant the added complexity of dealing with it and its potential side effects. Be aware that when using Component Pooling care must be taken to ensure that no inappropriate state information is maintained within the Panther Service Component across method calls.
The class com.prolifics.jco.JCOContainer is used to manage Panther JCOs (service component instances). One gets a JCOContainer instance by calling the class method, JCOContainer.getJCOContainer(), and this returns the one and only JCOContainer instance available to the class loader that loaded the classes of the com.prolifics.jco package. For example,
JCOContainer container = JCOContainer.getJCOContainer();
One calls getComponent() in order to get a PantherComponent instance. The instance may be created, or may come from a pool of previously created and used instances. For example,
PantherComponent component = container.getComponent("Greeting");
If you have set the Component Pooling properties to effectively disable Component Pooling, as discussed previously, the statement above will cause a new PantherComponent to be created. When you no longer need to use the PantherComponent instance, release it like this:
component.release();
If you have set the Component Pooling properties to effectively disable Component Pooling, as discussed previously, the statement above will cause the PantherComponent to be destroyed, closing the associated Panther Service Component. Otherwise, if the pool is able to hold the released instance, it will be placed back into the pool for reuse. You must make sure that the component does not retain any state information from its previous use. For example, reinitialize all Panther fields in the service component at the start of each method used in the Component Interface, or at the end.
Database Driver Connection Pooling
Making a database connection, which can be slow, is not a reason to use Component Pooling. The Panther JCO runtime engine supports database driver connection pooling for all Panther database drivers. By default, the maximum connection pool size is 5. In order to change it, you may use dm_set_conn_pool_size(), or you may use use the application property, @app()->conn_pool_size. When a new database connection is requested, Panther will choose the least recently used connection from the connection pool, assuming there is one available. Otherwise, it will create a new connection. When there is a request to close a connection, Panther will put it into the pool if the current number of pooled connections is less than @app()->conn_pool_size. Otherwise, it will actually close the database connection.
In order to use database driver connection pooling effectively, acquire your database connection at the start of each service component method, and close it at the end of the method. It is not recommended, but you may turn off database driver connection pooling by setting @app()->conn_pool_size to 0. In that case you should acquire your database connection during screen entry of the service component, and close the connection on screen exit. This allows the pooling of service components to effectively pool database connections as well. However, you will also need to ensure that each service component method cleans up any database connection state before the method returns. Also, be aware that this technique can cause your application to exceed the limit on database connections that is allowed by your Database Client software if you do not set your Component Pooling properties accordingly.
When using database connection pooling it is possible for a connection to become stale if it remains pooled, but inactive, for too long. A connection becomes stale as determined by the database client software or database engine being used, not by Panther. When this happens, a database engine error will occur. It is recommended that application code should handle any database engine errors that may be caused by use of a stale connection by flushing the database connection pool. This can be done using JPL code like this:
dbms close_all_connections
vars poolmax = @app()->conn_pool_size // Save the current maximum pool size.
@app()->conn_pool_size = 0 // Close all db connections in the pool; Flush the pool.
@app()->conn_pool_size = poolmax // Restore the maximum pool size to what it was.
Note that 'dbms close_all_connections', as shown above, is merely putting back into the pool the current connection that caused the error, plus any others that may have been opened by this service component instance. It will not do the same for connections that are currently in use by other service component instances.