
Using Git with Panther
Panther for Windows comes with several styles of Source Management support for its Prodev IDE, each requiring a different built-in driver. Drivers available for Windows include those for PVCS and MSSCCI.
The built-in driver for MSSCCI (Microsoft Source Code Control Integration, aka SCPI, or Source Control Plug-in) has been available since the release of Panther 5.50. MSSCCI is a communications protocol that is used directly between the IDE and an MSSCCI Provider's DLL. Various third-party MSSCCI Providers are available for Panther to use for several types of Source Management systems.
Panther 5.54 introduces enhancements and new features for its MSSCCI driver and for Source Management configuration.
These enhancements and new features improve its capabilities for use with a third party Windows plugin-in for MSSCCI, called Agent Git.
Install Agent Git
Agent Git, is available from Zeus at https://zeusedit.com/agentgit/index.html.
Start by installing Git and Agent Git on a local Windows computer. Make sure the Agent Git bitness matches the bitness of Panther.

Cloning a repo
Then, create a local git repository by cloning an existing repository on GitHub, GitLab, or even an Azure DevOps repository that is configured to use Git for source management. For example,
C:\gitlab-repos\panther-app>git clone ssh://git@gitlab.prolifics.com:23/johndoe/panther-app.git
(Note: You may need to generate an SSH key for your machine before you can use the ssh protocol with Gitlab.)
Configure a Panther Library for Source Management w/Agent Git
Next, you need to configure a Panther Library for Source Management using Agent Git. This can be done with Panther’s formlib utility. A new feature of Panther 5.54 is that it supports configuration of Panther Libraries for Source Management directly from the Panther IDE. (“File->Source Mgmt->Configure Library…” is a new option on the menubar)
The Panther IDE will use Source Management only for screens, reports, JPL, repository entries, and basically any Panther binary file type that can be edited directly within the IDE. However, you may have other file types within the library you are using, such as images. The Panther IDE will not maintain those files using Source Management. However, their presence within a Library that is under Source Management will simply be ignored. You may use external tools to check them out, edit them, and then check them back in. Then, use formlib with the ‘-s’ flag to synchronize the library with the repository.
Note that Panther's Source Management with Agent Git will work with only a local Git repository. You may clone a remote Git repository as a starting point, and pull and push changes outside of Panther's IDE, in order to maintain synchronization with a remote repository.
Working with branches is not directly supported within the IDE. Also, staging is done automatically during a commit, but you may find it useful to think of the Panther library as a staging mechanism that Panther already provides.
Configure Git within Panthers’ IDE
1. To begin using Source Management with Git for your Panther library, you may using an existing Panther library, or start by creating a new one. You may create a new library named myapp.lib as follows:
C:\gitlab-repos\panther-app>formlib -c myapp.lib
(Note that the library need not be located in the Git repository, but you may choose to keep it there and push it to your remote repository occasionally, as an added precaution.)
2.The Configuration Management Settings screen is new in Panther’s IDE for Panther 5.54. It provides a UI that may be used instead of using ‘formlib –g’ for assigning a Configuration Management String to a Panther library. Essentially, it applies a Configuration Management string to the library in much the same way as is done by using ‘formlib –g’, only it pieces the string together based upon fields that are filled out within the UI.
3.To begin, select “File->Source Mgmt->Configure Library….” Choose a different library if the Panther library you wish to use with Configuration Management is not already selected in the Library option menu. In the screen shot below, client.lib has been chosen, and it has not yet been configured for Source Management.
4.Upon selecting ‘Enable Configuration Management’, one may select the SCPI/MSSCCI driver from the Driver option menu. The settings for that driver will then be displayed. This is how it looks:

5.Notice that the ‘Store Files in Binary’ checkbox is enabled as well as the Combo Box for selecting an MSSCCI Provider, but the other fields are disabled. It is not recommended to select ‘Store Files in Binary’, since this makes it difficult to compare different versions of the screen to one another.
6.There are a couple of fixed choices for the Provider, with the default being Agent Git. The choices are unrelated to which MSSCCI Providers have actually been installed. Therefore, configuration can be performed even without the required driver having been installed. However, doing so will prevent use of the library afterwards, at least until the required driver is installed, or unless the configuration is changed later or removed. The Provider name is used by the Panther IDE to look up the path to the Provider’s DLL in the Windows registry, and to load that DLL. If you type in a different Provider name, it should be correct for a Provider that is installed or for one that you plan to install later.
7.There are checkboxes to the left of various configuration fields, which must be selected in order for those fields to become enabled for editing. In the screen shot below, ProjectName has been enabled in this manner.
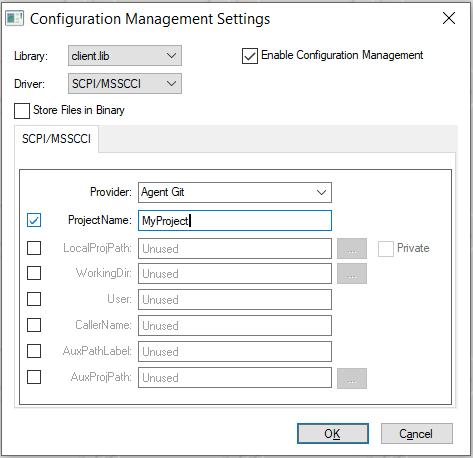
(Note that the default values shown as “Unused” are not actually values that will be assigned. They are simply placeholders.)
8.When the checkbox next to WorkingDir is selected, the field is initialized to the name of the chosen Panther library. This is the recommended setting for use with Agent Git. Also, for use with Agent Git, CallerName, AuxPathLabel, and AuxProjPath have no use, and may be left as “Unused”.
9.Upon completing entry of all desired settings, clicking the OK button will update the Panther library, and cause Panther to attempt to load the Providers’s DLL. If successful, the updated Panther library may be used with Panther’s Source Management features. If the DLL fails to be loaded, or if some other error occurs, the Panther library will become read-only. You will be able to tell if MSSCCI/SCPI is in use for a Panther library by examining the Library Table of Contents screen. If it is in use, it will show “scpi” next to the library’s name on that screen.
10.Using the Configuration Management Settings screen, if you select a Panther library that has already been configured for Source Management, it will show you the current Configuration Management settings for that library. Here is a screen shot showing that:

11.On this screen you may select either ‘Modify Configuration Management’ or ‘Remove Configuration Management’. The former allows you to edit the fields in the same manner as for a Panther library with no existing Configuration Management settings. The later removes all Configuration Management settings. The changes take effect only when the OK button is clicked. If no changes are required, simply click the Cancel button. Here is what the screen looks like after selecting ‘Modify Configuration Management’:
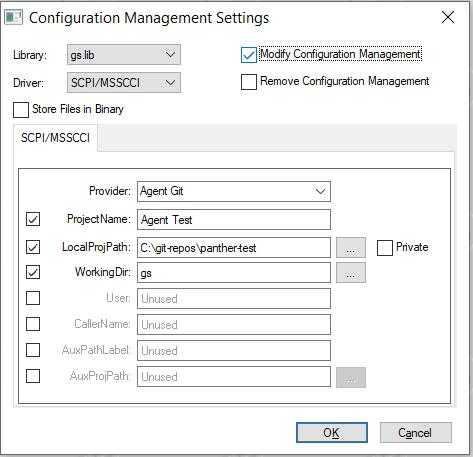
12. Notice that the fields containing valid values have been enabled for editing.
13.If a mistake is made in assigning Configuration Management settings, or if one opens an existing Panther library that is already configured for MSSCCI/SCPI Source Management, but its Provider cannot be loaded, you may wish to change the settings. Even though the Panther library will have been opened (or re-opened) as read-only, this does not prevent you from modifying the Configuration Management settings. You will be warned that the Panther library is read-only, but you may override it. In that case, once changes are made to the library, it will be returned to the read-only state. If you expect the library to now be usable with Panther’s Source Management features, you should then close the library and reopen it. If the driver DLL loads successfully, you will be able to use Panthers Source Management features.
Here are some
important details to be aware of when working with Agent Git within the Panther
IDE:
a. Deleting a file
from a library under Source Management using Git has no effect on the Git
repository. If you wish to remove a file from the Git repository, remove
its tracking information, or simply prevent further tracking for it, these
changes need to be performed using Git tooling that is external to Panther.
b. Normally, when
you choose to open a library member within a library that is under Source
Management, whether directly or by means of the “Check Out” item on the menubar, a selection dialog is displayed, whereupon the
selection of a library member causes the ‘Check Out” dialog to appear.
However, if the library member had previously been checked out, but had been
closed without checking it back in, the “Check Out” dialog will not be
displayed. In such a case, closed library members that had not been
checked back in can be identified in the Library Table of Contents screen by
the presence of a username and date-time stamp next to the member name.
c. The Check Out
dialog contains a field for entering a comment. This comment is not
retained within either Git or the Panther Library itself, and so the comment
field can be ignored when checking out a library member under Source Management
for Git.
d. You may view an
existing Source Management configuration string for a Panther library using
'formlib -tv myapp.lib'. This displays all
information for the Panther library, in addition to the table of
contents. Also, the “Configuration Management Settings” screen within the
Panther 5.54 IDE will display the Configuration Management settings as a set of
fields containing the current settings. If you do not see what you expect
to see on that screen, you may use ‘formlib –tv’ to
be sure.
Additional general documentation for working with Panther's Source Management feature can be found at https://docs.prolifics.com/panther/html/dev_html/acclib.htm
Configure Git with Panther (manually)
1.If you choose to, you may enable Source Management using Agent Git manually by running the following command.
C:\gitlab-repos\panther-app>formlib -g "scpi Provider='Agent Git' ProjectName='Panther App' LocalProjPath='(private)C:\gitlab-repos\panther-app' WorkingDir='myapp'" myapp.lib
2.LocalProjPath is the location of your local Git repository for your project. It should contain a sub-folder named ‘.git’ if you have chosen a correct path. (Note that Windows Explorer hides folders whose names begin with a ‘.’, unless you change the View options.) Cloning a project whose ProjectName is 'Panther App' from within the C:\gitlab-repos\ directory creates the local repository within a sub-directory named "panther-app". Note the conversion to lower case and replacement of the space character with a hyphen. This explains the discrepancy between the ProjectName and LocalProjPath in the example shown above.
3.The value for WorkingDir is used as a subdirectory or relative path under the LocalProjPath directory. It is recommended for keeping the contents of multiple Panther libraries separated. If this sub-directory or relative path does not exist when the Panther Library under Source Management for MSSCCI is first opened, the Panther IDE will attempt to create it at that time. This is a new feature for Panther 5.40. A failure to create or to open any required directories will result in Prodev abandoning the use of its MSSCCI driver for that library, and the library will be opened read-only.
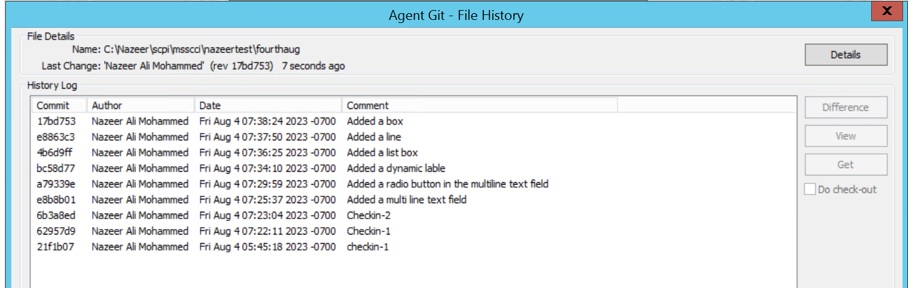
4.The prefix "(private)" in front of the path for LocalProjPath within the Management Configuration String passed to Formlib, indicates that this is not a folder that is shared by other users for Source Management. That should be the case for a local Git repository that is not within a shared folder. This allows Panther's MSSCCI driver to extract source from the Panther library to LocalProjPath prior to checkin, just before the Check In dialog opens. This allows you to diff the source to be checked in against the previous commit using the Window displayed by the History button of the Check In dialog. At that point, you may also edit the source directly before the commit takes place. The presence of the History button, leading to Panther’s use of the SccHistory() API for MSSCCI, is a new feature for Panther 5.54. Agent Git implements the SccHistory() API by displaying a modal dialog Window that has a variety of features for Git. You may refer to Agent Git’s documentation for further details on its usage.