


 | JetNet/Oracle Tuxedo Guide |     |
The Enterprise Bank sample application is provided as a demonstration of some of Panther's capabilities for building three-tier applications. After you become familiar with its functionality, use the Panther authoring environment to investigate how Enterprise Bank works. You should also look at the JPL modules that are used to call services from client screens and initiate database interactions from the service components.
The Oracle Tuxedo middleware adapter supports additional features, including support for Oracle Tuxedo System/Q message queuing and Oracle Tuxedo event brokering. These two features are used in Enterprise Bank, but are not visible to JetNet users. In this description of Enterprise Bank, features that rely on message queuing and event brokering are noted as such.
Instructions for building and running Enterprise Bank are given in $SMBASE/samples/entbank/README.txt.
The User's View of Enterprise Bank |  |
Enterprise Bank is a small database application that models some of the simple tasks present in a real banking application. The database, entbank, was created with JDB, Panther's simple relational database manager that is used for building application prototypes. Using JDB allows you to test data entry and effect database transactions within Panther as part of the application development process.
However, since JDB is not an XA-compliant resource manager, transactions in Enterprise Bank are not controlled by the monitor. Only XA-compliant resource managers allow transactional control by a monitor. Also, XA transactional control is only available with Oracle Tuxedo.
Enterprise Bank resides in the samples/entbank directory in your Panther installation. There you will find a README.txt file that has detailed instructions on how to build and run the application. These instructions include directions for correctly configuring your environment to run Enterprise Bank, as well as pertinent Oracle Tuxedo-specific instructions.
You can run Enterprise Bank either as an ATM customer client, or as a bank employee or administrator client.
Enterprise Bank Customer ATM Client |  |
The ATM client allows you to perform only customer-related tasks, such as personal account deposits and withdrawals.
To launch the ATM customer client, start Panther specifying the top-level customer Enterprise Bank screen as the command-line parameter:
$SMBASE/util/prodev atm
In Windows, double-click on the EntBank Customer ATM icon.
When Enterprise Bank is started, the ATM welcome screen is displayed.
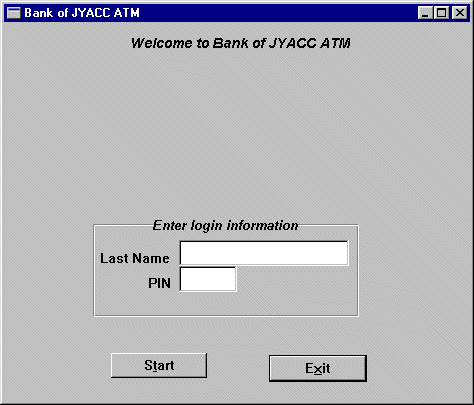
Figure C-1 Customer ATM login screen.
Logging on to the ATM requires a valid customer Last Name and PIN. You can use any of those that are present in the customer database table. Try Last Name DUCK and Password ducky. Notice that entry into the PIN field is not visible since this is confidential information. Once you have correctly entered the login data, choose the Start push button to initiate customer services.
If the user fails to login correctly after three attempts, the client connection is terminated and a security violation event (ATM_SECURITY) is posted to the event broker. The server establishes its subscription to this event at initialization time. Notification of the event is done via a service call (service LOG_SEC_EVENT). This service logs a message to the log file that includes the name of the user that failed to login. This process uses the Oracle Tuxedo event brokering feature.
For more information on the event broker and more detail on the coding required to implement the ATM_SECURITY event, refer to page 8-8. Comprehensive information on the event broker is in your Oracle Tuxedo documentation.
Once you have successfully logged on to the ATM, the Customer Selections screen opens. From this screen you can choose any of the following features:
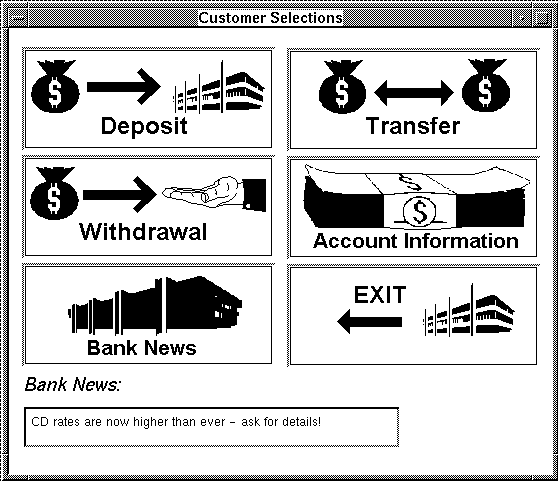
Figure C-2 Customer Selections screen presents the services that are available to a user of the Customer ATM client.
Choose the Deposit push button on the Customer Selections screen to open the Deposit screen. This screen contains a pulldown menu from which you can choose which of your accounts you wish to access. Enter the amount of the deposit either from a keypad or by direct text entry. Once the amount has been entered and the Deposit button chosen, the new balance appears. Choose Done to dismiss the screen.
Choose Withdrawal on the Customer Selections screen to open the Withdraw screen. This screen is identical in function and appearance to the Deposit screen except that it has a Withdraw button instead of a Deposit button. Choose Done to dismiss the Withdraw screen.
If the user attempts to withdraw an amount in excess of the maximum withdrawal amount, the request fails and a For more information on the event broker, refer to page 8-5. For more information on message queuing, refer to page 8-11. Comprehensive information on the event broker and message queuing is in your Oracle Tuxedo documentation.
The Transfer screen contains two pulldown menus: one for the debit account id and another for the credit account id. Enter the amount to transfer from the debit account to the credit account in the same manner as on the Deposit and Withdraw screens: through keypad entry or direct entry. After the accounts have been selected and the amount specified, choose the Transfer button to perform the transfer and display both new balances in the Debit Balance and Credit Balance text areas. Choose Done to dismiss the screen.
Choose Bank News to display a news message at the bottom of the Customer Selections screen.
To view all of the current balances in your accounts, choose the Account Information button from the Customer Selections screen. The Account List screen opens listing the following information on all your accounts: account id, name, balance, account type, and branch id. A legend is displayed describing the account type designator. Dismiss the window by choosing Done.
When you have finished your customer transactions, exit the ATM client by choosing Done.
Make a Deposit
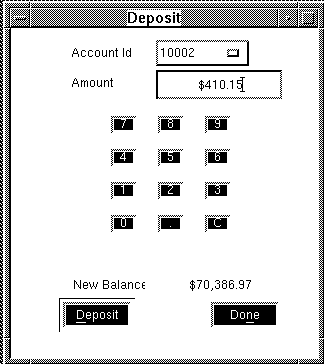
Figure C-3 Deposit screen permits either keypad or direct text entry of the deposit amount, and provides a pulldown menu from which to select the account.
Make a Withdrawal
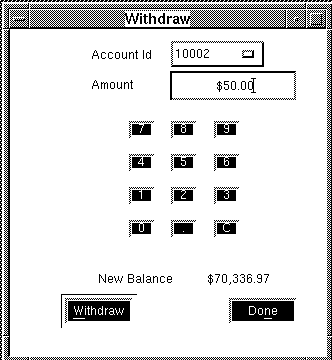
Figure C-4 A customer can make an account withdrawal from the Withdraw screen.
Withdrawal Limit Exceeded
WITHD_LIM_EXC event is posted to the event broker. The server establishes its subscription to this event at initialization time. Notification of the event is done via enqueuing a message to the WITHD_EXC_Q queue. This process uses the Oracle Tuxedo event brokering and reliable queue system.
Transfer
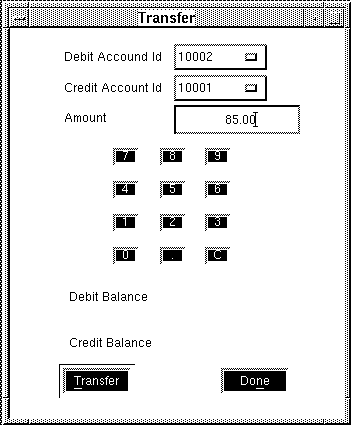
Figure C-5 Transfer screen permits an ATM user to transfer money between accounts.
Bank News
Balance Inquiry
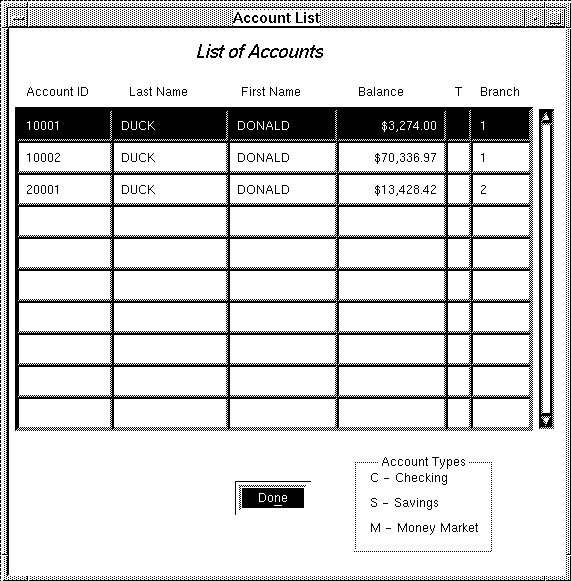
Figure C-6 A customer can examine the status of his/her accounts on the Account List screen.
Exit Customer Services
The Enterprise Bank Employee Client |  |
The Bank Employee client allows you to perform employee-related tasks, such as opening accounts and updating account information.
To start the employee client, start Panther, specifying the top-level employee Enterprise Bank screen as the command-line parameter:
$SMBASE/util/prodev branch
In Windows, double-click on the EntBank Employee WS icon.
When Enterprise Bank is started, the Employee Workstation welcome screen is displayed.
Logging on to the employee client requires a valid employee last name and password. You can use any of those that are present in the employee database table. Try last name FLOYD and password farmers. Once you have correctly entered the login data, choose the Start push button to initiate employee services.
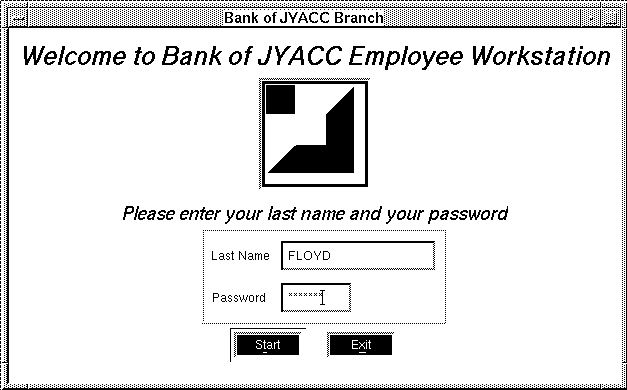
Figure C-7 Logon as an employee: the Employee Workstation
The employee and administrator clients are both menu-driven. The actions that you can take are available from the Enterprise Bank menu bar. The options present on the menu bar give you access to all employee features.

Figure C-8 Employee services are available from pulldown menus on the menu bar.
The Accounts menu option contains two selections on its pulldown menu: Account List and Account Maintenance.
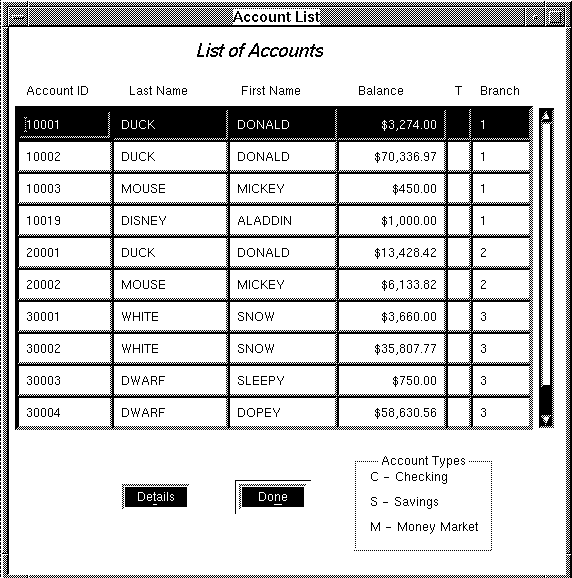
Figure C-9 Account List screen displays all customer accounts sorted by account number.
Choose Accounts Account List to open the Account List screen. All account numbers are listed along with the following account information: customers name, the balance of the account, the account type and the branch ID of the account. Dismiss the Account List screen by choosing Done.
To examine detailed information for an account, select the account on the Account List screen. Choose the Details push button to open the Account Details screen.
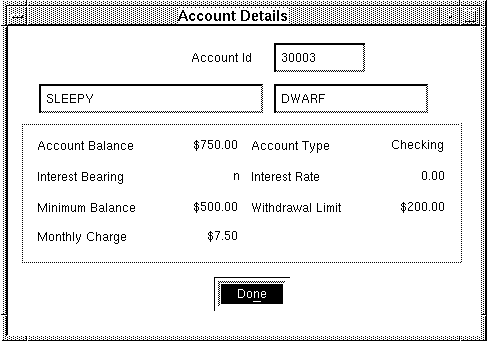
Figure C-10 Examine the details of a given account by bringing up the Account Details screen from the Account List screen.
This screen lists the following info for the selected account:
Dismiss the Account Details screen by choosing Done.
The Account Maintenance screen is used by an employee to examine a customer's existing accounts, add a new account, or delete an existing account. Choose Account
To retrieve a specific account, enter the customer's name, SSN or Account Id. This screen employs a pattern searching mechanism that permits you to enter any character[s], including the wildcard ("%") character, in the name or SSN fields. Choose the Find button after the pattern search data has been entered. If more than one account satisfies the search criteria, the Account Selection screen will open from which you can select the account (see below). If only one account matches the search criteria, that account's data will appear in the Account Maintenance screen. Once the information is on the screen, the account updating features become enabled:
Examine a Customer's Accounts
 Account Maintenance from the menu bar to open the screen.
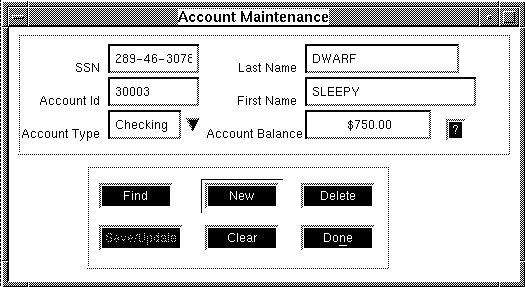
Figure C-11 A bank employee can update, add, or close an account with the Account Maintenance screen.
The Account Selection screen is used to select an account for maintenance when the specific identifying information is not at hand. It is opened by entering pattern search data in any of the identification fields on the Account Maintenance screen.
This screen displays the following information within scrolling lists: SSN, name, account id, account type, and account balance. To select an account, select the SSN, then choose the OK button. Alternatively, dismiss the screen by choosing Done.
The Customers menu option contains three selections on its pulldown menu: Customer List, Customer Maintenance, and New Customer Mailings.
Choose Customers
Note:
Accessing the Customer Details screen from the Customer List screen demonstrates the use of asynchronous service calls. The data for the Details screen comes from two separate tables, both of which use the same key:
The Customer Details screen displays the following customer information: name, SSN, address, home phone, work phone, and PIN. For each account that the customer holds, the following fields are displayed: account id, account balance, account type (C: checking, S: savings. or M: money market), and account branch id.
Choose Customers To change an existing customer's information, enter either the customers SSN or name and choose the Find button. You can use the pattern searching mechanism to obtain customer data by entering any combination of characters with the wildcard ("%") character in these fields. The customer's data is fetched and changes can be made.
Several buttons are available to take action after editing a customer's data: Save/Update to commit the change, Clear to clear all data, and Delete to remove a customer. Choose Done to dismiss the screen.
Enterprise Bank includes a feature to do a generic bank information mailing to all new customers. This process uses Oracle Tuxedo message queuing. Message queuing allows the queuing up of non-time-critical tasks that are more efficiently processed in batch mode. When Customer Maintenance is used to add new customers, customer data is sent to the To process all new customers for mailing, choose Customers For more information on message queuing, and more detail on the coding required to use the
Select an Account for Maintenance
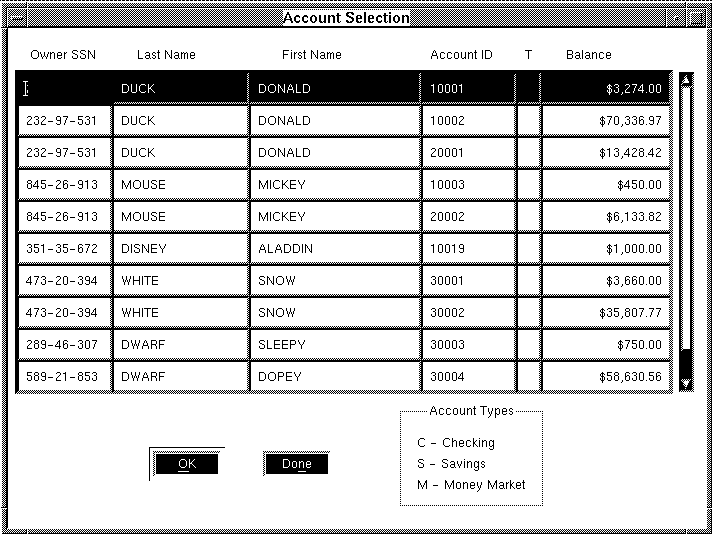
Figure C-12 Account Selection screen lets you select an account for updating in the Account Maintenance screen.
Customers Menu Option
Display a Complete List of Customers
 Customer List to raise the Customer List screen. This screen displays a list of all bank customers showing name and SSN. You can select any of the SSN entries and choose the Details button to raise the Customer Details screen that provides more customer information.
owner_ssn. In the JPL code for the c_detail screen, service calls are made to the services FINDCUST and GET_ACCT. Since the call to GET_ACCT does not depend on the completion to the call to FINDCUST, the call to FINDCUST is made asynchronously.

Figure C-13 Customer List screen shows all bank customers.
Display a Single Customer
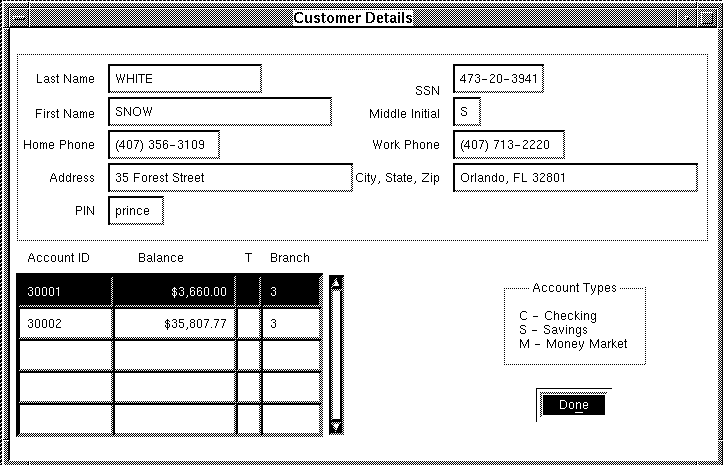
Figure C-14 Customer Details screen contains all the information for a customer.
Update Customer Information
 Customer Maintenance to open the Customer Maintenance screen. This screen is used to update existing customer information or add a new customer. The screen contains the following data entry fields: Last Name, First Name, Middle Initial, SSN, Home Phone, Work Phone, Address, City, state, Zip, and PIN. To add a new customer, choose the New button, enter the data, and then choose save/Update.
New Customer Mailings
NEW_CUST_Q message queue for processing at a later time, when the mailing documents would be produced.
 New Customer Mailings to open the New Customer Mailing List screen. You have the option of selecting specific customers from those that are queued up, or of choosing to send the mailing to all new accounts in the queue. Choose Retrieve List to see a listing of all customers currently in the queue.
NEW_CUST_Q queue, refer to page 8-15. Comprehensive information on Oracle Tuxedo System/Q message queuing is in your Oracle Tuxedo documentation.
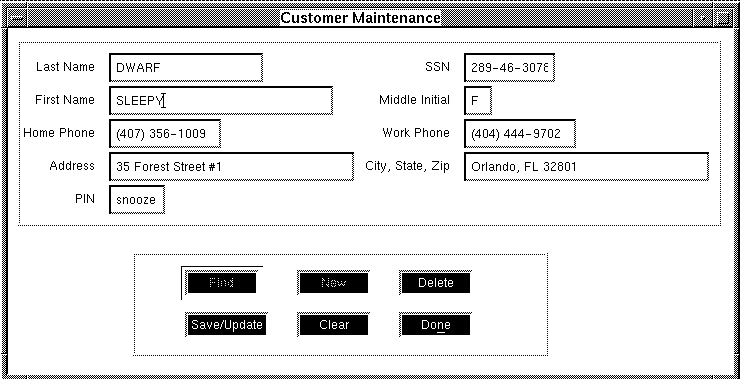
Figure C-15 Customer Maintenance screen.
The Enterprise Bank Administrator Client |  |
The Bank Administrator client permits you to access all employee features plus bank personnel data, as well as providing the ability to broadcast messages to all clients logged on to the system.
To start the administrator client, start Panther and give the top-level employee/administrator Enterprise Bank screen as the command-line parameter:
prodev branch
In Windows, double-click on the EntBank Employee WS icon.
When Enterprise Bank is started, the Employee Workstation welcome screen is displayed.
To logon to the employee client as an administrator requires a valid administrator last name and password. There is no separate table in the database for administrators, they can be found in the employee table and have their Administration Privileges field set to "Y." Try last name CAPONE and password chicago. Once you have correctly entered the login data, choose the Start button to initiate administrator services.
The employee and administrator clients are both menu-driven. The actions that an administrator can take are available from the Enterprise Bank menu bar. The options present on the menu bar give you access to all administrator features.

Figure C-16 Administrator services are available from the pulldown menus on the menu bar.
The Accounts menu option contains four selections on its pulldown menu: Account List, Account Maintenance, Post Interest, and Account Type Settings. The Account List and Account Maintenance have already been described for the Employee client.
Choose Accounts Post Interest to open the Periodic Activity screen, from which an administrator can post interest to any of the bank accounts. The administrator chooses between All Accounts or Account Type radio buttons to specify which accounts are to have interest posted to them. When choosing Account Type, the administrator selects the account type from a pulldown menu that contains the three bank account types: Checking, savings, and Money Market.
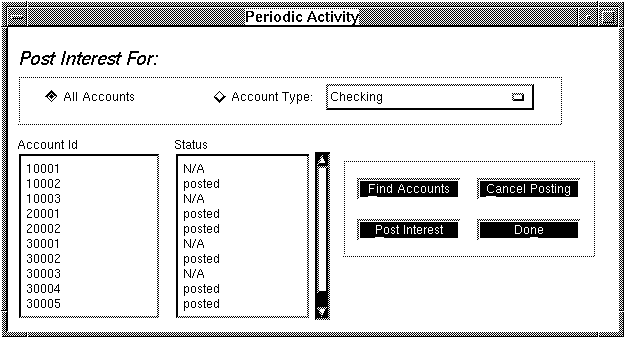
Figure C-17 Post interest to any interest bearing account on the Periodic Activity screen.
Once the account type choice is made, choosing Find Accounts fetches the accounts that pertain to the search criteria and displays them in the scrolling window that lists the accounts by Id number.
To post interest for the accounts selected, choose the Post Interest button. The status for each account is posted in the second scrolling list. To cancel posting to accounts, choose the Cancel Posting button. Choose Done to dismiss the screen.
Choose Accounts Account Type settings to raise the Account Type setting screen. This screen is used by an administrator to view or change account type features. An Account Type pulldown menu permits the administrator to choose which account type to edit. This screen contains the following data entry fields:
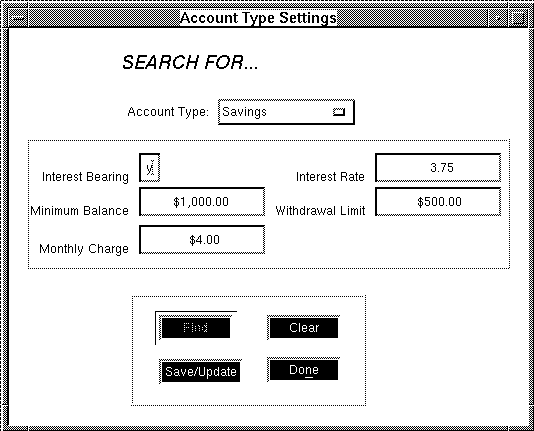
Figure C-18 An administrator can update account parameters such as interest rate on the Account Type Settings screen.
Several push buttons are available to take action after editing. After an account type had been selected and the settings possibly changed, the administrator can choose Save/Update to commit the change, cancel the edit by choosing Clear, or dismiss the screen by choosing Done.
The Customers menu option contains the same two selections as it does on the Employee client: Customer List and Customer Maintenance, which have already been described above.
The Personnel menu option provides two choices: Employee List and Employee Maintenance.
Choose Personnel
Choose Personnel
To add a new employee, choose New, enter the employee's information, then choose Save/Update.
To retrieve an existing employee's data, enter the employee's name or Employee Id. This screen employs a pattern searching mechanism that permits you to enter any character[s], including the wildcard ("%") character, in any of these identification fields. Choose the Find button after the pattern search data has been entered. If more than one employee satisfies the criteria, the Employee Selection screen will open from which an individual employee can be selected (see below). If only one employee matches, that employee's data will appear in the Employee Maintenance screen. Once the employee's data is in the screen it can be edited.
Several buttons are available to take action after editing: choose the Save/Update button to commit the change, cancel the edit by choosing the Clear button, or remove the employee by choosing the Delete button. When editing is finished, dismiss the window by choosing Done.
The Employee Selection screen is used to select an employee's data for updating when the specific identifying information is not at hand. It is raised by entering pattern search data in any of the identification fields on the Employee Maintenance screen.
This screen displays the following information within scrolling lists: employee id, name, branch id, and title. To select an employee, select the corresponding Employee Id in the scrolling window, then choose the OK button. Alternatively, dismiss the screen by choosing Done.
Administrators have the ability to broadcast a message to any clients who are using the system. Choosing Messages from the menu bar raises the Broadcast screen.
Five radio buttons permit the administrator to choose whom to broadcast to: all clients, all customers, one customer, all employees, or one employee. If one customer or one employee is desired, the Customer or Employer Last Name button is selected, and the last name is entered into the respective text widget. The message to be broadcast is typed into the Message text widget. To send the message, choose the OK button. Choose Done to dismiss the screen.
Customers Menu Option
Personnel Menu Option
Display a List of Employees
 Employee List to open the Employee List screen. This screen provides a list of all bank employees. The administrator can choose to either view all employees or just employees specific to a branch, by way of two radio buttons and text entry field for branch Id. Once the choice has been made and the OK button has been chosen, the following data pertaining to each employee is displayed within scrolling windows: employee id, name, branch id, and title. The information on this screen is for viewing purposes only. Choose Done to dismiss the screen when finished.
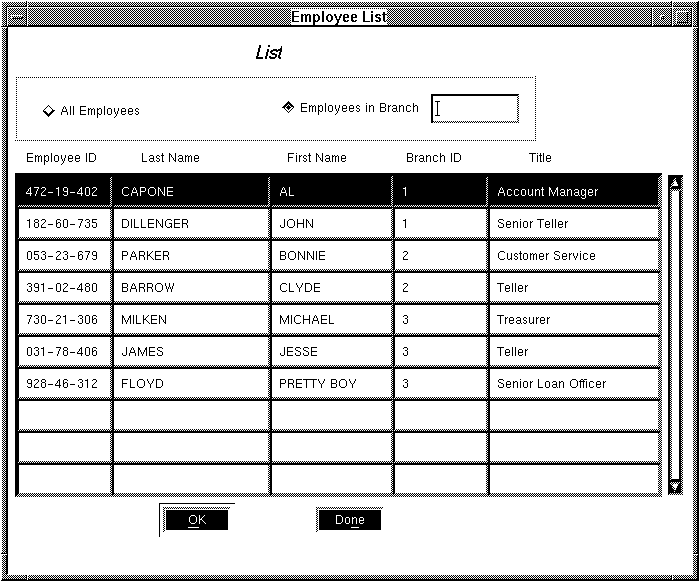
Figure C-19 An administrator can lookup an employee on the Employee List screen.
Add/Update or Delete an Employee
 Employee Maintenance to open the Employee Maintenance screen. This screen is used to make changes to an employee's data, add a new employee, or delete an employee. The screen has the following data entry fields: Last Name, First Name, Employee Id, Middle Initial, Branch Id, Password, Title, and Administration Privileges (an employee can have administrator privileges when this field is set to "Y"; otherwise it is set to "N").
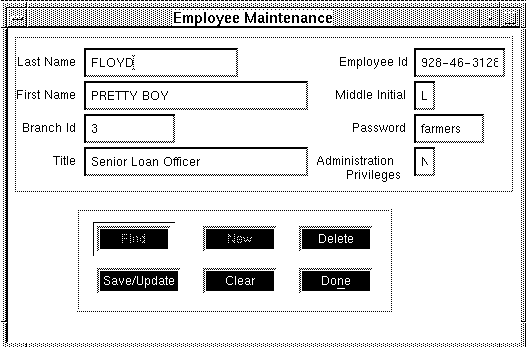
Figure C-20 Employee Maintenance screen permits an administrator to update personnel files.
Select an Employee for Maintenance
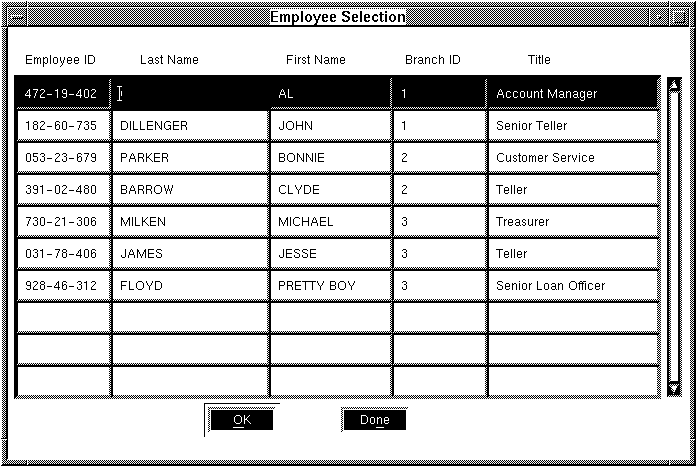
Figure C-21 Employee Selection screen permits an administrator to select an employee's data for updating in the Employee Maintenance screen.
Broadcasting a Message
Broadcast a Message
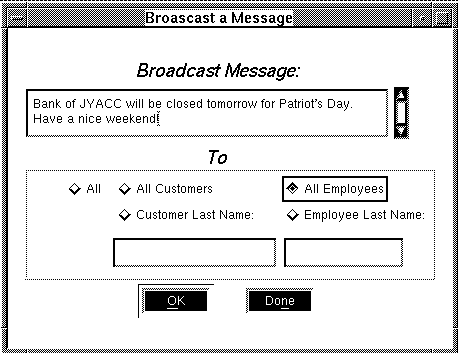
Figure C-22 An administrator can broadcast a message to any clients logged onto the system with the Broadcast a Message screen.
Designing Enterprise Bank |  |
The development of Enterprise Bank proceeded with the creation of the entbank database. After that, development followed a top-down approach:
During development of Enterprise Bank, the service screens associated with the services are opened and closed with each request to a service. This is done within the pre_ and post_service handlers defined in the server initialization JPL. The handlers are set (via the Here is the handler code from the server initialization JPL:
For a real application, in production mode, the pre_ and post_service handlers would be replaced with The following code shows how this is implemented; it is excerpted from the server initialization JPL module:
JAMFLEX buffers are used for data transport in all services except those that make use of the extended Oracle Tuxedo features—message queuing and event brokering. The customer mailings feature uses FML buffers, and the withdrawal limit exceeded and security violation alert features use STRING buffers.
hdl_pre_service and hdl_post_service application properties) to pre_service and post_service respectively. These handlers make calls to the default development handlers sm_tp_pre_service_winopen and sm_tp_post_service_winclose respectively.
proc pre_service( callid, service_name, container_name )
{
	if (server_logging)
		log "===> Starting service ':service_name' \
			in container ':container_name'"
	return sm_tp_pre_service_winopen( callid, \
			service_name, container_name )
}
proc post_service( callid, service_name, container_name )
{
if (server_logging)
log "===> Ending service ':service_name' \
in container ':container_name'"
return sm_tp_post_service_winclose( callid, \
service_name, container_name )
}sm_tp_pre_service_winopen_or_select and sm_tp_post_service_winclose_or_deselect, to minimize unnecessary overhead of opening and closing service components. When the service component should be opened depends on the value of the Cache Service Component attribute specified for the service in the JIF. Depending on the value, the opening and closing of the service component can occur when the service is first advertised, the first time it is called, or each time it is called. For information on pre_ and post_service default handler behavior, refer to page 6-27.
// For production style environment (when using runtime
// Panther executables instead of development
// executables), set this to 1
global production_env = "0"
...
proc dbms_init()
{
...
if (production_env)
{
// for production environment, service components
// are opened when services are advertised, closed
// when services are unadvertised, and
// selected/deselected with each request
@jam->hdl_pre_service = \
"sm_tp_pre_service_winselect"
@jam->hdl_post_service = \
"sm_tp_post_service_windeselect"
@jam->hdl_advertise = \
"sm_tp_advertise_winopen"
@jam->hdl_unadvertise = \
"sm_tp_unadvertise_winclose"
}
else
{
// for development environment, service components
// are opened and closed with each request to
// a service
@jam->hdl_pre_service = "pre_service"
@jam->hdl_post_service = "post_service"
}
@jam->hdl_jif_changed = "jif_changed"
@jam->hdl_exception = "exc_hand"
@jam->hdl_server_exit = "server_exit"
return 0
}


